
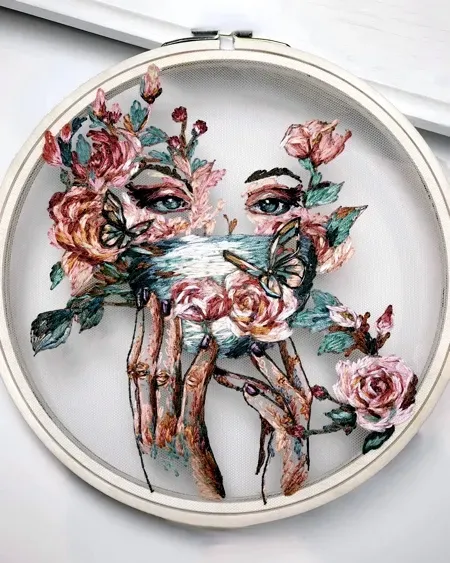
3D embroidered artwork invites fabric to become sculpture, adding depth and tactile appeal that draws the eye. In this overview, you can discover a practical 3D embroidery tutorial that builds from planning and fabric prep to finishing touches. If you want to know how to create 3D embroidered artwork, this guide blends clear steps with textured embroidery techniques to help your stitches rise off the surface. You’ll learn about 3D embroidery stitches and the layering approach that makes light and shadow feel tangible. From planning a motif to step-by-step finishing, this embroidery art step-by-step resource keeps guidance practical, inspiring confidence with every stitch.
Viewed through the lens of three-dimensional needlework, the concept expands into raised embroidery, where height is built with padding and careful layering. This textured fabric sculpture approach uses volume, light, and shadow to create convincing relief on textile surfaces. From an LSI perspective, related ideas such as dimensional design, stitch vocabulary, backing and stabilizers, and finishing techniques reinforce how texture and form communicate in textile art.
Planning 3D embroidered artwork: From Concept to Layered Design
Understanding that 3D embroidered artwork begins with a clear concept helps you map where height will live. This stage mirrors the early steps of a 3D embroidery tutorial, outlining what elements will pop and which will stay flat, and considering fabric, hoop size, and backing. By sketching the design and noting elevations, you set the foundation for textured embroidery techniques that maintain balance as layers grow.
Translate the concept into a practical plan: select motifs with natural planes, decide the order of stitching, and determine how each layer interacts with light and shadow. The plan should include a simple color strategy, a rough height map, and notes on where to apply padding to achieve believable depth. This careful prep makes the embroidery art step-by-step flow smoother when you begin stitching.
Materials and Stabilizers: Selecting the Right Backing for Depth
Choosing a fabric base that can handle multiple layers is essential. Cotton duck or linen provides firmness, while a frame or hoop keeps tension steady, and a foam stabilizer or soft tear-away supports the raised forms. Additionally, select threads that offer a range of values and textures; padding-friendly needles help avoid bulk and pucker.
Stabilizers interact with your padding layers to prevent distortion. Foam gives height, tear-away provides stability, and a smoothing backing keeps edges neat. This combination aligns with textured embroidery techniques to hold the shape of 3D embroidery stitches.
Techniques for Building Height: Stacks, Padding, and Raised Surfaces
Height comes from stacking stitches and padding. Use padded satin stitch for smooth raised areas, long and short stitch for shading on curved forms, and cast-on stitch to lift threads away from the fabric.
Consider bullion knots, French knots, couching with spokes, and careful edge control to avoid a bulky finish. The goal is a harmonious mix of 3D embroidery stitches that reads as depth rather than a collection of separate textures.
A Step-by-Step Approach: Embroidery Art Step-by-Step Tutorial Flow
Begin with the base: secure fabric and stabilizer, then sketch the outline and stitch major contours. A light thread outline anchors layers that will be raised.
Build a base layer with long and short stitches, then insert padding where height is intended. Finally, craft the raised forms, adding texture with French knots or bullion knots as accents. If you are looking to learn how to create 3D embroidered artwork, this sequence demonstrates the embroidery art step-by-step approach in practice.
Texture, Color, and Light: Achieving Realistic Depth
Texture is the core of realism. Mix padded satin with shading techniques to simulate curvature, and use color values to suggest light directions. Understanding how textures catch light helps you plan where highlights will live in the 3D scene.
Experiment with layering the same color at different heights to create subtle shifts in hue and value. This approach aligns with the embroidery art step-by-step ethos of deliberate, repeatable methods to build believable dimension.
Finishing, Display, and Troubleshooting for Lasting Impact
After shaping, stabilize and frame the piece to preserve height. Trim stabilizers carefully and back the work with a matching fabric or mount. Display options that keep the piece slightly away from the wall help maintain the raised look.
Common challenges include uneven tension, lifting edges, and color bleeding. Address these by tightening the workflow of padding, re-stitching where needed, and testing color swatches on similar fabric. This reflection echoes the 3D embroidery tutorial spirit of steady practice and incremental improvement.
Frequently Asked Questions
What is 3D embroidered artwork, and how does it differ from flat embroidery in a 3D embroidery tutorial?
3D embroidered artwork adds height and volume to fabric by layering stitches, creating tactile, dimensional images. It differs from flat embroidery by using padding, backing, and varied textures to lift elements off the surface. Techniques that emphasize textured embroidery techniques and a curated set of 3D embroidery stitches help create depth, light, and shadow in a single piece.
What are the essential steps in a how to create 3D embroidered artwork beginner guide?
Begin with the basics: choose a sturdy fabric, an appropriate hoop, and a suitable stabilizer. Plan and transfer your design, marking elevations and height notes to guide layering. Build in layers: a base fill, padding for height, and raised forms using 3D embroidery stitches, then secure and frame the piece.
Which 3D embroidery stitches are most effective for adding depth in 3D embroidered artwork, and how do textured embroidery techniques help?
Common choices include padded satin stitch, long and short stitch for shading, bullion knots, and French knots for texture. Use padding to push areas outward and combine stitches to simulate real textures. The result is a believable dimensional effect that leverages textured embroidery techniques.
How should I plan and transfer a design for embroidery art step-by-step projects?
Begin with a clear plan, sketch elevations, and decide which areas will rise. Transfer the pattern using true-size printing, a lightbox, or a window method, marking height notes as you go. This foundation supports a smooth progression from base layer to raised forms in a 3D embroidered artwork.
What are common challenges in 3D embroidered artwork, and how can I troubleshoot issues like uneven tension or lifting edges using textured embroidery techniques?
Common issues include uneven tension, puckering, and raised layers lifting. Rebalance tension, reinforce the base, and adjust padding as needed. Use textured embroidery techniques to rework areas gently and anchor raised sections more securely.
What finishing touches and display options best preserve the height of 3D embroidered artwork?
Trim stabilizers carefully, back the piece with supportive fabric, and mount it in a frame or on a display board to maintain the raised look. Choose display methods that allow airflow behind the work to keep texture intact, and photograph under natural light to capture depth for your portfolio.
| Section | Key Points | Notes |
|---|---|---|
| Introduction | 3D embroidery adds height and texture by layering stitches and textures to make pieces pop off the fabric. | Intro to the guide; accessible to both beginners and experienced stitchers; covers planning, fabric prep, and finishing to achieve dimensional art. |
| Understanding the concept | 3D embroidery differs from flat embroidery by adding height and volume; uses stacking stitches, textures, and backing to support raised forms. | Goal is an intuitive process, not daunting. |
| What you will learn |
|
From this guide: practical skills and workflows for designing, stitching, and finishing 3D embroidery. |
| Materials and preparation |
|
Choose materials based on height, fabric weight, and project needs. |
| Planning the design and transferring the pattern |
|
Guides stitch planning and height guidance. |
| Stitches and techniques that create depth |
|
A balanced mix yields believable dimensional effects. |
| Step by step guide to building 3D embroidered artwork |
|
Follows a clear, practical progression from foundation to display. |
| Textured embroidery techniques explained |
|
Texture as the core of dimensional realism. |
| Common challenges and troubleshooting |
|
Tips for maintaining smooth, durable dimensional work. |
| Finishing touches and display options |
|
Preserve height and showcase with proper presentation. |
| Inspiration and practice tips |
|
Build confidence through steady practice and experimentation. |
Summary
Conclusion