
3D Embroidered Designs open a doorway to texture-rich embroidery that engages both the eyes and the fingers. If you’re just starting your embroidery journey, the idea of adding three-dimensional elements may seem daunting, but with patience you can master the basics. But with a clear plan, the right tools, and a few proven techniques, you can create striking pieces that pop off the fabric and invite touch. This brief guide previews 3D embroidery techniques and demonstrates layered embroidery ideas that turn simple motifs into tactile, sculpture-like designs. As you practice beginner embroidery projects and explore stitches for 3D effect, you’ll see the texture come to life as your confidence grows.
Beyond the exact phrase used earlier, the concept can also be described through related terms that your readers may encounter in tutorials and pattern books. Think dimensional embroidery, raised-stitch work, sculptural thread art, padded motifs, or relief-style stitching—each highlighting height, depth, and tactile contrast achieved through padding and selective stitching. In the broader world of textile craft, this approach often sits under umbrellas like dimensional textile art, layered thread work, or faux-relief embroidery, providing flexible vocabulary for inspiration and learning. By anchoring your exploration with these LSI-inspired terms, you can discover a wider range of techniques, projects, and examples that reinforce the same core ideas of depth and texture.
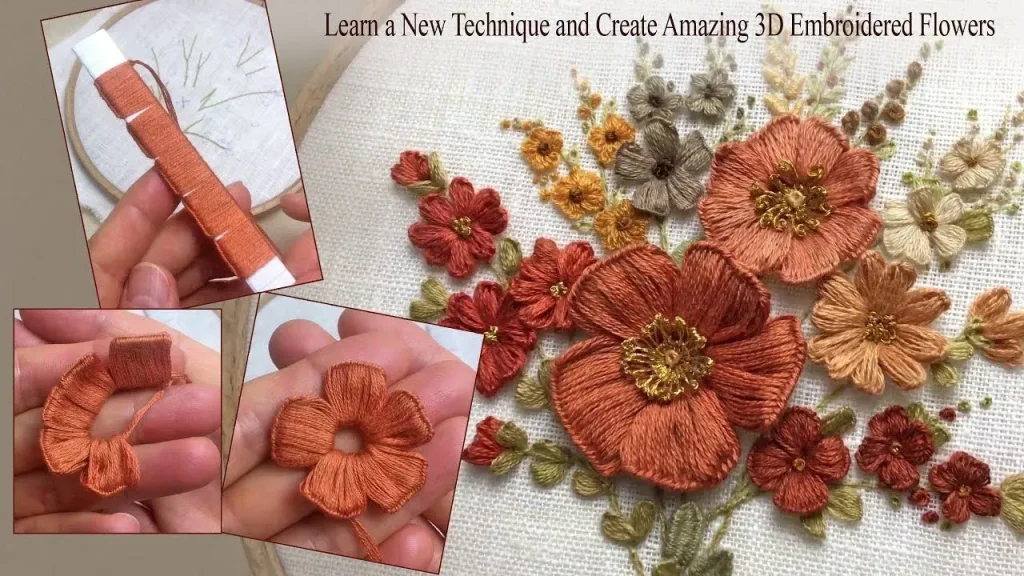
Discovering 3D Embroidered Designs: Texture-rich Embroidery for Beginners
3D Embroidered Designs introduce texture-rich embroidery that invites you to feel the fabric with your eyes and hands. For someone just starting, the idea of raised stitches might feel intimidating, but the basics are approachable with a clear plan, the right tools, and patient practice. By focusing on simple shapes and careful padding, beginners can grow confident while producing work that has real depth.
As you begin, build your project around layering and padding to create dimensional motifs that pop from the surface. Choosing a sturdy base fabric and compatible threads helps stitches sit evenly, while practicing tension and stitch control develops a solid foundation for more complex textures. This approach translates well to home decor, accessories, and wearable art, reinforcing core embroidery skills without overwhelming the learner.
Core Techniques: 3D Embroidery Techniques to Create Depth
Mastery of 3D Embroidered Designs starts with core techniques that lift shapes off the fabric. Padding stitches provide gentle volume behind petals and leaves, while raised satin stitches build rounded forms that catch light. You’ll also encounter bullion knots and beaded accents that add shimmering texture and focal points to your pieces.
As you gain confidence, layering these stitches over padded areas creates multi-dimensional motifs. Practice on swatches to observe how height, density, and thread selection affect the final look, and learn to balance light and shadow across layered elements. The discipline of these 3D embroidery techniques translates into more intricate projects with consistency and beauty.
Layered Embroidery Ideas: Building Texture Brick by Brick
Layered embroidery ideas hinge on starting with a clear silhouette and then adding progressively offset layers to craft depth. Begin with an outline or base shape, then place padding behind select sections to establish a raised core. Each additional layer should be slightly shifted, like bricks in a wall, to create the sense of growth and three-dimensional form.
Padding between layers helps separate elements, making petals, leaves, or geometric motifs feel more distinct. This brick-by-brick approach lets you translate simple designs into dynamic textures, while encouraging experimentation with color shifts and stitch lengths to emphasize curvature and dimensionality.
Stitches for 3D Effect: Staples That Lift Motifs Off Fabric
Stitches for 3D effect are the backbone of tangible texture. French knots, bullion knots, and short satin stitches over a padded base all contribute height and micro-dimension. Using a variety of stitch heights and angles allows you to mimic natural forms, from the curve of a petal to the contour of a leaf.
Experiment with combining stitches to achieve light catch and shadow. For example, edge-focused satin stitches on padding can create crisp ridges, while split stitches or backstitches outline layers to define separation. The goal is to harmonize technique and padding so the raised elements feel cohesive and organic.
Beginner Embroidery Projects: Quick Paths to 3D Mastery
Beginner embroidery projects are an ideal starting point for practicing padding, layering, and the basics of 3D texture. Choose simple motifs—such as a central flower with a few petals or a small leaf cluster—to learn how to transfer designs, pad targeted areas, and build layers methodically.
A practical plan includes planning the design, transferring outlines, padding selected zones, stitching layered elements, and finishing with clean outlines. These beginner-friendly projects reinforce the fundamental techniques and pave the way for more ambitious layered embroidery ideas as your skills grow.
Practical Tips and Troubleshooting for Natural 3D Texture
Practical tips help you maintain natural, balanced 3D texture. Keep padding light and consistent, avoid over-padding, and ensure fabric tension remains even in the hoop to prevent warping. Regularly check the alignment of layers as you stitch to preserve the intended depth.
When issues arise—such as uneven padding, loose stitches around raised areas, or flattening after washing—adjust by re-securing padding, reinforcing edges with extra stitches, and choosing a gentle care routine. With mindful handling, padding-based textures retain their height and dimension, and your finished pieces continue to showcase the tactile appeal of 3D embroidery.
Frequently Asked Questions
What are 3D Embroidered Designs and how does texture-rich embroidery create depth?
3D Embroidered Designs are embroidery pieces that use padding, raised stitches, and layering to add height and dimension. Texture-rich embroidery achieves depth by placing padding behind motifs and varying stitch heights, producing sculptural shapes that stand off the fabric.
Which 3D embroidery techniques should beginners start with to achieve stitches for a 3D effect?
Begin with padding stitches to create volume, raised satin stitches over a padded area, and simple bullion knots or French knots for centers. As you gain control, incorporate layered stitches to build more height; these are core 3D embroidery techniques that work well for beginners.
How can I plan layered embroidery ideas to build texture brick by brick in a 3D Embroidered Designs project?
Start with a base silhouette, then add padding behind inner elements and introduce subsequent layers of stitches just outside the previous layer. Offset each layer slightly to mimic natural growth, creating a brick-by-brick texture that reads as layered embroidery ideas.
What beginner embroidery projects are best to practice 3D Embroidered Designs?
Try a simple 3D floral motif on a scarf, tote, or pillow panel. A small piece with a padded center and a couple of layered petals helps you practice padding, layering, and basic 3D stitches without overwhelming complexity for beginner embroidery projects.
What tools and materials are essential for texture-rich embroidery when working on 3D Embroidered Designs?
A sturdy embroidery hoop, cotton or linen fabric, appropriate embroidery needles, embroidery floss or stranded cotton, and some batting or felt for padding are essential. Pair these with a water-soluble pen for transfer and scissors to support clean layering and consistent tension for 3D effects, all key to texture-rich embroidery.
How can I troubleshoot common issues in 3D Embroidered Designs, such as uneven padding or flattening after washing?
In 3D Embroidered Designs, uneven padding is common—recheck the padding behind raised areas and adjust by adding or removing small batting pieces. Reinforce the edges with extra stitches, and after finishing, wash gently by hand and air dry to preserve padding and keep the 3D texture intact.
| Topic | Key Points |
|---|---|
| What are 3D Embroidered Designs? | Embroidery with raised, padded, or layered stitches to create depth and dimension; tactile and sculptural feel; can mimic petals, leaves, fruits; works for home decor, apparel, and art. |
| Benefits of 3D textures | Adds visual and tactile interest; enhances motifs; beginner-friendly; helps practice core skills like needlework, stitch control, and thread management; yields dramatic, dimensional results. |
| Toolkit essentials | Embroidery hoop; base fabric (linen/ccotton/canvas); embroidery needles; floss/threads; padding materials (batting/felt); water-soluble pen; scissors/markers; clean workspace. |
| Base and threads | Blend thread types (regular floss for depth; metallic/matte ribbons); padding behind stitches; sturdy base fabric; linen/cotton are beginner-friendly. |
| Core techniques | Padding stitches; raised satin stitches; bullion knots and beaded accents; French/colonial knots; satin stitches over padding; layered stitching. |
| Natural 3D look tips | Work outside-in or center-out; pad only raised areas; subtle color variations for shading; maintain consistent tension around padding. |
| Layered embroidery design concept | Start with a base layer, then add layered stitches to mimic growth; padding between layers; example of a layered flower with a padded center. |
| Beginner project steps (overview) | Plan and transfer; prepare base and padding; create center and initial petals; add subsequent petal layers; add details; mounting/display. |
| Troubleshooting | Uneven padding; loose stitches around padding; flattening after washing; fix by rechecking padding, reinforcing stitches, gentle washing and air drying. |
| Applications & growth | Apply textures to scarves, totes, pillows; layering ideas for landscapes, animals, or abstract designs; start simple and gradually increase complexity. |
| From beginner to advanced | Gradual progression: pad small shapes, vary threads, add layers; practice leads to more natural 3D embroidery results. |
Summary
3D Embroidered Designs (delivered as an HTML table)