
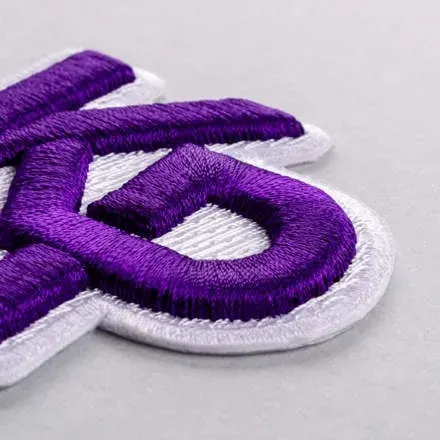
3D embroidered patches have transformed how we personalize bags, jackets, and denim with a tactile, eye-catching texture that rises from the fabric and catches light from every angle, making your pieces feel unique. These raised embellishments add dimension that catches the eye and invites a closer look, transforming ordinary logos into bold statements that endure through wear and washing. This introductory guide blends core concepts of puff embroidery with a practical embroidery patch tutorial you can follow step by step, including design notes, stitch counts, and troubleshooting tips to help you achieve professional results. You’ll learn about 3D embroidery techniques, the role of stabilizers for machine embroidery, and how foam backing for patches influences lift, edge finish, and overall durability, plus tips for choosing fabrics that work well with puff. From choosing materials to finishing touches, this concise overview gives you the confidence to create your own standout patches and to experiment safely with textures, tones, and placements.
Using LSI-aligned terms, you’ll often hear them described as raised embroidery patches, puff patches, or dimensional embroidery embellishments that pop against fabric. Viewed this way, the approach becomes easier to grasp, with research-driven terms like foam backing for patches and stabilizers for machine embroidery reinforcing the practical connection between design, materials, and durable finishes.
Frequently Asked Questions
What are 3D embroidered patches and how do 3D embroidery techniques create the puff effect?
3D embroidered patches are designs that rise above the fabric using foam backing and layered stitching. 3D embroidery techniques place buoyant foam behind the stitches, then build up fills and outlines to create a puffed, dimensional effect that makes the patch stand out on clothing or bags.
What stabilizers for machine embroidery work best when making 3D embroidered patches?
For 3D patches, use a dual-layer stabilizer approach: tear-away stabilizer on the back and a light top stabilizer to keep stitches crisp. This helps prevent fabric distortion during stitching and allows easy removal afterward, improving the puff embroidery’s consistency.
How do you prepare foam backing for patches to achieve a durable puff embroidery result?
Cut foam to match the patch shape and place it behind the fabric with light adhesive. Use an appropriate foam thickness (often 2–3 mm) so the puff is pronounced but stitched cleanly. Secure the foam with tacking stitches to prevent movement and ensure an even puff.
Can you follow an embroidery patch tutorial to reliably create puff embroidery patches at home?
Yes. An embroidery patch tutorial guides you from design and digitizing to backing, stabilization, puff placement, and finishing. If you don’t digitize yourself, you can use a patch service to convert artwork into a puff-friendly stitch file and then follow the tutorial steps.
What are common mistakes in 3D patches and how can you troubleshoot puff embroidery issues?
Common issues include fabric puckering, foam showing through, uneven puff, glue residue, and backing tearing. Solutions: match stabilizers to fabric weight, adjust stitch density and foam thickness, ensure foam is fully covered by stitches, allow adhesive to dry before stitching, and choose appropriate backing for the patch size.
How should you care for and finish 3D embroidered patches to ensure wash durability?
Care by hand-washing or using a gentle cold cycle with mild detergent. Avoid high heat, and place a protective cloth between the iron and patch if ironing is needed. Finish with a secure edge, test wash durability, and consider using fusible backing for a no-sew attachment to improve wash resistance.
| Topic | Key Points |
|---|---|
| What are 3D embroidered patches? | Patches that rise from fabric using foam or stuffing behind stitches to create a raised, sculpted look. |
| How they differ from traditional embroidery | Traditional embroidery sits flush against fabric; 3D patches use foam behind stitches to push the design upward, creating dimensional relief and better visibility on busy fabrics or dark backgrounds. |
| What you gain from this tutorial | An understanding of 3D embroidery techniques, how to layer foam and stitches for puff, design considerations, and practical steps to produce patches that last through wears and washes. |
| Materials and tools | Embroidery machine and needles; stabilizers (tear-away/cut-away); foam backing (2–3 mm); top stabilizer or water-soluble topping; dense threads (polyester or rayon); fusible or sew-on backing (optional); scissors, hoop, surface; adhesive spray (optional). |
| Foam and stabilizer considerations | Foam should hold shape but stitchable; stabilizers support stitching and ease removal; foam thickness and thread density influence puff and surface smoothness. |
| Step-by-step workflow (high-level) | Design/digitize puff areas; prepare backing/foam; hoop and stabilize; outline; secure foam; build puff with fills; add top details; finish edge; trim backing; attach/test. |
| Troubleshooting | Puckering, foam showing, uneven puff, glue residue, backing tearing; fix with proper stabilizers, edge coverage, shorter stitches, dry adhesive, and suitable backing. |
| Care and maintenance | Hand-wash or gentle cycle with cold water; avoid high heat; iron on low with a cloth; store patches flat to preserve puff. |
| Creative variations | Multiple foam layers, combine puff with applique, metallic threads, differing patch sizes for jackets, bags, caps, or denim pieces. |
Summary
3D embroidered patches bring a tactile, sculpted flair to clothing and accessories, transforming simple designs into raised, wearable art. By using foam behind stitched layers, you create depth that makes your patches pop on busy fabrics or dark backgrounds. Following a clear workflow—from design and stabilization to foam placement, puff creation, and finishing—helps ensure patches are durable and wash-friendly. Practice, refine stitch planning, and experiment with foam thicknesses, stabilizers, and thread colors to build a versatile library of puff techniques that extend your creative options for 3D embroidered patches and beyond.