
If you’ve ever explored the world of 3D embroidery, you’re about to dive into a practical 3D Embroidered Tutorial that blends tradition with texture. Designed with embroidery for beginners in mind, it breaks down the basics into manageable steps. You’ll learn how to build depth with padding and layered embroidery techniques that elevate plain outlines into dimensional artwork. Along the way, you’ll encounter 3D embroidered stitches and project ideas that translate well to small patches or larger 3D embroidery projects. By the end, you’ll have a solid pathway from practice to more ambitious finished pieces that stand out on fabric.
Seen from another angle, this topic unfolds as a three-dimensional stitching guide that emphasizes texture, height, and careful planning. You’ll hear terms like dimension-enhancing stitching, padding-based layering, and textured thread elevation that all point to the same core goal. In this framing, beginners can start with simple forms and progressively add padded layers to create depth without overwhelming complexity. The result is a practical, creative path to soft sculpture on fabric, commonly described as dimensional embroidery or padded stitch work.
[3D Embroidered Tutorial] A Beginner’s Guide to 3D Embroidery: From Concepts to Layered Depth
If you’re new to 3D embroidery, this beginner-focused guide lays out a clear path from familiar hand-stitching to the tactile world of depth and form. The emphasis is on the 3D embroidery tutorial concept, helping you translate flat fabric into dimensional art. As you explore, you’ll encounter embroidery for beginners topics woven with the idea of layering, padding, and texture to create raised elements that invite closer inspection and tactile curiosity.
This section outlines essential starting points: the right tools, a plan for your layers, and a mindset that values steady progress over speed. You’ll see how the 3D Embroidered Tutorial framework uses simple steps to build confidence, moving you from basic stitches to more ambitious layered embroidery techniques and, eventually, to small 3D embroidery projects that showcase dimension without overwhelm.
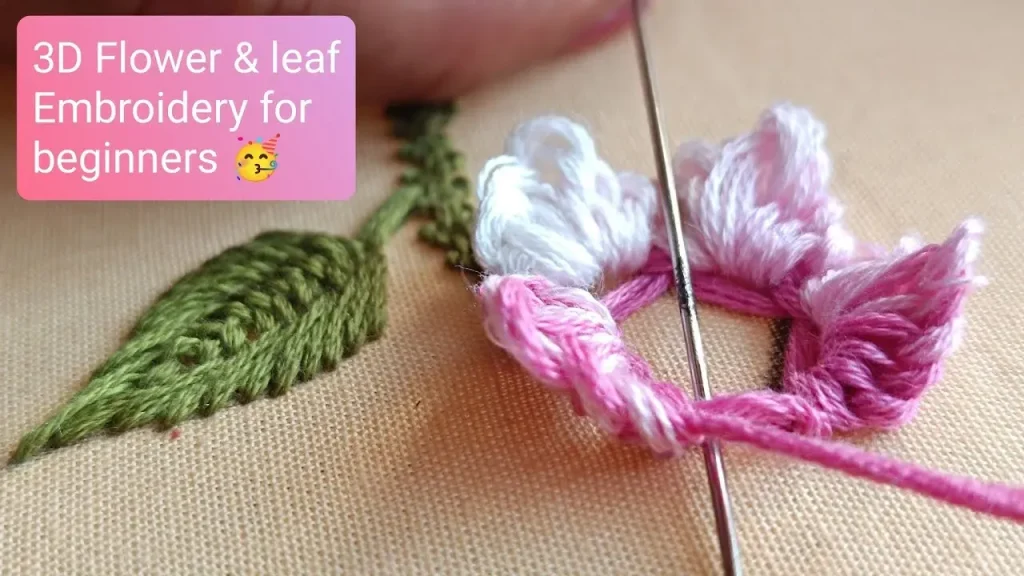
Layered Embroidery Techniques: Structuring Depth with Multiple Layers
Layered embroidery techniques are the heartbeat of 3D depth. By starting with a base silhouette and adding padding across successive layers, you can craft elements that stand off the fabric with a natural cast and shadow. This approach aligns with the goal of producing dimension through deliberate layer management, stitch choice, and padding density, giving even modest motifs a surprising sense of presence.
In practice, plan your layers to complement lighting and texture. A second layer of padding or a lighter thread can define contours, while a third layer might emphasize highlights. The result is a cohesive piece where each layer contributes to the overall depth, echoing the layered structure you’ll encounter in a dedicated 3D embroidery projects workflow.
Mastering 3D Embroidered Stitches: Padding, Lifting, and Texture
Central to the craft are the 3D embroidered stitches that create physical lift. Padding between fabric and stitch lines becomes the engine that pushes threads outward, forming petals, ears, or rounded shapes that pop from the surface. You’ll blend padded satin stitches with closely spaced stem stitches to hold layers in place, all while preserving smooth edges that read as dimensional rather than bulky.
As you practice, you’ll learn a practical sequence: stabilize the fabric, place padding, secure it with a ground stitch, and then cover the padding with an outer stitch that matches your color and texture goals. This routine, a core component of any 3D embroidery tutorial, offers repeatable steps that reinforce confidence and produce consistent, tactile results.
Tools, Stabilizers, and Materials for 3D Embroidery Projects
A strong 3D embroidery setup starts with the right tools: a sharp needle suited to your fabric, a good embroidery hoop, quality floss or stranded cotton, and a reliable stabilizer. Padding materials—such as felt scraps or soft batting—are crucial for lifting elements off the surface. This kit supports the entire process of building up dimensions and reduces distortion as you work on three-dimensional forms.
Choosing the right fabrics and padding also matters for the final look. Heavier fabrics handle more padding without warping, while lighter fabrics may require thinner layers. Stabilizers come in many weights and textures, so you can tailor your approach to the design you’re creating, whether you’re pursuing delicate 3D embroidery projects or larger, more dramatic pieces.
Designing Simple 3D Embroidery Projects for Beginners
Design principles for beginners often center on scalable, small motifs. Start with a flower, leaf, or a cute animal face that can demonstrate the concept of raised elements without becoming overwhelming. By planning the layers, padding, and stitch density ahead of time, you’ll practice the core ideas behind embroidery for beginners while building toward more elaborate 3D embroidery projects.
A practical approach is to map out your layers on paper before touching fabric. Consider where shadows will fall, how padding will alter the silhouette, and how color transitions will accentuate edges. This planning stage helps you translate intention into real, dimensional embroidery that grows with your skills and confidence.
Troubleshooting, Finishing, and Care for 3D Embroidery
Even seasoned makers encounter issues like padding showing through or edges not staying crisp. When padding becomes visible, try double-layering or switching to a fabric with a tighter weave. If top stitches loosen along the edges, reinforce with a thin outline to stabilize the boundary. For color bleed, use colorfast threads and ensure fabrics are clean and dry before stitching.
Finishing touches matter as much as stitch choices. Secure threads, gently press from the back with a cloth to protect dimensional elements, and consider framing or mounting for display. Proper storage and washing care will preserve texture and shape, ensuring your 3D embroidery pieces remain vibrant across multiple projects and a growing collection.
Frequently Asked Questions
What is the 3D embroidery tutorial and how does it differ from traditional embroidery?
The 3D embroidery tutorial is a structured, beginner-friendly guide that teaches layering, padding, and 3D embroidered stitches to create dimension. Unlike flat embroidery, it builds depth through layered padding and ground stitches, producing raised elements that stand off the fabric.
What tools are essential for embroidery for beginners following the 3D embroidery tutorial?
For embroidery for beginners, gather a sharp needle suited to your fabric, an embroidery hoop, quality floss or stranded cotton, a stabilizer, and padding materials such as felt scraps or soft batting. Set up a taut workspace and follow the tutorial steps for planning and stitching.
How do layered embroidery techniques create depth in 3D embroidery projects?
Layered embroidery techniques build depth by adding padding and stitches in stages: a base layer defines the silhouette, a second layer creates a secondary plane, and a third layer emphasizes contours. Alternating satin stitches with running stitches and occasional beads helps balance layers in 3D embroidery projects.
What are 3D embroidered stitches and how are they used in the 3D embroidery tutorial?
3D embroidered stitches include padded satin stitches, closely spaced stem stitches, and defined outline stitches. In the 3D embroidery tutorial, you stabilize the fabric, place padding behind the stitch line, secure it with a ground stitch, and then cover the padding with an outer stitch that matches color and texture.
How should a beginner plan a simple 3D embroidery project using the 3D Embroidered Tutorial?
Start with a simple motif (flower, leaf, or small animal face). Plan layers: outline the motif, add padding behind the outline, cover with a base stitch, then add a secondary padding layer with a contrasting color to build dimension. Finish with a few detail stitches to enhance texture.
What common issues occur in 3D embroidery and how does the tutorial guide troubleshooting?
Common issues include padding showing through, top stitches loosening at edges, and colors bleeding. Troubleshooting tips from the tutorial include double-layering padding, re-stitching edges to stabilize boundaries, using colorfast threads, and ensuring fabric is clean and dry before stitching.
| Topic | Key Points |
|---|---|
| Overview | – 3D embroidery blends traditional hand-stitching with depth and texture using padding or layering to lift elements off the fabric. – The guide presents a tutorial-style path from beginner basics to advanced effects, with actionable steps and the terminology needed to discuss 3D embroidery confidently. |
| Framework and Goals | – Focus is a structured tutorial from beginner to advanced techniques, emphasizing steps, stitches, and layering concepts. |
| Applications | – Suitable for fun stitching, decorative patches, or more complex textile pieces; the article provides practical guidance for real projects. |
| Core Concepts | – Essential 3D techniques, how to execute 3D stitches, and ideas for first layered projects to demonstrate depth and dimension. |
| What Makes It Special | – Creates tactile depth via padding and varying densities; elements can appear to rise or pop off the surface. |
| Accessibility | – Framework is beginner-friendly with pathways to advanced effects, acting as a bridge from simple embroidery to ambitious 3D work. |
| Starting Basics | – Tools: sharp needle, embroidery hoop, floss, stabilizer, padding materials. – Mindset: planning is key; focus keyword is the 3D Embroidered Tutorial. |
| Planning the Design | – Choose a simple motif; plan layered padding and stitches to build depth without collapsing over time. |
| Core Stitches | – Backbone stitches: padded satin, stem stitches, outline stitches with padding between fabric and stitch line to create 3D effect. |
| Padding and Lifting | – Use padding materials (felt, batting, etc.); cut to fit, anchor behind stitch line, ensure appropriate height without distorting fabric. |
| Layered Techniques | – Build depth with base silhouette, a second layer, and possibly a third. Alternate stitch types to balance layers and maintain harmony. |
| Color and Texture | – Use depth-inspired palettes: darker underlayers, lighter exposed surfaces; mix shiny and matte textures and contrast thread types. |
| Step-by-Step Workflow | – 7 steps: prepare fabric, outline motif, add padding, cover padding with base stitch, add secondary layer, finalize with detailing, finish and secure. |
| Troubleshooting | – Padding showing through, loose top stitches, color bleed. Solutions: double-layer padding, re-stitch outline, use colorfast thread and clean/dry fabric. |
| Project Integration | – Apply to patches, home décor, framed art; start small and gradually tackle larger projects. |
| Advanced Tips | – Explore mixed media, different stabilizers/hoop sizes, and density changes; document progress and build a portfolio. |
| Safety and Care | – Use non-flammable padding; wash gently; store pieces properly; iron with a cloth to protect raised elements. |
Summary
Table and conclusion generated.