
3D embroidered patches transform ordinary fabrics into wearable art, adding texture, depth, and personality to jackets, bags, and gear. When well crafted, they catch the eye with raised surfaces and rich colors, inviting a closer look at the stitching technique and material choices. If you’re exploring how to bring a design from concept to finished accessory, this guide walks you through the embroidery patch design process from idea to durable product. The journey also highlights why backing, finishing, and patch making and finishing contribute to longevity. Whether you’re a hobbyist, a small business owner, or a design student, mastering these steps helps you craft custom embroidered patches that tell a story.
In other terms, these raised-thread badges can be described as textured fabric emblems that add dimension to apparel and bags. Another way to frame them is as three-dimensional embroidery, where padding and layering create tactile depth. From a production perspective, the process resembles a badge design workflow involving digitizing, padding, stitching, and finishing. Brands often view these items as scalable branding accents, turning patches into accessories that extend a logo or motif beyond the garment. Understanding this wider terminology helps writers and designers capture the concept using LSI-friendly language while keeping the core ideas intact.
Design Intent as the Foundation of 3D Embroidered Patches
Design intent sits at the heart of every successful patch. By defining the purpose, target application, and brand voice upfront, you set a clear direction for color choices, size, shape, and hierarchy of visual elements. This alignment helps ensure the final patch communicates the intended message clearly, whether it’s a bold emblem on a denim jacket or a subtle accent on a tote bag. In the context of the embroidery patch design process, early decisions about what should be raised in 3D and what should stay flat guide later steps—reducing revisions and speeding up production.
A well-defined design intent also informs practical constraints, such as stitch density, thread selection, and backing compatibility. When designers specify which areas will be puffed, they shape not only aesthetics but also durability and legibility. This foresight is essential for turning a concept into a wearable, durable accessory that works across different fabrics and brands, and it anchors the entire project in the realm of successful patch making and finishing.
Digitizing for Depth: The Embroidery Patch Design Process in 3D Puff
Once the concept is approved, the artwork moves into digitizing, a critical phase of the embroidery patch design process. Digitizing converts artwork into stitch files that guide the machine, with special attention to underlay, satin stitches, and the stacking of puff layers. In 3D puff embroidery, a foam or padding layer sits beneath raised elements, so the digitizing plan must orchestrate the sequence: boundary outlines, puff stacking, padding placement, then surface stitches to lock color and detail.
The height and density of the puff significantly affect both the visual impact and the patch’s durability. Digitizers balance puff height with stitch tension and material tolerance to maintain legibility on small logos and intricate lettering. Poorly planned puffing can compromise stability, so this phase is essential for ensuring the final patch remains vibrant after laundering and regular wear.
Materials, Backing, and Finishing for Durable Custom Embroidered Patches
Material choice shapes the patch’s look, feel, and longevity. Backing options—iron-on, sew-on, or non-adhesive—determine how the patch attaches and how it withstands washing. For patches that endure frequent cleaning, a strong sew-on backing paired with a heat-sealed edge often performs best, while foam or padding beneath the stitches supports the 3D effect without compromising fabric compatibility.
Thread selection and edge finishing are equally important. Polyester threads offer colorfastness and durability, while the padding behind 3D puff embroidery must withstand heat and washing. A stable backing (sometimes with felt or neoprene beneath the puff) plus a Merrowed or laser-cut edge helps define the patch and protect the raised areas. Finishing steps—trimming, backing attachment, and thorough inspection—are integral to ensuring the patch holds its shape over time.
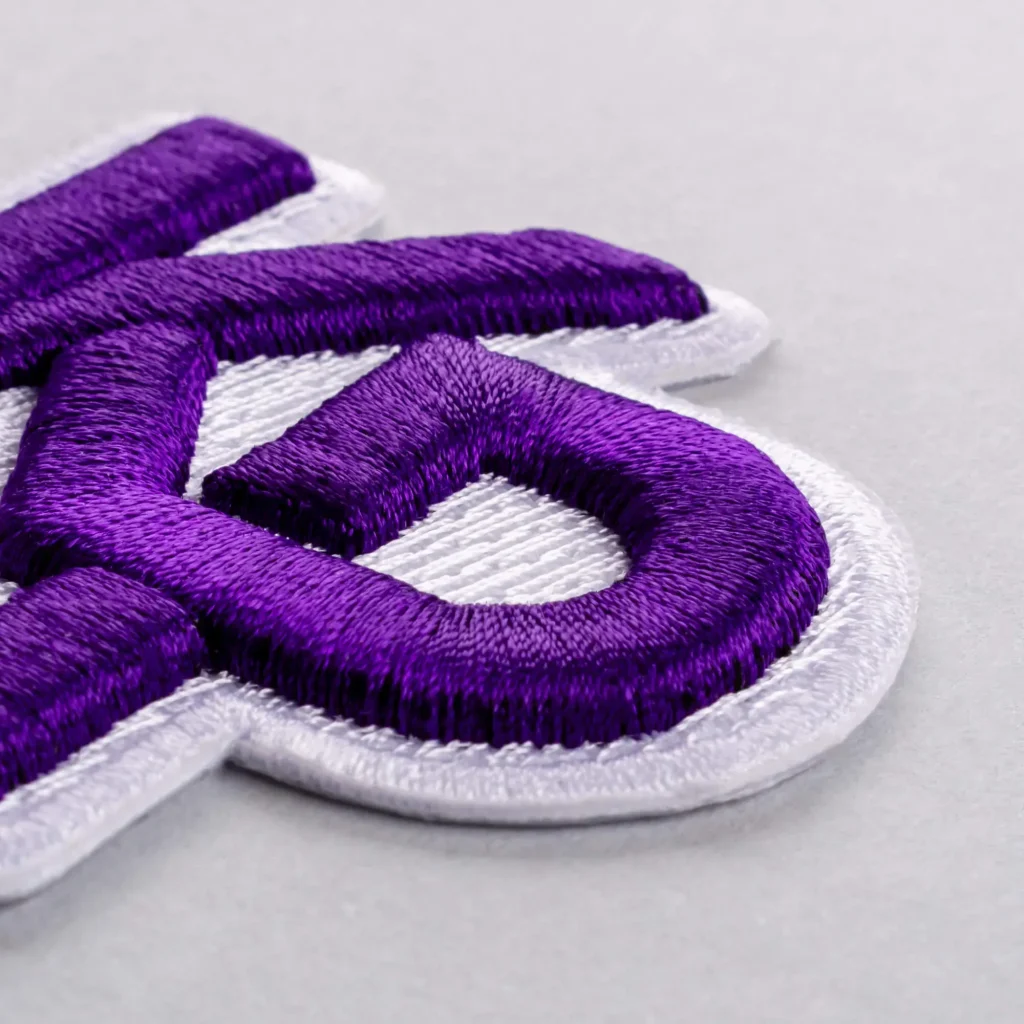
3D Puff Embroidery Patches: Creating Raised Texture and Visual Impact
The 3D puff embroidery technique creates tactile depth that catches the eye from a distance and rewards closer inspection. By layering stitches and applying padding, designers achieve a raised surface that gives characters, logos, and mascots a sculpted, almost tangible presence. This approach is central to making 3D embroidered patches stand out on apparel and gear, elevating flat designs into wearable art.
When executed well, puff height is balanced to maintain legibility, especially for small lettering and fine details. The choice of thread types, stitch width, and padding thickness all influence how pronounced the 3D effect will be. The result is a durable patch with a distinctive texture and a finish that remains vibrant after exposure to wear and washing.
Quality Control, Patch Making, and Finishing: Turning Patches into Accessories
A robust quality control process checks puff consistency, backing adhesion, and edge finish before patches are sent to customers. This is where the patch making and finishing phase proves its value: inspectors verify color accuracy across batches, confirm padding aligns with the design, and ensure there are no loose threads or gaps where the puff should be solid. A successful test wash is often included to gauge colorfastness and puff resilience under laundering.
Finishing transforms a concept into a market-ready accessory. Beyond trimming and heat-sealing, proper finishing includes packaging, labeling, and care instructions that help end-users maintain the patches’ appearance. When quality is built into each stage—from design intent through patch making and finishing to final product—the patches are more likely to endure as durable, desirable accessories that brands and hobbyists can proudly showcase.
Applications and Brand Story: Custom Embroidered Patches in the Real World
The true value of patches emerges when they are applied to a range of products, from jackets and backpacks to hats and gear. Custom embroidered patches enable brands to extend identity across merchandise and line extensions, offering colorways and sizes that fit different collections or teams. Whether used for sports teams, clubs, schools, or fashion labels, patches enrich brand storytelling by providing tangible, wearable symbols.
As a business asset, custom embroidered patches offer flexibility and storytelling potential. Designers and brands can use the embroidery patch design process to experiment with variations that maintain puff consistency while exploring different color palettes. Turning patches into accessories with thoughtful packaging and presentation creates a cohesive product ecosystem, encouraging collection, repeat purchases, and stronger brand recall.
Frequently Asked Questions
What are 3D puff embroidery patches, and how do they elevate custom embroidered patches?
3D puff embroidery patches use foam or padding beneath raised stitch layers to create a dimensional, textured motif. They add depth, texture, and a tactile feel to custom embroidered patches, enhancing visual impact while requiring careful backing and edge finishing to maintain durability through wear and washing.
How does the embroidery patch design process influence the durability and appearance of 3D embroidered patches?
The embroidery patch design process defines where puff areas will rise, the stitch types used, and the backing needs. By planning puff height, layer sequencing, and digitizing strategy early, you ensure legibility, clean edges, and reliable performance on fabrics.
What are the essential steps in patch making and finishing to produce high-quality custom embroidered patches?
Key steps include digitizing the artwork, selecting an appropriate backing, building the puff layers, trimming and heat-sealing, and applying edge finishes such as merrow or laser-cut borders. Together, these patch making and finishing steps determine durability and a polished look.
How can you turn patches into accessories with 3D embroidery beyond clothing?
3D embroidered patches can be used on bags, hats, and other merchandise as standalone accessories or branding elements. Turning patches into accessories requires sturdy backing and durable edge finishing to withstand handling and washing while preserving the 3D effect.
Why is digitizing important for 3D puff embroidery patches and how should you approach it for best results?
Digitizing translates artwork into stitch files and plans puff layers, padding placement, and stitch order. For best results, balance puff height, stitch density, and thread selection to maintain legibility and durability across sizes.
What care and maintenance steps preserve the color and height of 3D embroidered patches after washing?
Follow care guidelines such as gentle washing or hand washing with mild detergents, avoid harsh cleaners, and test wash for colorfastness and puff stability. When ironing or heat-setting, test on a discreet area, and store patches away from direct sunlight to preserve color and height.
| Section | Key Points |
|---|---|
| Introduction | 3D embroidered patches are wearable mini artworks that add texture, depth, and personality to clothing, bags, and gear; raised surfaces and vibrant colors invite a closer look at stitching technique and material choices; guide covers from concept to a durable, market-ready product; emphasizes 3D puff embroidery, backing, finishing, and tailoring for brands. |
| Phase 1 — Concept, Sketching, and Design Intent | Define size/shape/color hierarchy; decide if the patch is a bold emblem or subtle accent; translate logo into scalable, stitch-friendly form; plan which areas will be raised (puffs) and which stay flat; these decisions affect look, stitching time, thread choices, and stability. |
| Phase 2 — Digitizing and 3D Puff Technique | Digitize artwork into a stitch file; plan underlay, satin stitches, and stacking puff layers; use foam/padding beneath raised elements; determine stitching sequence; padding thickness controls 3D height and balance with durability and legibility. |
| Phase 3 — Materials, Backing, and Finishing | Choose backing (iron-on, sew-on, or non-adhesive); select threads (polyester for durability or rayon for sheen); ensure padding is compatible with washing and heat; consider edge finishing (merrowed or laser-cut); finish with trimming, heat-sealing, backing attachment, and quality inspection. |
| Phase 4 — Production, Quality Control, and Delivering a Finished Accessory | Produce in small runs or factory-scale; QA checks for puff consistency, backing adhesion, and edge finishing; verify color accuracy across patches; perform test wash for colorfastness and puff resilience; packaging and labeling with care instructions. |
| Phase 5 — Turning Patches into Accessories and Use Cases | Patches become accessories for jackets, backpacks, hats, and bags to support branding and self-expression; suitable for sports teams, clubs, schools, and fashion lines; provide colorway/size variations without compromising puff quality. |
| Care, Maintenance, and Longevity | Hand-wash or gentle machine wash with mild detergents; avoid harsh fabric softeners; test iron-on patches on an inconspicuous area before full application; store away from direct sunlight and high heat; with proper care, patches maintain depth and vibrancy across seasons. |
Summary
Table summary of key points for 3D embroidered patches.