
3D embroidery for beginners opens a world of dimensional texture and playful depth on fabric. This friendly guide introduces beginner 3D embroidery projects and explains how to do 3D embroidery with padding, layering, and simple stitches. You’ll explore 3D puff embroidery techniques and DIY 3D embroidery tips that keep projects approachable for learners. By starting with a lightweight toolkit and the right stabilizers for 3D embroidery, you’ll keep shapes crisp as you build height. With clear steps, practical demonstrations, and encouragement, you’ll gain confidence with each stitch.
Beyond typical embroidery, you can add dimensionality to fabrics through padded layers and stacked stitches. This approach reveals 3D surface effects by raising elements above the base fabric, using padding and careful thread placement. In place of ‘3D embroidery for beginners,’ you might hear terms like dimensioned stitching, raised motifs, or textured applique, all aiming for tactile interest. As you get started, focus on simple shapes, consistent tension, and basic padding to build confidence. Whether you’re stitching for decor or wearables, these techniques open a world of DIY textile art.
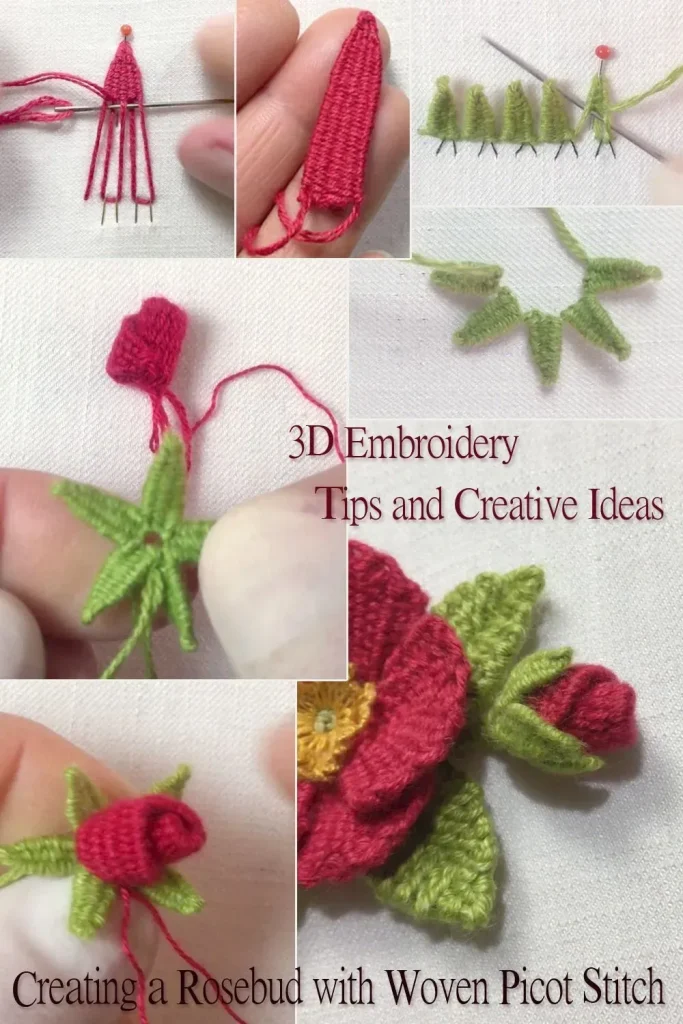
3D Embroidery for Beginners: A Step-by-Step Starter Guide
3D embroidery for beginners opens a doorway to dimensional texture that makes fabric come alive. This starter guide walks you through the mindset, basic tools, and simple techniques that create tangible uplift without overwhelming complexity. By layering padding, choosing bright contrast colors, and plotting clean stitch paths, you’ll experience the immediate satisfaction of raised motifs that pop from the surface.
Begin with the essentials and build confidence one stitch at a time. A small toolkit—a tight weave fabric, a few colorfully contrasting threads, a lightweight hoop, and a gentle stabilizer—goes a long way. As you progress, you’ll naturally expand your collection, but the key is to begin with approachable projects and steady practice, turning beginner curiosity into competent, enjoyable 3D embroidery.
Essential Tools and Stabilizers for DIY 3D Embroidery
A solid starter kit makes the difference between frustrating sessions and joyful progress. Focus on tools that support padding, layering, and clean finishes: firmly stretched fabric, sharp needles or chenille needles, and a hoop that keeps tension steady. Crucially, stabilizers for 3D embroidery provide the backbone that preserves shape as you build height with each pad.
Selecting the right stabilizers and fabric can dramatically influence how smoothly your raised motifs turn out. Tear-away or cut-away stabilizers help secure the back while padding adds volume without bulk. Matching your hoop tension to your fabric ensures minimal puckering, so your 3D elements retain crisp edges and a balanced silhouette.
Understanding 3D Puff Embroidery Techniques for Beginners
3D puff embroidery techniques are the heart of the dimensional effect. By placing a padding layer beneath a stitched cover, you create rounded petals, plump shapes, and subtle domes that rise from the fabric. This foundational approach lets beginners experiment with height without overcomplicating their stitchwork.
As you practice, you’ll notice how layering different stitches—puff stitches, satin coverage, and simple dimensional lines—can transform a flat motif into something tactile and expressive. Start with modest shapes, then gradually introduce additional layers or color shifts to deepen the visual impact while maintaining control over the project’s overall balance.
How to Do 3D Embroidery: Practical Techniques and Padding
How to do 3D embroidery begins with core techniques that translate across many designs. Focus on 3D puff stitches to create rounded features, then add layered petals or stacked elements to build depth. Padding is the secret sauce that gives these stitches their lift, so measure height carefully and secure each layer before moving on.
A practical approach is to sketch a simple shape, lay down padding, and then cover with stitching that anchors the volume. As you gain confidence, you can reuse this method across different motifs, refining tension, color choices, and fabric compatibility. The result is reliable dimensional embroidery that remains approachable for beginners.
Beginner-Friendly Projects: From 3D Floral Brooch to Small Motifs
Beginner-friendly projects anchor your progress in tangible results. Start with a 3D floral brooch that uses padding to lift petals and a central focal point. This simple starter project demonstrates how padding beneath stitches creates dimension while offering a wearable, functional piece you can proudly showcase.
Building on that foundation, try a small 3D motif trio—perhaps a flower, a leaf, and a tiny star—each with its own height. This DIY 3D embroidery exercise keeps the process enjoyable while introducing you to multiple shapes and padding heights. Completing these projects reinforces beginner 3D embroidery concepts and boosts your confidence for more ambitious designs.
Tips for Sustained Practice: DIY 3D Embroidery and Project Planning
Consistency is the backbone of growth in 3D embroidery for beginners. Set manageable practice goals, such as mastering a single puff stitch or a single padding height, and schedule short sessions so progress remains steady and enjoyable. A simple project plan helps you see tangible improvements and stay motivated.
To keep momentum, document your work—photos, notes on fabric, stabilizer choices, and padding amounts. This DIY 3D embroidery diary becomes a valuable reference as you tackle more complex motifs and experiment with color layering. Over time, your toolkit and technique equity grow, turning ambitious projects into repeatable, satisfying outcomes.
Frequently Asked Questions
What is 3D embroidery for beginners and how can I start with beginner 3D embroidery projects?
3D embroidery for beginners adds depth by padding, layering, and strategic stitch placement to create raised shapes on fabric. Start with one simple motif on tightly woven fabric (cotton or linen), use a light hoop, and build height using padding with satin or long-and-short stitches. Begin with a small 3D floral brooch or a tiny motif trio to practice padding, stitching, and color layering.
How to do 3D embroidery for beginners: which core techniques should I learn first?
Begin with core techniques that recur in many designs: 3D puff (padded) stitches for rounded shapes, layered petals for depth, and simple dimensional stitches with padding. Place a padding layer under each stitch and cover it with satin or split stitches to create volume, then test stabilizers and hoop tension to keep things clean as you work.
What are some DIY 3D embroidery ideas for beginners to practice 3D puff embroidery techniques?
Try a beginner-friendly 3D floral brooch or a small motif trio (flower, leaf, star). Each shape gets its own padding height, using puff stitches on some and layered petals on others to explore height. These DIY 3D embroidery projects reinforce padding, stitch placement, and color layering without overwhelming complexity.
Which stabilizers for 3D embroidery should I use as a beginner?
Use tear-away or cut-away stabilizers to support the back of your fabric, especially when adding padding for 3D effects. Pair stabilizers with appropriate hoop tension and test on scraps first to prevent puckering and ensure your raised elements hold their shape.
How do I choose fabrics and padding for beginner 3D embroidery projects?
Choose tightly woven fabrics like cotton or linen for stability. Add light padding such as batting or felt beneath stitches to create height, and use contrasting thread colors to enhance depth. Start with simple shapes and gradually increase padding as you gain confidence.
What common mistakes should beginners avoid when learning 3D embroidery for beginners and how can I fix them?
Avoid uneven padding, puckering fabric, loose threads at edges, and flattened raised areas. Fix by even padding before stitching, using stabilizers and proper hoop tension, finishing threads with careful knotting or backstitch, and adding a little extra padding if needed to maintain height.
| Aspect | Description |
|---|---|
| Concept of 3D embroidery | Adds dimensional texture and depth to fabric using padding, layering, and strategic stitch placement to create raised shapes. |
| Beginners’ goal | Build confidence with simple, enjoyable projects and practical techniques that you can reuse. |
| Learning approach | Front-load basic tools, clear steps, and supportive tips to progress from curious starter to proficient maker with each stitch. |
| Visual appeal & accessibility | Transform flat motifs into lively, tactile designs using approachable techniques like puff stitches, layered petals, and soft padding. |
| Mindset & toolkit | You don’t need to buy every gadget at once; start with core items and expand your toolkit as confidence grows. |
| Core techniques | 3D puff (padded) stitches, layered petals, and simple dimensional stitches, with stabilization and proper hoop tension affecting the result. |
| Project examples | Project 1: beginner-friendly 3D floral brooch; Project 2: small 3D motif trio; both teach padding and height. |
| Troubleshooting & practice | Common challenges (uneven padding, puckering, loose threads) and practical fixes; a structured practice plan supports steady progress. |
Summary
Conclusion: celebrate your growth and plan your next steps 3D embroidery for beginners is a journey that builds confidence with every stitch. From simple starter projects to small, layered motifs, you’ll develop a toolkit of techniques you can apply across many crafts. Remember that the key is consistent practice, thoughtful material choices, and a willingness to experiment with 3D puff embroidery techniques and other dimensional stitches. As you gain familiarity with stabilizers for 3D embroidery and padding strategies, you’ll find that your projects become more ambitious while remaining approachable. If you’re just starting out, celebrate tiny wins: a clean line around a raised petal, a nicely layered leaf, or a neatly finished brooch. Those moments compound into genuine skill and a growing sense of pride in your handmade creations. Keep learning, keep stitching, and soon you’ll be crafting beautiful, dimensional embroidery pieces that reflect your unique style. Your future 3D embroidery projects are waiting—step by step, stitch by stitch.