
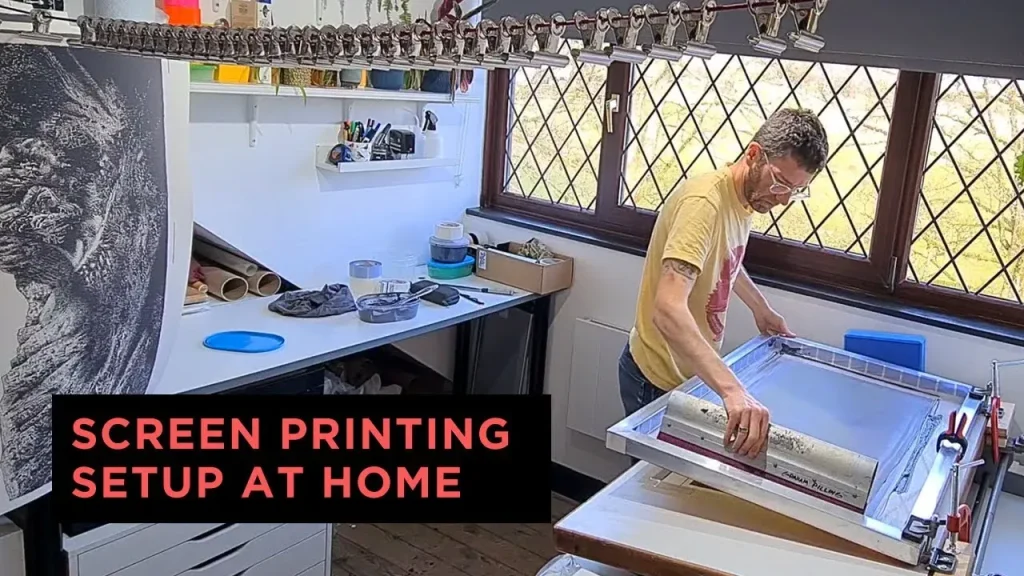
Screen Printing Setup at Home can transform a casual hobby into a repeatable, scalable process for creating custom apparel, posters, totes, and other projects, enabling you to move from rough drafts to polished, sale-ready prints without leaving your workspace. With a dedicated work zone, you can iterate designs quickly, test color combinations, and establish a practical workflow that reduces waste, improves consistency, and makes the DIY screen printing process feel almost automatic rather than ceremonial. This starting guide emphasizes affordable, accessible tools and clear steps, aligning with a beginner screen printing guide while highlighting essential screen printing supplies that keep costs reasonable and learning curves gentle. A thoughtful layout also helps you manage ventilation, cleanup, and drying, so you can extend your sessions safely and keep the space organized as you expand your home screen printing capabilities. If you’re wondering how to set up a screen printing studio at home, this concise overview provides a solid foundation for planning your space, selecting core gear, and booking your first successful print run.
Viewed through an alternative lens, this home-based setup resembles a compact workshop where simple gear and disciplined workflow deliver consistent results. You can think of it as an at-home screen-printing studio, a small-scale print shop, or a DIY textile printing corner designed for quick experiments and gradual growth. LSI-friendly topics that naturally arise include selecting inks, mastering color separations, ensuring safe drying, and organizing a space that remains inviting as you expand your projects. By framing the concept with related terms like home studio printing, hobbyist print setup, and beginner-friendly equipment, this paragraph helps search engines connect the idea to broader guides and practical how-tos.
Screen Printing Setup at Home: A Beginner’s Guide
A Screen Printing Setup at Home can transform a hobby into a repeatable process for apparel, posters, totes, and more. A dedicated home workspace with affordable tools makes it easier to iterate designs and build a small, repeatable workflow without a commercial studio.
To start, map space, budget, and goals. Planning reduces waste and frustration and helps you scale projects. Focus on DIY screen printing supplies you can source affordably, and set up a clean, dust-free area with a drying rack.
With a thoughtful plan, you’ll move from unsure first attempts to confident, consistent results. Keep a simple print log, organize inks, and treat Screen Printing Setup at Home as a repeatable system. This approach is a core element of any beginner screen printing guide.
Essential DIY Screen Printing Supplies for Beginners
The backbone of any beginners’ setup is a core set of screen printing supplies. You’ll need screens, emulsion and sensitizer, a squeegee, ink, and basic cleaning tools. This is the heart of DIY screen printing.
You don’t need expensive gear to start. A few small frames (around 8×10 inches), water-based inks for easy cleanup, and a simple exposure method let you practice basic tricks and build confidence.
Add a drying area, tape and masking materials, rags, and labeled storage to keep your home screen printing space organized and safe.
Creating a Functional Home Studio: Space, Ventilation, and Safety
Creating a functional home studio means choosing space with good ventilation, a flat, dust-free surface, and a dedicated area to cure prints. A practical layout minimizes variables that affect color, adhesion, and drying.
Safety matters. Use gloves and eye protection as needed, store inks upright, and ensure you have proper ventilation when working with emulsions and solvents. If you’re wondering how to set up a screen printing studio at home, start with a ventilated corner and a plan to expand later.
Organize your layout to keep the clean screen area separate from the ink station, and plan for light control to keep emulsions from prematurely curing.
From Design to Print: A Simple Workflow for Beginners
From concept to print, a simple workflow helps beginners build muscle memory. Start with a high-contrast design to print clean lines, and consider separating artwork into layers to simplify color separations. This approach aligns with a beginner screen printing guide.
Coat, expose, rinse, and set up the print. Use a consistent test routine to dial in squeegee pressure, ink viscosity, and exposure times. Keep a log of mesh count and settings for future reference.
Cure the ink according to manufacturer guidelines and finish by cleaning screens promptly to extend life. Practice a few small runs before scaling up.
Common Challenges in DIY Screen Printing and Practical Fixes
Common challenges in DIY screen printing include blurry or faint prints, pinholes in the stencil, and color misregistration—problems often faced by home setups.
Fixes include checking ink viscosity, ensuring proper screen tension, and improving alignment with registration marks. If needed, recoat and re-expose to tighten the stencil.
Regular maintenance—cleaning screens, protecting frames, and storing emulsions properly—reduces recurring issues and lengthens tool life.
Growing Your Home Studio: Upgrades, Maintenance, and Long-Term Care
Growing your home studio means scalable upgrades that fit a budget. Consider larger frames, higher mesh counts, an improved exposure setup, and a dedicated drying area to expand your capabilities.
Maintenance remains essential: rinse screens promptly, inspect squeegees for wear, and label and store inks and emulsions to extend shelf life. Keeping a routine ensures your DIY screen printing stays reliable.
As confidence grows, you can tackle multi-color designs and more complex artwork, always returning to the core lessons of the beginner screen printing guide and leveraging your growing screen printing supplies.
Frequently Asked Questions
What is a Screen Printing Setup at Home and why should you start a home screen printing station?
A Screen Printing Setup at Home is a dedicated, organized workspace that lets you design, expose, print, cure, and finish garments or posters using affordable DIY screen printing supplies. It enables repeatable, testable workflows, easier color iteration, and gradual scaling without a commercial studio. Starting with a clear plan and a small, well-equipped setup helps beginners build confidence and consistency.
What essential screen printing supplies should a beginner use for a Screen Printing Setup at Home?
For a solid start, focus on reliable basics: screens with tight mesh (e.g., 230-280), emulsion and sensitizer, a 70-90 durometer squeegee, water-based ink, a simple exposure method, cleaning tools, a drying rack, tape and solvents, and labeled storage. These screen printing supplies cover the full workflow from coating to curing and cleanup.
How do I choose the right equipment for a Screen Printing Setup at Home, and what does this look like for how to set up a screen printing studio at home?
Begin with modular, affordable gear: a manual press or frame-and-stencil approach, small frames for practice, and a stable drying area. Prioritize mesh count around 230-280 and plan for a future upgrade if volume grows. Pick a consistent light source for exposure and a simple drying rack to minimize workflow variability.
How should I organize a DIY screen printing workspace at home to support a Screen Printing Setup at Home?
Create two clean zones: an ink/print area and a screen preparation area, with good ventilation, diffuse lighting, and a drying station. Use labeled bins, a pegboard for tools, and a dedicated worktable with a water-resistant mat to simplify cleanup and reduce dust.
What is a simple step-by-step workflow for designing and printing in a Screen Printing Setup at Home?
A practical flow is: 1) prepare the design, 2) plan film positives if using photo-emulsion, 3) coat the screen, 4) expose and reveal the stencil, 5) rinse and inspect, 6) set up the print and pull ink, 7) cure, and 8) clean up and reclaim if needed. Treat this as an iterative process to improve with practice.
What common challenges arise in home screen printing and how can I troubleshoot them within a DIY screen printing setup?
Common issues include blurry prints, pinholes, misregistration, uneven coating, and ink drying problems. Solutions: adjust ink viscosity and screen tension, recoat and re-expose if needed, use alignment marks and dust-free work zones, practice coating technique, and maintain ventilation to avoid overly rapid drying.
| Topic | Key Points |
|---|---|
| Introduction |
|
| Planning Your Home Screen Printing Setup |
|
| Essential Tools and Supplies for Beginners |
|
| Choosing the Right Equipment for a Home Studio |
|
| Setting Up Your Workspace |
|
| A Step-By-Step Landscape: From Design to Print |
|
| Practical Tips for Beginners |
|
| Common Challenges and Solutions |
|
| Maintenance, Safety, and Long-Term Care |
|
| A Simple First Project to Build Confidence |
|
Summary
Conclusion: The core idea is that starting a screen printing journey at home is about building a repeatable rhythm: design, expose, print, cure, and clean. With patience, the right DIY screen printing supplies, and a well-organized workspace, beginners can achieve surprisingly professional results. Remember to start small, document your process, and gradually invest in equipment as you develop your skills. Your home studio can become a productive space for creative experimentation, custom apparel, and the satisfaction of seeing a design come to life through your own Screen Printing Setup at Home.