
3D embroidery on fabric adds texture, depth, and a tactile dimension to your stitching projects. With padded layers and raised stitches, you can turn simple outlines into sculptural motifs that pop from the surface, using stitches for 3D embroidery to control height. This beginner-friendly overview explores fabric embroidery techniques, from padding choices to selecting threads that hold their shape when lifted. Core 3D embroidery tools such as frames, stabilizers, and sturdy needles help you keep the fabric flat and the padding consistent as you work. By balancing padding and stitch density, you create dimensional embroidery that reads clearly up close and adds a tactile, wearable sculpture to your fabric.
Beyond the exact term, this approach is also described as dimensional or raised embroidery on textiles, where cushioning behind the stitches creates visible volume. Think of it as textured stitching on fabric or fabric relief art, where pads, foams, or felt elevate motifs and invite touch. Artists often explore 3D embroidery stitches such as padded satin and puff stitches, pairing them with contrasting threads to emphasize form. To equip this craft, seek out dedicated 3D embroidery tools, sturdy frames, and suitable stabilizers that support multi-layered needlework while preserving fabric integrity.
1. Getting Started with 3D embroidery on fabric: Tools, Fabrics, and Setup
Launching into 3D embroidery on fabric begins with a solid setup. Start by selecting a beginner-friendly base like plain cotton or linen, and pair it with a lightweight stabilizer to keep stitches crisp as you add padding. A sturdy frame or hoop helps maintain fabric tautness, reducing movement and ensuring even padding beneath surface stitches.
In terms of tools, gather the essentials: sharp or tapestry needles in suitable sizes, a range of threads such as perle cotton or embroidery floss, and a variety of padding options like cotton batting, foam sheets, or felt. As you plan your project, keep in mind how the padding will create dimension and how different fabrics respond to lifting and raised stitches. This is the foundation for exploring fabric embroidery techniques with control and confidence.
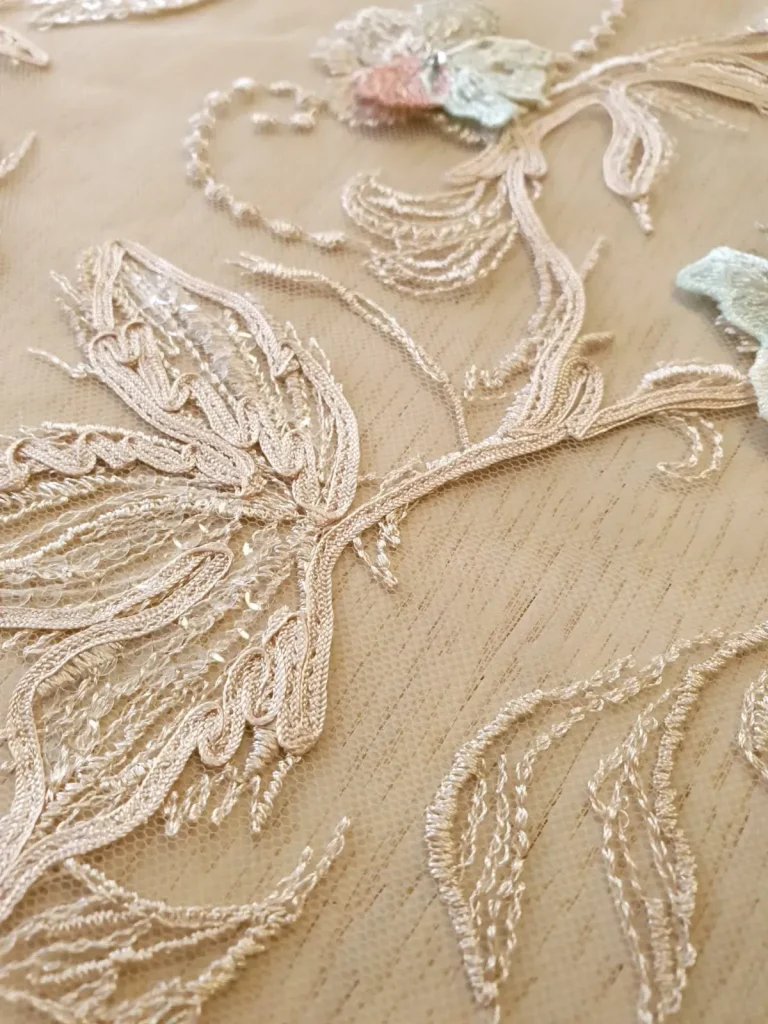
2. Mastering 3D embroidery stitches: From padded satin to puff and layers
A core goal of dimensional embroidery is to lift and sculpt shapes from the fabric’s surface. Start with padded satin stitches: outline the area to be raised, add padding behind the center, and cover it with satin stitches to create a smooth, rounded surface that catches light and shadow.
Next, explore raised or puff stitches to push padding upward into petal-like forms or leaf shapes. Combine with couching to secure larger padded elements, and consider French knots or bullion knots for seed-like accents. Layering these techniques enables multi-level dimension, while micro-padding beneath satin stitches adds a subtle grid texture that enhances depth.
3. Planning and Design: Layering for dimensional embroidery on fabric
Effective dimensional embroidery starts with thoughtful design planning. Sketch your motif on tracing paper, decide which areas will be raised, and map how many layers of padding each section will receive. A well-planned layout helps you balance the design and prevent bulk in small areas.
Color planning is equally important. Choose thread colors that complement the fabric base while allowing raised features to stand out. Outline raised areas with light backstitch, then build up padding and fill with your chosen stitches. This approach aligns with fabric embroidery techniques that emphasize structure, balance, and the play of light across dimensional surfaces.
4. Materials that Make 3D embroidery on fabric pop: Fabric, Stabilizers, and Padding
Material choice strongly influences the final look of your 3D embroidery on fabric. Begin with stable fabrics and appropriate stabilizers: tear-away for light padding and portable projects, or cut-away for thicker padding and denser stitching. The right stabilizer helps prevent distortion as you build layers.
Padding materials determine the volume and texture you achieve. Foam sheets deliver a pronounced raised effect, while felt or cotton batting provide softer, rounded shapes. Layering padding with careful thread selection enhances the dimensional quality, and experimenting with different padding thicknesses lets you tailor the feel of your stitches to the project.
5. Troubleshooting common challenges in dimensional embroidery on fabric
Warpage and puckering can derail a 3D embroidery project if the hoop tension is too tight or stabilizers aren’t well matched to the fabric weight. Adjust tension gradually and choose the stabilizer appropriate for your padding level to maintain fabric flatness while you work.
Padding inconsistencies and stitching visibility through padding are common early hurdles. Keep padding thickness uniform, trim excess padding as needed, and consider thicker or darker threads to hide padding seams. Proper needle choice and clean tension between stitches help prevent fraying and tangling when using multiple thread types.
6. Practice-ready projects to build confidence in 3D embroidery on fabric
Begin with simple motifs that emphasize padding and basic 3D stitches. A single flower on a tote bag can showcase padded satin stitches and French knots, letting you control padding thickness without overwhelming the design. Practice keeps a steady hand and reinforces your understanding of dimension creation.
As you grow more comfortable, expand into small patches, decorative pillows, or appliqués on clothing. Layer raised petals, leaves, and shapes to explore multiple levels of dimension. Using a mix of fabric embroidery techniques and the right 3D embroidery tools will help you translate ideas into tactile, expressive textiles.
Frequently Asked Questions
What is 3D embroidery on fabric and how does padding create dimension?
3D embroidery on fabric uses padding and raised stitches to turn flat fabric into dimensional, sculptural embroidery. Padding beneath the top stitches lifts threads away from the base, creating highlights and shadows that give depth—an essential aspect of dimensional embroidery.
What are the essential 3D embroidery tools and setup for a beginner working on fabric?
Key 3D embroidery tools include a stable frame or hoop, suitable fabric such as cotton or linen, stabilizers, sharp or tapestry needles, and a variety of threads for padding. Add padding materials like foam or batting, scissors, marking tools, and a light adhesive to help position padding as you stitch.
Which stitches for 3D embroidery on fabric work best for beginners seeking a raised effect?
Begin with 3D embroidery stitches such as padded satin stitch, raised or puff stitches, and couching with padding, plus small knots like French or bullion knots for detail. These 3D embroidery stitches build dimension quickly while you practice control and padding.
How should I plan padding and layering in 3D embroidery on fabric to avoid bulk?
Plan designs on tracing paper, decide which areas will be raised, and layer padding gradually to build dimension without overstuffing. Use multiple lightweight padding layers for subtle depth or thicker padding for bold effects, keeping the dimensional embroidery balanced across the motif.
Which fabrics, stabilizers, and threads work best for 3D embroidery on fabric and why?
Start with stable fabrics like plain cotton or linen that hold padding well. Use tear-away stabilizers for light padding and cut-away stabilizers for thicker padding; water-soluble stabilizers can help remove stabilizers after finishing. Threads such as perle cotton or embroidery floss create crisp or fuller surfaces, contributing to effective fabric embroidery techniques with dimension.
What are common mistakes in 3D embroidery on fabric and how can I fix them?
Common issues include warping or puckering from too-tight tension, flat or lumpy padding, and padding showing through the top layer. Fix by adjusting hoop tension, ensuring even padding thickness, repositioning stitches, using thicker padding where needed, and choosing compatible thread types to reduce fraying on stitches for 3D embroidery stitches.
| Key Point | Description |
|---|---|
| Definition and Concept | 3D embroidery on fabric is a stitching technique that uses padding, lifting, and raised stitches to create sculptural motifs that stand off the base fabric, adding texture and dimension beyond traditional flat embroidery. |
| Benefits | Adds texture, depth, and a tactile dimension to projects. Suitable for beginners since simple stitches can gain volume with proper padding and thread choices. |
| Tools, Setup, and Materials | A hoop/frame to keep fabric taut; stable base fabric (cotton/linen) and appropriate stabilizers (tear-away or cut-away); needles suited to padding (sharp or tapestry, often sizes 7–9 or larger); threads (perle cotton, embroidery floss, silk) and padding materials (cotton batting, felt, foam sheets, or soft polyfill); padding materials (foam/felt/batting); scissors, marking tools, and optional fusible web or fabric glue to hold padding in place. |
| Fabrics, Stabilizers, and Threads | Choose stable, easy-to-work fabrics (plain cotton/linen). Stabilizers: tear-away for light padding, cut-away for thicker padding; water-soluble stabilizers can be removed later. Threads: perle cotton for crisp lines, embroidery floss for fuller look; specialty threads can add sparkle. Padding options include foam, felt, batting, and layered scraps for dimension. |
| Planning Your Design | Sketch designs on tracing paper first; decide where padding will go and which areas will be raised. Plan layering to build dimension gradually, and choose colors to emphasize raised features. Outline raised areas before padding and stitches to maintain shape. |
| Stitches and Techniques | Key techniques include padded satin stitch (raised surfaces), raised/puff stitches, couching with padding, French knots and bullion knots for beads, layered stitching for multi-level depth, and satin stitch with micro-padding for subtle textures. Start with small motifs to practice padding thickness and stitch length. |
| Common Mistakes and Troubleshooting | Issues like warping/puckering, flat or lumpy padding, stitching showing through padding, and thread fraying. Tips: keep hoop snug but not overly tight; use appropriate stabilizers; maintain consistent padding thickness; adjust padding or stitch placement to hide padding; use sharp needles and quality threads; secure threads and work in clean steps. |
| Practice Projects | Start with simple ideas: a single flower on a tote or patch, a small felt patch with raised elements, a decorative pillow with layered petals, or a clothing embellishment on denim or cotton using padding for a raised motif. |
| Finishing and Care | Secure all threads, trim excess padding if needed, and set any adhesives. Care depends on fabric and threads; hand washing is gentler, or use a gentle machine cycle with a protective bag. Dry flat to maintain stitch height, especially for thicker padding. |