
How to Transfer Embroidered Designs is a practical skill that moves a pattern from a template to fabric with precision. Mastering embroidery transfer methods helps you pick reliable techniques and avoids guesswork during the project. Clear patterns for embroidery act as the blueprint, guiding placement and proportions as you work. Precise tracing embroidery designs ensures the lines stay crisp and ready for stitching. By building a repeatable approach to these steps, you’ll gain confidence to tackle both simple initials and complex motifs.
In broader terms, you can describe this process as motif mapping, design placement, or pattern transfer, all aimed at keeping proportions true. LSI-friendly phrasing connects concepts like reference grids, transfer paper, and alignment guides to the same end: a clean, stitch-ready design on fabric. Rather than chasing a single method, consider testing light transfer papers, tracing with water-soluble markers, and confirming center points before stitching. This layered vocabulary helps search engines understand related topics while keeping your content approachable for readers.
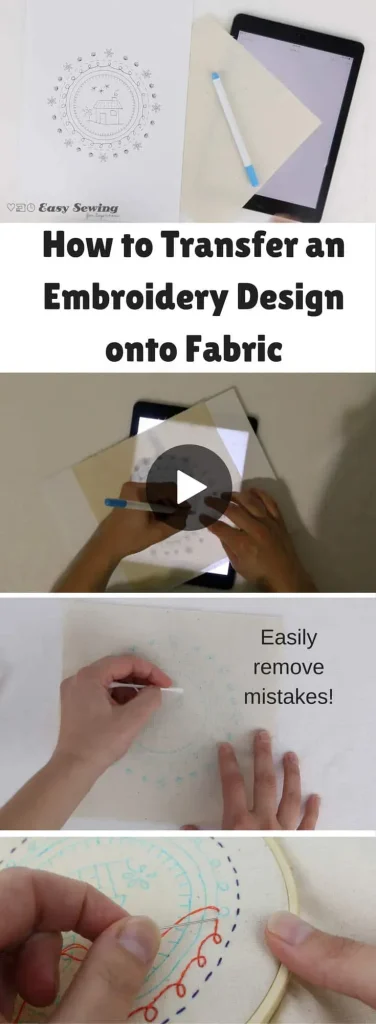
How to Transfer Embroidered Designs: A Practical Workflow for Patterns, Tracing, and Stabilizers
Transferring embroidered designs hinges on a clear workflow that respects patterns, tracing methods, and stabilizers for embroidery. By aligning these elements from the start, you create a reliable pathway from concept to finished stitch, reducing distortion and skew. Focus on patterns for embroidery as the blueprint—ensuring the final size, placement, and proportions are faithful to the original design. A well-prepared pattern makes tracing easier and stabilizing more predictable, setting the stage for precise embroidery transfer and consistent results.
Begin with a clean workspace, precise pattern sizing, and a tested tracing plan. Print digital patterns at 100% scale or use a trusted enlargement/reduction method to preserve fidelity. If the design won’t fit in one hoop, divide it into sections and maintain alignment through a shared grid reference on fabric and pattern. This approach supports how to transfer designs to fabric with minimal rework, ensuring your lines stay accurate through stitching and eventual finishing.
Patterns for Embroidery: Turning Sketches into Transfer-Ready Templates
Patterns are the backbone of successful embroidery transfers. They translate your artwork into a scalable guide that preserves placement, orientation, and proportion. Whether you start with a commercial pattern book, a digitized file, or a hand-drawn sketch, the goal is a clean template that translates well to fabric. By focusing on crisp edges, clear reference points, and generous margins, you create patterns that are easy to align during transfer and stitching.
When preparing patterns, consider adding anchors and centerlines that align with your hoop. Cut with ample margins to allow for adjustment and ensure the design remains intact if you need to re-tape or reposition. If you’re unsure about fit, test a small swatch to confirm that the pattern translates correctly to your chosen fabric, thread color, and stabilizer configuration before committing to the full project.
Tracing Embroidery Designs: Techniques for Clean Transfers on Any Fabric
Tracing is the moment where your pattern becomes a set of actionable lines on fabric. The method you choose should suit the fabric type, thread color, and your workflow preferences. Common tracing methods—carbon or transfer paper, lightbox projection, and water-soluble markers—support precise lines while minimizing marks on the finished surface. By selecting a tracing embroidery designs approach that fits your fabric, you can maintain line quality and avoid smudging during stitching.
For darker fabrics or delicate textures, backlit tracing or marker systems that wash out after stitching are especially helpful. Always test the marking method on a scrap swatch to verify visibility, transfer accuracy, and mark removal. Pattern feedback during tracing—checking alignment with hoop lines and grain—ensures the transferred lines stay consistent as you move from paper to fabric.
Embroidery Transfer Methods: Matching Fabric Type and Stabilizers for a Smooth Finish
Choosing embroidery transfer methods involves balancing fabric type, stitch density, and the intended finished look. Stabilizers for embroidery are a crucial partner to your pattern and tracing steps, preventing puckering and distortion. Tear-away, cut-away, and wash-away stabilizers each have ideal scenarios: tear-away for light woven fabrics, cut-away for knits and dense stitching, and wash-away for delicate or highly detailed work. Selecting the right stabilizer reduces tension-related issues and keeps stitches positioned as designed.
Apply stabilizers thoughtfully by fabric side and project needs, then remove or dissolve as appropriate after stitching. For layered or delicate designs, you might pair a light tear-away with a backing to preserve surface softness, or use a cut-away for extra edge stability on stretchy textiles. Understanding stabilizers for embroidery helps you tailor the transfer process to the fabric’s weight, weave, and finish, ensuring your design transfers cleanly from pattern to fabric.
Stabilizers for Embroidery: Choosing the Right Support for Your Pattern
Stabilizers for embroidery are not an afterthought—they’re part of the core transfer workflow that protects both fabric and stitches. The right stabilizer supports stitch density, anchors the fabric in the hoop, and minimizes distortion during long or dense sections. When selecting stabilizers for embroidery, consider fabric weight, weave, and whether the project will be washed or worn. This choice directly affects how the design translates from your pattern into finished embroidery.
Practice with different stabilizer combinations on scrap fabric to understand how material, hoop tension, and stitch length interact. For sheer or delicate fabrics, wash-away stabilizers can disappear with washing, leaving only the stitch pattern visible. For heavy fabrics or garments with stretch, cut-away stabilizers provide robust support. Matching stabilizer characteristics to your pattern helps maintain placement accuracy and a clean final result.
Troubleshooting Common Transfer Issues: Avoid Skew, Puckers, and Smears
Even well-planned transfers can encounter hiccups. Common transfer issues include faint lines, misalignment, or fabric puckering. When lines look faint, re-trace with slightly heavier pressure or switch to a higher-contrast marker on a test swatch. If marks smear during stitching, choose a marker that remains stable through stitching or switch to a transfer method that leaves clear lines only on the pattern side. Regularly checking alignment against hoop guides helps you catch skew before stitching begins.
If the fabric begins to pucker, adjust hoop tension or switch to a lighter stabilizer. Knit fabrics may benefit from a more supportive stabilizer to prevent edge distortion, while very sheer fabrics might require a wash-away stabilizer to preserve drape. Always test new methods on scrap fabric to verify how well the lines transfer and whether they erase cleanly after finishing. With practice, you’ll develop a reliable workflow for how to transfer designs to fabric that minimizes guesswork and maximizes accuracy.
Frequently Asked Questions
How to Transfer Embroidered Designs: what are the essential steps that combine patterns, tracing, and stabilizers?
Transferring embroidered designs centers on three elements: patterns for embroidery, tracing methods, and stabilizers for embroidery. Start by preparing patterns at the final size, print or cut them with generous margins, and mark center points. Choose a tracing method (carbon tracing, lightbox projection, or water/air-soluble markers) that works for your fabric, then hoop the fabric and apply a suitable stabilizer. Transfer the lines onto the fabric, verify alignment against hoop guides, and begin stitching. After finishing, remove marks and stabilize as needed. This approach preserves proportions, placement, and stitch quality for How to Transfer Embroidered Designs.
What are reliable embroidery transfer methods for different fabrics when learning How to Transfer Embroidered Designs?
Common embroidery transfer methods include carbon or transfer paper, lightbox tracing, and water- or air-soluble markers. For darker fabrics, a lightbox or projecting method can reduce marking on the fabric; for light fabrics, carbon or transfer paper works well with light pressure. Always test the method on a scrap swatch to ensure marks erase cleanly and don’t shadow through. Pair the chosen transfer method with appropriate stabilizers for embroidery to maintain fabric integrity while transferring the design.
How can patterns for embroidery be prepared and tested to improve accuracy when transferring embroidered designs?
Patterns for embroidery should be scaled to final size, with clear center points and alignment marks. Print at 100% scale or use a trusted scaling method, then cut the pattern with generous margins. Create a grid reference on the fabric to help nest or tile the design across hooping cycles. Before stitching, mark centers and reference points, and perform a quick test patch to confirm that the pattern fits the fabric, aligns with the hoop, and preserves the original proportions.
How to transfer designs to fabric with minimal distortion: the role of stabilizers for embroidery?
Stabilizers for embroidery are crucial to prevent puckering and distortion. Choose tear-away for lightweight woven fabrics, cut-away for knits or dense stitches, and wash-away for delicate fabrics or designs that will be washed. Apply the stabilizer to the fabric side as directed, and consider layering it on both sides for extra support on heavy projects. Matching stabilizer type to fabric weight and stitch density helps keep lines clean and edges stable during How to Transfer Embroidered Designs.
What tracing embroidery designs techniques help ensure clean lines during transfer?
Effective tracing techniques include carbon or transfer paper with light pressure, a backlit lightbox for clear visibility, and water- or air-soluble markers that wipe away after stitching. Always test marker removal on a scrap fabric to ensure marks disappear without staining. Align tracing with hoop lines and grain, and double-check center points or cross-lines to maintain consistent placement before you start stitching.
What is a practical step-by-step workflow for How to Transfer Embroidered Designs?
Practical workflow: 1) Prepare a clean, well-lit workspace and gather tools. 2) Iron and prepare the fabric, then hoop it securely. 3) Prepare the pattern at exact size and mark alignment points. 4) Apply the suitable stabilizer to the fabric. 5) Transfer the pattern using your preferred tracing method. 6) Check alignment against hoop guides and adjust if needed. 7) Start stitching, beginning with borders or anchor stitches. 8) Finish by removing marks and trimming stabilizers as directed. This repeatable workflow keeps transfers accurate across projects.
| Aspect | Description | Notes / Tips |
|---|---|---|
| Goal of transfer | Move a design from template to fabric with aligned stitches, balanced density, and a clean final piece. Poor transfers can cause slipped lines, skewed motifs, or uneven tension. | Accurate transfer reduces errors and saves time; mastering this yields a professional result. |
| Three essential elements | Patterns, tracing, and stabilizers work together to preserve the original design and protect the fabric/hoop from distortion. | Keep all three in harmony for reliable embroidery results. |
| Patterns | Patterns serve as the blueprint. They can come from commercial pattern books, digitized designs, or hand-drawn sketches converted into printable patterns. They should be clean, scalable, and faithful to proportions. | A precise pattern makes tracing and stabilizing straightforward. |
| Pattern preparation & sizing | Verify final size, print at 100% scale, or scale correctly; divide large designs; create a grid on fabric to nest across hoopings; anchor the pattern. | Test patch on fabric to confirm fit and alignment before stitching. |
| Tracing | The pattern becomes a physical guide on fabric. Choose a tracing method based on fabric, thread color, and preference (carbon/transfer paper, lightbox, or markers). | Test visibility and mark-removal on scrap fabric to avoid staining the final piece. |
| Tracing methods details | Carbon/transfer paper creates erasable lines; lightbox helps trace on dark fabrics; water-soluble or air-soluble markers fade or wash away after stitching. | Practise with light pressure and test marker removal to ensure clean final lines. |
| Alignment checks | Pattern feedback: check alignment with hoop lines, fabric grain, and reference points; ensure consistency across panels. | Double-check placement before starting to stitch. |
| Stabilizers | Stabilizers keep fabric stable and stitches even, preventing puckering and distortion. Choose based on fabric type, stitch length, weight, and whether you plan to remove after stitching. | Balance fabric handling, stitch density, and final product; remove or trim as required. |
| Stabilizer types | Tear-away (easy removal for woven fabrics), Cut-away (sturdy for knits/dense stitches), Wash-away (delicate fabrics; dissolves in water). | Choose based on fabric and project needs; test for show-through and finish. |
| Choosing stabilizers | Match stabilizer to fabric weight, weave, and desired final look; lighter fabrics may use tear-away, heavier or stretchy fabrics may benefit from cut-away; shear fabrics may require wash-away with careful thread choice. | For sheer fabrics, consider combining stabilizers or fabric backing to prevent show-through. |
| Putting it together: workflow | Step-by-step workflow: 1) Prepare workspace 2) Prepare fabric 3) Prepare pattern 4) Apply stabilizer 5) Transfer the pattern 6) Check alignment 7) Start stitching 8) Finishing (remove marks and trim stabilizer). | A consistent workflow increases reliability and repeatability. |
| Troubleshooting | Common issues: faint lines, smeared marks, puckering, or misalignment. | Retrace with higher-contrast marks, test different markers, adjust hoop tension, or switch stabilizers; practice on scraps. |
| Fabric-specific tips | Cotton/linen: light tear-away with clear tracing; velvet/corduroy: stabilization and careful placement; knits: stabilizer that supports edges; silk/chiffon: wash-away may help but choose thread carefully. | Tailor approach to fabric weight, weave, and finish; always test on a scrap. |
| Final takeaway | A reliable workflow translates any design into embroidery with confidence. Refine patterns, choose a respectful tracing method, and pair with the right stabilizer to protect fabric and stitches. | Develop your own go-to tools and preferences for consistent results. |
| Conclusion (from base content) | Transferring embroidered designs is a practical blend of planning, technique, and patience. By focusing on patterns, tracing, and stabilizers, you create a solid foundation for successful embroidery projects. Start with a precise pattern, choose a tracing method that preserves line quality, and pair it with the right stabilizer to protect your fabric and stitches. With practice, you’ll master How to Transfer Embroidered Designs and gain a more consistent workflow that reduces guesswork and elevates your embroidery results. | The core steps—patterns, tracing, stabilizers—serve as your compass for a clean, professional finish. |
Summary
How to Transfer Embroidered Designs is a practical, repeatable process that centers on patterns, tracing, and stabilizers. Begin with precise patterns, prepare a clean transfer, choose a tracing method that respects the fabric, and select a stabilizer that matches stitch density. With regular practice, this workflow yields consistent placement, balanced density, and a polished finish on any embroidery project. By applying these core elements, you can tackle designs from initials to intricate motifs with confidence, ensuring reliable, professional results in every project.