
Embroidered borders and motifs can transform a simple fabric into a finished, professional-looking piece. To get that polished effect, start with clear embroidery border design tips that balance scale, rhythm, and fabric weight. Consider edge embroidery patterns that repeat or mirror along the edge to guide the eye without overwhelming the main motif. Think about thread compatibility, stitch density, and fabric tension to keep borders crisp through wear and washing. With mindful planning of border width, motif repetition, and color harmony, you’ll create edges that feel intentional and durable.
Viewed through the lens of decorative edging, borders become a framing device that unifies fabric and function. Consider motifs for embroidery borders to build a readable rhythm and to echo any existing pattern on the textile. With edge embroidery patterns in mind, you can place corners and sides to balance negative space and practicality. For ideas and inspiration, explore border and motif ideas for sewing that translate across garments, linens, and home decor.
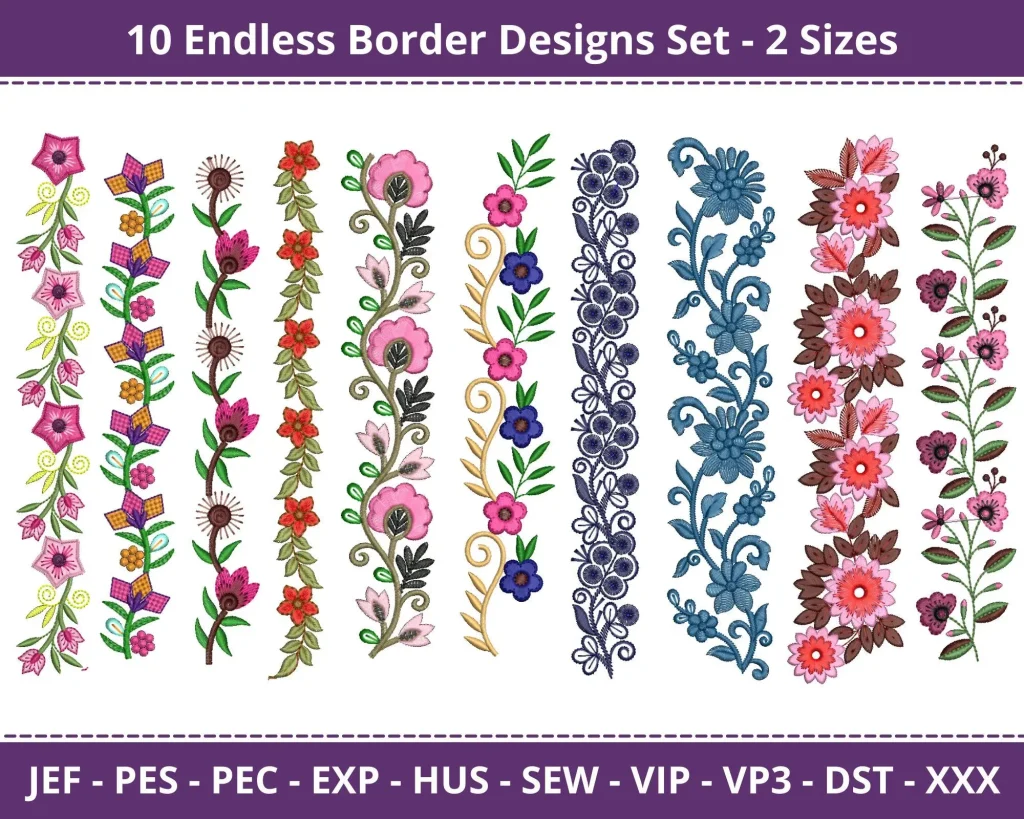
Embroidered borders and motifs: A cohesive design language
When you treat borders and motifs as a unified design language, you create balance, guide the eye, and add meaning to the piece. This approach aligns with core embroidery concepts and can be framed by practical guidance such as embroidery border design tips. Start by establishing a unifying motif family and a consistent scale that echoes the fabric’s texture and overall silhouette.
Think of repetition and harmony as the backbone of your edge design. By selecting motifs for embroidery borders that repeat and relate to each other, you build a cohesive frame rather than a collection of isolated decorations. Consider color coordination, rhythm, and how the border will interact with the fabric’s drape. This mindset also supports edge embroidery patterns that feel intentional and crafted, not accidental.
Choosing the Right Border: Size, Proportion, and Rhythm
The size of a border should serve the fabric and the item you’re creating, not overpower it. Use a proportion guideline—typically border width around one-tenth to one-fifth of the adjacent panel height—and adjust for fabric weight and project purpose. This practical approach echoes embroidery border design tips that emphasize balance between border and main field.
If you’re new to borders, begin with a simple option such as a single row of repeating motifs or a narrow geometric line. Plan the border as a frame that enhances the main design rather than competing with it. Test various placements and widths on a scrap, and consider how the edge embroidery patterns will read from a distance and up close.
Motifs that Work: Repetition, Symmetry, and Corners
Motifs for embroidery borders should read well along the edge, with repetition creating unity and a sense of continuity. Classic choices include small flowers, leaves, vines, geometric shapes, and stylized damasks. When placed along a border, design motifs as a continuous strip, a row of corner motifs, or a combination of both, ensuring a graceful transition at corners.
Corner motifs deserve special attention because they anchor the design and prevent empty or awkward ends. Pair a corner motif with a repeating side motif to maintain symmetry and balance. For modern edges, you can experiment with diagonal or chevron elements that still tie into the corner motif, preserving a cohesive look while updating the traditional border language.
Edge Embroidery Patterns: Layout, Planning, and Transfer
Layout is where many projects stumble, so pre-plan your edge design on paper and translate it carefully to fabric. Edge embroidery patterns offer options such as continuous borders, segmental borders with evenly spaced motifs, or corner-centered borders that anchor the design. Choosing a layout that suits the edge length helps maintain even spacing and reduces drift.
Before stitching, draft a quick plan on tracing paper or a fabric-safe erasable pen. Mark motif centers, spacing, and diagonal relationships at corners. Verify frame alignment in your hoop to avoid waviness, and transfer your plan precisely to fabric using your preferred method—whether tracing, water-soluble pens, or light fusible interfacing as a guide.
Threads, Color, and Contrast: How to Choose Embroidery Borders
Thread choice dramatically affects the border’s impact, from bold, contrasting edges to refined, tonal lines. For a standout outline, select colors that create strong contrast with the fabric; for a subtle, textural effect, choose threads that harmonize with the background while adding dimension through stitch finish. This decision-making aligns with edge embroidery patterns that need both clarity and harmony on the fabric.
When selecting embroidery threads for borders, balance sheen versus matte finishes, weight, and colorfastness. Heavier fabrics pair well with thicker threads and denser stitches, while lighter fabrics benefit from finer threads. Use color strategically: a single accent against a neutral base can unify the border with the main design, while a multicolor border echoes a larger palette in the project.
Practical Borders for Garments, Linens, and Home Decor
Borders offer versatility across garments, linens, and home decor. Place dense borders away from seam allowances on garments, and let borders harmonize with fabric weave or pattern on linens to create a cohesive look. In home décor, repeat a motif family—such as mono-chromatic florals or geometric repeats—across table runners, cushions, and napkins for a unified edge.
Border and motif ideas for sewing can span a single-row floral border, stepped chevrons on a table runner, or a two-tone vine border that alternates leaf shapes. Aim for a border vocabulary that can tie interior panels or patches into the overall design language, creating a signature look rather than disjointed accents. With thoughtful planning and care, embroidered borders and motifs become a deliberate craft that enhances any project.
Frequently Asked Questions
What are embroidery border design tips for Embroidered borders and motifs to ensure the border matches the fabric scale?
Start by sizing the border to the fabric so it doesn’t overwhelm the main piece. A border width of about one-tenth to one-fifth of the adjacent panel height creates a pleasing rhythm. Plan your layout on paper first, choose motifs for embroidery borders that repeat harmoniously, and begin with a simple option before adding complexity. The goal is to frame the main design without overpowering the fabric’s drape and texture, so keep the border in balance with the project.
Which motifs for embroidery borders work best when creating Embroidered borders and motifs with repeating patterns along edges?
Motifs for embroidery borders work best when they repeat to create unity. Choose a small floral, leaf, vine, or geometric motif that can be stitched as a continuous strip or as corner motifs with side motifs. Corner motifs anchor the design and help it read as intentional. For a modern edge, pair a diagonal or chevron motif with a consistent corner motif to maintain cohesion.
What edge embroidery patterns should I use for Embroidered borders and motifs on delicate fabrics, and how should I lay them out?
Edge embroidery patterns on delicate fabrics benefit from clear layout choices. Use continuous border, segmental border, or corner-centered border. Pre-draft the plan on tracing paper, mark centers and spacing, and verify alignment in the hoop before stitching. A careful plan prevents skew and ensures even edges along the entire length.
What border and motif ideas for sewing can I try to create a cohesive look with Embroidered borders and motifs on garments or linens?
Border and motif ideas for sewing that work well together include maintaining a cohesive motif family—mono-chromatic florals on one edge, or a geometric border with a floral corner. Keep the border hue and motif scale in harmony with the fabric. Examples: a single-row floral border at the hem, a two-tone vine border, or a stepped chevron along a table runner. These ideas help the border feel intentional and coordinated with the main fabric.
How do I choose embroidery threads for borders when working with Embroidered borders and motifs to achieve bold or subtle effects?
Decide whether you want a bold edge or a subtle finish. For bold edges, use contrasting thread colors; for subtle effects, pick a hue that harmonizes with the background. Consider fabric weight, thread sheen versus matte finish, and stitch density to maintain crispness after washing. Test color and finish on scrap fabric before stitching the border.
Which stitches and edge finishing techniques for Embroidered borders and motifs help keep edges crisp after washing?
Use stitches that suit the border’s texture and durability: satin stitch for filled edges, backstitch for clean lines, running stitch for light outlines, chain stitch for a rope-like effect, and stem stitch for vines. Maintain even tension, use a properly sized hoop, and apply a stabilizer or light backing for dense borders. Lock thread at corners and plan corner motifs to minimize distortion during laundering.
| Topic | Key Points | Practical Tips | Example / Notes |
|---|---|---|---|
| Choosing the Right Border: Size, Proportion, and Rhythm | The border should complement the fabric and the item; avoid overpowering it. Border width should be roughly one-tenth to one-fifth of the adjacent panel height; adjust for fabric weight and project purpose. Start simple and increase complexity as you gain confidence. Think of the border as a frame for the main design. | Consider fabric scale, panel height, and visibility when selecting border width; for large items use a wider border, for delicate items use a narrow edge. Pin or draw guidelines to test proportion before stitching. | Curtains with a wide border vs a baby bonnet with a narrow edge. |
| Motifs that Work: Repetition, Symmetry, and Corners | Repetition creates unity; motifs should read well along edges. Use small flowers, leaves, vines, geometric shapes, or damasks. Motifs can be continuous strips, corner motifs, or a combination. Corner motifs provide symmetrical anchors; modern edges can use diagonal or chevron motifs that still tie to corners. | Place corner motifs at ends; ensure cohesion with a continuous vine or a diagonal motif for a coordinated look. | A corner motif paired with a repeating vine along the sides. |
| Edge Embroidery Patterns: How to Lay Them Out | Pre-plan layout on paper and translate carefully to fabric. Layout options include continuous borders, segmental borders, and corner-centered borders. Mark motif centers, spacing, and corner relationships. Verify alignment with mat and hoop to avoid distortion. | Draft a plan on tracing paper; use a fabric-safe erasable pen; test on a scrap before final stitching; mark anchor points for long edges. | Continuous border with even spacing, or corner-centered layout ensuring corner motif anchors the design. |
| Threads, Color, and Contrast: Making Borders Stand Out (or Subtle) | Thread choice affects border impact. Bold edges use contrasting colors; subtle edges harmonize with the background. Heavier fabrics suit thicker threads and denser stitches; lighter fabrics benefit from finer threads. Consider sheen versus matte finishes; balance stitch density with thread thickness; use color strategically (accent color on neutral fabrics or a multicolor border). | Balance fabric weave and weight; test thread finishes; choose colorfast options. For bold edges choose high-contrast colors; for subtle edges pick harmonizing tones. | A floral border in a contrasting color on a plain linen. |
| Stitches, Techniques, and Edge Quality | Stitches define texture and durability. Common options: satin stitch, backstitch, running stitch, chain stitch, stem stitch. Satin gives a rich filled edge; backstitch yields clean lines; running stitch is light and breathable; chain stitch offers a rope-like effect; stem stitch provides a flexible, smooth line. Maintain even tension, keep fabric taut, and use appropriate hoop and needle. Consider stabilizers for dense borders and lock thread at corners to prevent drift. | Use an appropriately sized hoop and sharp needle; stabilize as needed; test tension and spacing on scraps. | A satin-stitch border for a linen table runner. |
| Practical Tips for Garments, Linens, and Home Decor | Borders should move with the fabric and not obstruct seams. On linens, borders can be the main design and should echo the weave or pattern. For home decor, use a consistent motif family (e.g., mono-chromatic floral or geometric reoccurrence). | Avoid dense borders near seams; select motifs that echo the fabric’s weave; apply borders to table runners, napkins, cushions, etc. | Single-row floral border along a hem; stepped chevron on a table runner. |
| Transferring Your Pattern and Ensuring Precision | Transfer methods matter: tracing, water-soluble pens, or light fusible interfacing as a guide. For non-stretch fabrics, transfer lines should be light. Mark anchor points along long edges to keep alignment. | Draft on tracing paper; test on scrap; check anchor points and hoop alignment before stitching. | Anchor points along the edge to maintain even spacing. |
| Caring for Embroidered Borders and Motifs | Proper care helps keep borders crisp over time. Wash on gentle cycles with cool water; air dry; use a pressing cloth and low heat iron. Choose colorfast threads and consider stabilizers for frequent washing. | Stabilize edges and select colorfast threads; test care instructions on scraps. | Low-heat iron over a pressing cloth to protect the border. |
| Creative Extensions: Expanding Your Border Toolkit | Experiment with combining different borders on a single edge. Layer borders (e.g., narrow chain with a floral motif strip) and add small corner motifs at the ends. Use mirror-imaged motifs or alternate colorways to build subtle gradients. Borders and motifs together form a signature design language. | Plan layered borders; choose motif families that can be woven into larger design language. | Layered borders along an edge for depth. |
Summary
Table of key points about embroidered borders and motifs.