
3D Embroidered Art is a vibrant, tactile form of fiber art that transforms flat fabric into dimensional sculpture, inviting viewers to touch and study the surface from multiple angles. By layering fabric, padding, and a variety of stitches, artists create works that push outward from the base, inviting examination from close-up inspection to gallery-style viewing, and revealing subtle shadows as light shifts. This guide situates the technique within the wider realm of textile sculpture and explores 3D embroidery techniques that add depth, volume, and tactile interest to fabric art across styles. From stitched sculpture to everyday craft, practitioners weave color and form into pieces that feel alive, respond to touch, and unfold new details as you move around them. If you’re new to this practice, an embroidery tutorial can help you start your own dimensional projects with confidence and curiosity, offering step-by-step guidance alongside tips on choosing materials, stabilizers, and safe stitching strategies.
Think of it as three-dimensional textile art where layers of fabric and stitch create volume that can stand alone on a shelf or lounge in a gallery setting. The language here blends embroidery-inspired techniques with sculpture-oriented thinking, yielding works that feel solid, yet delicate in weight. From an LSI perspective, terms like fabric sculpture, stitched forms, and thread-based relief help search engines connect this craft with broader categories. With practice, padding, layering, and raised stitches become tools for shaping light, shadow, and texture into compelling, three-dimensional fabric sculpture that communicates personality. Whether you’re a hobbyist or a practicing artist, exploring these terms—textile sculpture, fabric art, and embroidered relief—helps you find relevant guides, projects, and community ideas.
3D Embroidered Art and the Rise of Textile Sculpture
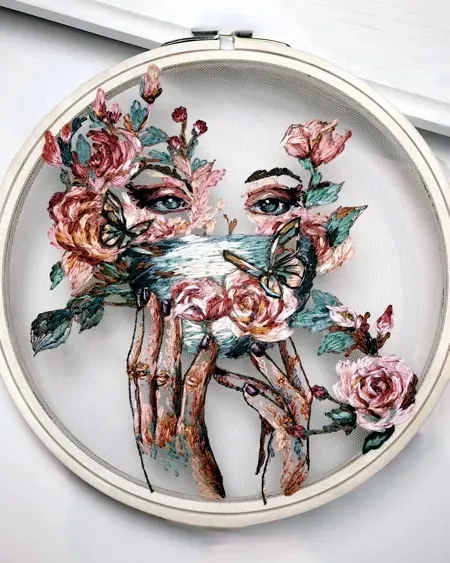
3D Embroidered Art transforms flat fabric into tactile sculpture by layering fabric, padding, and a range of stitches. This approach sits at the heart of textile sculpture, bridging fiber art and sculpture so pieces invite a closer look as well as a tactile response. By pushing fabric off the surface, artists create dimensionality that reads as both craft and sculpture.
In practice, this form blends traditional embroidery with three-dimensional construction, a family of 3D embroidery techniques that give fabric weight, space, and presence. The result is a stitched sculpture that can resemble flowers, animals, or abstract shapes, blending embroidery with sculpture and inviting viewers to explore the work from multiple angles.
Exploring 3D Embroidery Techniques: From Padding to Sculptural Form
Padding and couching are foundational 3D embroidery techniques used to build volume. Light padding pushes sections outward, while denser padding shapes the contour, turning flat stitches into sculptural evidence of form. Raised stitches, satin stitches built up in layers, and long-and-short stitches are employed to emphasize curves and textures.
Layering is another essential strategy, allowing artists to stack fabric shapes and secure them with rear stitching to create depth. When combined with textured elements like beads or metallic threads, the surface reads as a textile sculpture that balances weight, shadow, and light. This is why the practice sits comfortably within the broader realm of fabric art.
Materials, Tools, and Foundations for Textile Sculpture in Fabric Art
Getting started requires a sturdy base—heavy-weight cotton, linen, or canvas—plus stabilizers when needed. Padding materials such as felt, cotton batting, or foam establish the initial volume, while an array of threads—silk, cotton, wool, and metallics—provides color, texture, and sheen.
Beyond fabric and padding, consider the tools and supports that keep a piece true. Hoops, frames, sharp needles, and precision scissors help shape layers, while beads, yarns, and ribbon add surface interest. Thinking about composition from the outset—whether a single focal sculpture or a series of smaller forms—guides your padding, stitching, and layering choices within textile sculpture and fabric art.
From Flat to Three-Dimensional: Creating Stitched Sculpture with an Embroidery Tutorial
Transitioning from flat embroidery to a three-dimensional form begins with a clear plan: choose a motif, cut layered shapes, and determine padding depth. Begin with a foundation stitch that anchors the design to the base fabric, then incrementally add layers to build volume. Practicing with simple motifs helps you master balance, proportion, and the rhythm of stitches.
An embroidery tutorial can be a practical companion as you progress, teaching safe methods for attaching heavier beads and multi-layered fabric elements. As you practice, you’ll discover how combining different stitches—satin, long-and-short, bullion knots—produces both form and texture, shaping a piece that reads as a small sculpture rather than a flat surface in fabric art.
Beads, Padding, and Layering: Starter Project Approach to 3D Art
A starter project—such as a simple 3D flower—offers a tangible entry into the world of textile sculpture. Start with a sturdy base, place the largest fabric layer as background, then add padding behind the top layer to push petals outward. Secure padding with light basting stitches to maintain shape as you build the sculpture.
Next, employ a mix of stitches to model the form: satin stitches for petals, long-and-short stitches for shading, and bullion knots for center details. Layer successive petals and use color repetitions to create depth, then finish with a back stabilizer. This small stitched sculpture becomes a tactile demonstration of how padding, layering, and stitching translate into three-dimensional fabric art.
Display, Care, and Inspiration: Elevating 3D Embroidered Art in Home Decor
One of the joys of 3D Embroidered Art is its ability to become a focal point in interior spaces. Use proper lighting to highlight depth and shadows—spotlights or angled lamps can reveal the interplay of layers and stitching that define the sculpture. Display options vary from wall installations to freestanding pieces that catch the eye from multiple perspectives within textile sculpture and fabric art.
Care for three-dimensional works is straightforward but important. Keep pieces away from direct sunlight to prevent fading, and avoid damp environments that could affect base fabrics. If mounted, check tension periodically to prevent sagging. With thoughtful display and routine care, your stitched sculpture can inspire, educate, and elevate home decor through the rich language of embroidery and textile sculpture.
Frequently Asked Questions
What is 3D Embroidered Art and how does it relate to textile sculpture?
3D Embroidered Art is embroidery that uses depth, padding, and layered stitching to create dimensional forms that lift from the fabric. It sits within textile sculpture, blending fabric art with sculpture through volume and texture.
What tools and materials do I need to start 3D Embroidered Art as a beginner in fabric art?
Use a sturdy base fabric such as heavy weight cotton, linen, or canvas, plus stabilizer if needed. Include padding like felt, batting, or foam, and a selection of threads or fibers (silk, cotton, wool, metallics); add beads or surface accents if desired. Start simple and gradually build layers to learn the core 3D embroidery techniques.
Which 3D embroidery techniques are essential for creating 3D Embroidered Art?
Key techniques include padding or couching to build volume, and raised stitches for texture. Layering overlapping fabric shapes and using stitches like satin stitch, long and short stitch, and bullion knots help create depth and read as stitched sculpture.
How do you plan a starter project for 3D Embroidered Art?
Choose a simple motif and mount it on a sturdy base. Plan padding behind each layer, then build up with overlapping fabric shapes and a mix of stitches to achieve depth while keeping proportion.
How should 3D Embroidered Art be displayed and cared for in a home?
Display it as a textile sculpture on a wall or shelf with lighting that highlights depth. Avoid direct sunlight and high humidity to protect fabrics and threads; if framed, keep the tension stable.
What common mistakes should I avoid in 3D Embroidered Art and how can embroidery tutorials help?
Avoid over padding that makes pieces stiff and under padding that flattens forms. Balance texture with color and plan with sketches. An embroidery tutorial can teach safe padding, layering, and how to view your work from multiple angles.
| Topic | Key Points |
|---|---|
| What is 3D Embroidered Art | Embroidery with depth, volume, and texture; forms protrude from fabric; blends textile art with sculpture. |
| Core Techniques | Padding, raised stitches, layering; three-dimensional add-ons and mixed stitches to create sculptural forms. |
Summary
3D Embroidered Art is a dynamic fusion of craft and sculpture that invites makers to push fabric beyond its traditional boundaries. By embracing 3D embroidery techniques and the broader concept of textile sculpture, you can turn simple fabric into tactile, volumetric art. Whether you’re creating a single sculptural bloom or a larger installation, the process—planning, padding, layering, and stitching—offers a creative journey as rewarding as the finished piece. As you practice, you’ll discover how fabric art can become a three-dimensional conversation with light, space, and texture, inviting viewers to explore every stitch and layer of your unique stitched sculpture.