
3D embroidered projects transform fabric into tactile, sculptural art that adds depth and personality to any room. Used in 3D embroidery for home decor or as captivating 3D embroidered wall art, these pieces rely on layered stitching and careful material choices. In this guide, you’ll learn 3D machine embroidery techniques, plus tips for beginners to tackle beginner 3D embroidery projects with confidence. We’ll walk through setup, suitable fabrics, and textures, plus a simple 3D textured embroidery tutorial-style path you can follow. By the end, you’ll know how to design pieces that are not only beautiful but also durable, making your home feel more personal.
Beyond the common flat stitch, the concept expands into three-dimensional textile sculpture and layered fiber art that adds tangible depth to interiors. Craftspeople often describe these pieces using terms like dimensional stitching, raised embroidery, and foam-backed relief to convey volume. In practice, the same techniques translate into striking wall hangings, cushions, and small sculpture-like panels that shimmer with light and texture.
What 3D Embroidery Really Adds to Your Home Decor
3D embroidery brings a tactile dimension to home decor, turning flat textiles into sculptural elements that invite touch and contemplation. Layered fabrics, stitches, and soft add-ons catch light and create subtle shadows, giving depth that shifts with the room’s mood. This essence—3D embroidery for home decor—transforms cushions, wall panels, and accents into heirloom-like statements.
In practice, begin with a simple motif and a clear space for depth. Plan color, scale, and mounting for a cohesive look across a living room or bedroom. The result is durable, repeatable, and delightful to touch, blending craft technique with interior style.
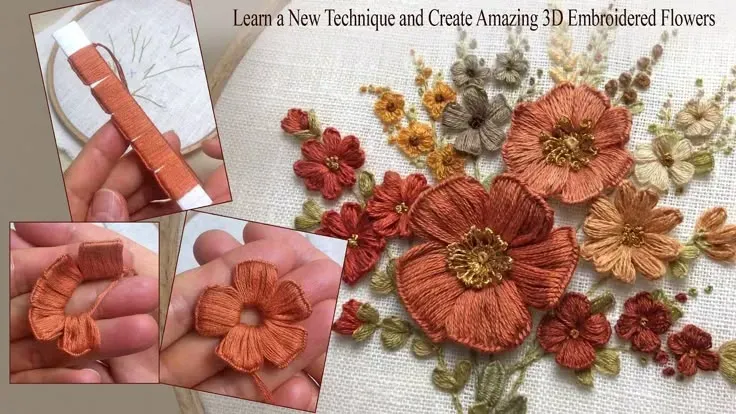
Tools and Materials for Creating 3D Embroidered Projects
A robust base fabric—cotton, linen, or canvas—paired with stabilizers and foam is the bedrock of 3D embroidered projects. Tear-away or cut-away stabilizers provide structure, while foam or lightweight batting creates lift in the raised elements. Variations in threads—cotton floss, silk, or metallics—bring color, sheen, and depth.
You can enhance texture with felt shapes, beads, or subtle accents, keeping bulk under control. Tools such as sharp needles, an embroidery hoop or frame, small scissors, and optional hot glue for securing foam layers complete a reliable toolkit. For those exploring machine-assisted effects, try 3D machine embroidery techniques to automate some layered effects, and consult a 3D textured embroidery tutorial for beginner-friendly guidance.
Techniques to Create Depth: Layering, Foam-Backed Relief, and Raised Stitches
Depth in 3D embroidered projects comes from deliberate layering. Stitch multiple fabric layers, slip in foam behind elements, and anchor edges to keep layers aligned. Raised stitches—satin stitch, long-and-short stitch, and French knots—form petals and geometric highlights that appear to lift from the surface.
Foam-backed relief pushes selected motifs outward, while applique layering builds dimension through staged fabric shapes. Coupling couching with beads adds subtle sparkle, creating a cohesive toolkit for 3D embroidered projects that read as sculpture rather than flat textile art.
Beginner-Friendly Path: Beginner 3D Embroidery Projects You Can Start Today
If you’re new to this craft, start with a single bloom or simple leaf to build confidence with depth, stitch tension, and fabric stability. A focused motif keeps practice manageable while you explore the basics of 3D embroidery, paving the way for beginner 3D embroidery projects you can actually finish.
Sketch your motif, transfer it to a stable base, and practice layering and anchoring stitches. This path aligns with beginner 3D embroidery projects and can be guided by step-by-step resources like a 3D textured embroidery tutorial to help you achieve quick wins.
Showcasing 3D Embroidered Wall Art and Cushions in Your Home
3D embroidered wall art makes a striking focal point with sculptural presence. Choose a color palette that either harmonizes with your room or provides a bold contrast, knowing the raised textures cast interesting shadows as the light shifts. This dynamic effect keeps the piece feeling fresh through the day.
Cushions adorned with layered petals or geometric shapes bring tactile interest to sofas and beds. Use a sturdy backing and a clean finish such as piping or hidden zippers to ensure daily use without sacrificing style. These pieces blend durability with decorative flair, enhancing any living space with texture.
Advanced Concepts: Mixed Media, Framing, and Care for 3D Embroidered Projects
As you grow, you can push boundaries with mixed-media elements—clay, wood, or metal accents that complement the embroidery. A three-dimensional frame or shadow box can showcase multiple layers, giving depth a new dimension independent of the fabric. Exploring 3D machine embroidery techniques can help you manage layers when you want machine precision.
Care and display go hand in hand with sculpture-like textile art. Dust gently, wash only when necessary, and frame behind museum glass to protect from humidity. For ongoing growth, consult advanced resources like a 3D textured embroidery tutorial and refine your approach with 3D machine embroidery techniques to maintain durability and elevate your craft for years to come.
Frequently Asked Questions
What is 3D embroidery for home decor and how do I begin a 3D embroidered project?
3D embroidery for home decor refers to fabric-based designs with dimensional layers and raised elements to create texture and depth. To begin a 3D embroidered project, start with a simple motif and a clear space purpose, choose a stable base fabric (cotton, linen, or canvas), and plan your layers. Add foam or soft stabilizer for lift, then stitch multiple layers with anchor stitches to keep them aligned, finishing with a backing or decorative frame.
How do I design compelling 3D embroidered wall art for my space?
To design 3D embroidered wall art, pick a color palette that complements your room and decide on an appropriate size and mounting method. Create a base panel, add layered shapes, and build the 3D elements using foam or stuffing for depth. Use raised stitches to emphasize curves and petals, and finish with a frame or edge trim that suits your decor.
What are essential 3D machine embroidery techniques to add dimension to fabric art?
Key 3D machine embroidery techniques include layering and stuffing to build depth, raised stitches (such as satin stitch, long-and-short stitch, and French knots) for dimensionality, foam-backed relief to push areas outward, applique layering for stacked shapes, and couching with beads for texture. These techniques can be executed with a sewing machine or by hand, adapting to the project’s needs.
What beginner 3D embroidery projects should I start with to build confidence?
Begin with small, manageable motifs like a single bloom or geometric leaf. Design and transfer the outline to a stable base, prepare foam backing and one or two decorative shapes, layer and secure the pieces, then build the 3D elements with foam or stuffing and finish edges for a polished piece. This approach aligns with beginner 3D embroidery projects and sets a solid foundation.
Where can I find a 3D textured embroidery tutorial, and what basics should I learn first?
Look for a 3D textured embroidery tutorial that covers core skills: planning layers, choosing a stable base fabric, selecting foam or batting for lift, and practicing layering and raised stitches. Start with a simple motif, then gradually tackle more complex textures as you gain confidence. A structured tutorial helps you apply the techniques consistently to your 3D embroidered projects.
How should I care for and display 3D embroidered projects like cushions and wall panels?
Care for 3D embroidered projects by dusting gently with a soft brush, washing only if necessary on a gentle cold cycle, and air-drying flat to preserve shape. For wall pieces, frame behind museum glass to protect from dust and humidity. Display cushions and panels on stable frames or hardware, ensuring foam elements stay supported and avoiding direct heat that could warp layers.
| Aspect | Summary |
|---|---|
| Definition | 3D embroidered projects use dimensional layers, stitches, and optional add-ons to create raised, sculptural fabric designs with depth and texture. |
| Why they suit home decor | Provide tactile, sculptural interest; create focal points with depth, as light interacts with layered textures and shadows evolve through the day. |
| Planning | Start with a simple motif and space in mind; plan color schemes, scale, mounting/display, and how it fits with existing room decor. |
| Materials | Base fabric (cotton/linen/canvas); stabilizers; foam or batting for lift; decorative threads; add-ons (felt, foam shapes, beads); tools (needles, hoop, scissors). |
| Core techniques | Layering with stuffing; raised stitches; foam-backed relief; applique layering; couching and beads; using non-traditional materials for texture. |
| Beginner approach | Start small: design, layer, build 3D elements, finish edges, add final touches such as beads for contrast. |
| Display & care | Ideal for wall art or cushions; dust gently; wash on gentle cycle if needed, air-dry flat; frame behind glass for protection. |
Summary
This table provides a concise overview of the core concepts surrounding 3D embroidered projects and their application in home decor.