
3D embroidery techniques transform flat fabric into tactile, dimensional art that catches the eye and invites a closer look, enabling designers to tell a story with pattern, light, and texture. Designed for sewists and designers aiming for pro-level embroidery designs, these methods blend stitches, padding, backing, tension, and careful planning to achieve durable, eye-catching dimensional effects, with attention to thread direction and fabric stretch to keep dense areas stable. Key techniques include 3D embroidery stitches and puff embroidery to create raised petals, lettering, or sculpted motifs, with layering, shadowing, and color transitions that catch light from every angle. Using the right stabilizers, backing, and thread choices helps ensure durability while maintaining vivid texture, even after multiple washes, folds, or flexing during wear on garments and accessories. In practice, you’ll see stitched texture techniques come to life as depth and shadow enhance the surface, guiding the viewer’s eye toward focal motifs and subtle shading.
To understand this craft, think of three-dimensional embroidery as raised textures created through padding, layering, and careful stitch choices. Other terms you may see include dimensional stitching, volume embroidery, and stitched texture techniques that evoke depth without bulk. Designers seeking professional results often explore foam padding, specialized stabilizers, and multi-layer approaches to achieve machine embroidery 3D effects on fabrics like denim, twill, and lightweight cotton. By combining skilled techniques with a clear plan for color, height, and placement, you can produce pro-level embroidery designs that stand out.
3D Embroidery Techniques: Mastering Dimensional Stitching
3D embroidery techniques add height and contour to fabric, transforming flat motifs into tactile art. By combining a variety of stitches, padding, and careful placement, you can achieve realistic depth using 3D embroidery stitches, puff embroidery, and stitched texture techniques that read as sculpted elements on garments or accessories.
To reach pro-level embroidery designs, start with a solid understanding of backing, stabilizers, and thread choices. Selecting the right combination of linen backing, tear-away or cut-away stabilizers, and appropriate sheen helps maintain shape through wear, while planning the design on a grid aids in consistent height across curves and corners.
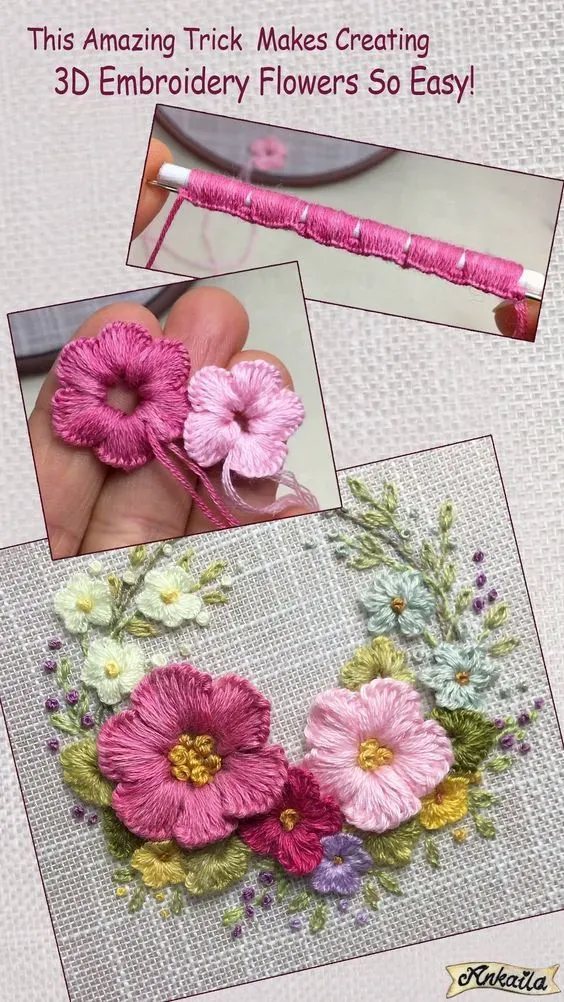
3D Embroidery Stitches and Puff Embroidery: Building Height and Volume
3D embroidery stitches create the framework for raised forms, while puff embroidery adds volume by inserting padding beneath the stitch layer. Using foam or soft padding, you can coax threads into cloud-like shapes that cast natural shadows and highlight textures.
When designing for a project, balance height with fabric weight and thread tension to achieve consistent 3D effects. Machine embroidery 3D effects can be enhanced by testing density on similar fabric swatches and choosing colors that differentiate light and shadow.
Tools, Fabrics, and Stabilizers for Pro-Level Embroidery Designs
A reliable setup starts with quality stabilizers, hoops, and threads. Tear-away or cut-away stabilizers provide support for dense 3D motifs, while the hoop keeps fabric flat despite height differences. Polyester and rayon threads offer durable finishes that shine in pro-level embroidery designs.
Padding materials—foam, soft foam alternatives, or 3D puff pads—are essential for puff elements. Combine them with appropriate needle choices and machine settings, and remember to test on scrap fabric to dial in density and height before committing to the final piece.
Padding, Layering, and Shadow: Crafting Realistic 3D Effects
The magic of 3D looks comes from strategic padding and layered stitching. Use a base contour with 3D embroidery stitches, then add padding behind selected areas to push threads outward, recreating natural shadows and highlights.
Layering multiple stitched surfaces with varying heights and densities gives a convincing dimensional read. Pay attention to stitch direction and color transitions to emulate texture like petals, scales, or fur.
Design Planning and Color Layering for Depth in 3D Embroidery Techniques
Effective 3D designs start on paper or a digital file: plan which features sit highest and how surrounding textures will support depth. Consider color layering—placing lighter hues on raised surfaces and deeper tones where shadows fall—to enhance dimensionality.
In digital design files, separate layers for base fills, outlines, and puff areas simplify edits and ensure consistent results across multiple items. This planning also helps with alignment near seams and zippers on garments.
Projects and Practice Plans: Mastering 3D Embroidery Techniques
Practical projects such as a floral motif with puff petals and layered centers, a monogram with raised outlines, or a nature scene with wings combining 3D embroidery stitches and puff elements offer varied height challenges and color work.
A structured practice plan accelerates mastery: start with 3D stitches and puff basics, progress to layered padding on simple shapes, then tackle a full design with color layering and edge finishing. Regular practice builds pro-level embroidery designs you can apply to garments and patches.
Frequently Asked Questions
What are 3D embroidery techniques and how do 3D embroidery stitches create depth in fabric?
3D embroidery techniques add raised elements and layered textures to fabric. 3D embroidery stitches build height and contour using tools like satin and fill stitches to shape motifs. Puff embroidery adds volume with underlying padding, and with the right stabilizers and backing, you gain durable, visible depth for garments, patches, and decor.
How can puff embroidery enhance pro-level embroidery designs and add dimensional texture?
Puff embroidery creates volume by placing padding beneath raised areas, producing a cloud-like texture. In pro-level embroidery designs, combine puff elements with 3D embroidery stitches and thoughtful color layering to achieve realistic depth. Balance padding thickness with fabric weight and stitch density to maintain durability through washing.
What is the difference between machine embroidery 3D effects and standard flat embroidery, and when should you use them?
Machine embroidery 3D effects rely on padding, layering, and deliberate stitch paths to lift motifs off the fabric, while standard flat embroidery stays level. Use 3D effects for logos on jackets, patches, and accessories where visibility and tactile interest matter. Reserve flat embroidery for delicate fabrics or cleaner, minimalist looks.
Which stitched texture techniques help simulate natural textures (petals, leaves, fur) in 3D embroidery techniques?
Stitched texture techniques such as long-and-short satin, crowding, and contour shading create shadow and form that mimic natural textures. When applied to 3D embroidery techniques, these stitches add height and depth. Pair with layering and selective padding to enhance realism.
What steps and tools are essential for achieving durable 3D embroidery techniques on garments?
Key steps include design planning, selecting appropriate stabilizers (tear-away or cut-away), securing a stable hoop, and choosing padding for puff elements. Essential tools are the right needles, polyester or rayon threads, backing materials, padding foams, and, if needed, temporary basting sprays. Finishing with secure edge stitches helps durability during wear and washing.
What is a practical practice plan to master 3D embroidery techniques and progress to pro-level embroidery designs?
Start with basic 3D embroidery stitches and puff basics on scraps to learn height control. Week by week, add layering and texture with simple shapes, then tackle small projects combining puff and stitched texture techniques. By the end, complete a full design that demonstrates depth, color layering, and clean edge finishing toward pro-level embroidery designs.
| Topic | Key Points |
|---|---|
| Focus Keyword | 3D embroidery techniques |
| Related Keywords | 3D embroidery stitches; puff embroidery; machine embroidery 3D effects; stitched texture techniques; pro-level embroidery designs |
| Post Title | 3D Embroidery Techniques: Master Pro-Level Stitching Designs |
| Meta Description | Discover 3D embroidery techniques for pro-level designs, including 3D embroidery stitches, puff embroidery, and machine embroidery effects for best results. |
| Introduction Summary | 3D embroidery techniques transform flat fabric into dimensional art; essential for pro-level results; methodical approach; covers basics to advanced textures and finishing touches. |
| Core Concepts | Dimension via stitching, padding, and layering; distinction between 3D stitches and puff embroidery; foam/padding underlays; combining elements for realism. |
| Tools & Setup | Stabilizers, hoops, threads, padding mediums, needles and machine settings, backing techniques. |
| Step-by-Step Approach | From flat design to height with contour; add padding for puff; build layers; edge finishing; test on scrap |
| Common Challenges & Solutions | Fabric puckering; needle breaks; misalignment; uneven puff height; address with proper stabilizers, correct needle size, adhesives, and careful planning. |
| Care & Longevity | Adhesive curing; wash inside out; gentle cycles; air drying; storage of patches and finished pieces. |
| Practice Plan | 4-week plan: Week 1–3: practice stitches, layering, puff; Week 4: complete a full design with color layering and edge finishing. |
Summary
3D embroidery techniques open a world of dimensional stitching, turning flat fabric into raised, tactile art. This descriptive overview highlights how stitches, padding, and layering—along with the right tools and careful design planning—deliver durable, eye-catching results across garments, accessories, and home decor. Regular practice with varied motifs helps refine technique, optimize thread choices, and balance density for different fabrics. Whether elevating fashion pieces, patchwork, or embroidered art, the journey through 3D embroidery techniques blends precision and creativity into lasting works.