
Embroidered Patchmaking blends art and technique to produce durable, decorative badges that identify teams, brands, clubs, or personal style. In this web-friendly guide, you’ll learn how to design patches with practical steps, from concept to finished product. Whether you’re building a small side project or launching a line of patches for sale, a clear plan helps you achieve professional results and repeatable outcomes. This guide covers backing, stitching, and finishing to support reliable production, including considerations for fabric, thread, and edge treatments. With patience, practice, and attention to detail, you’ll build a toolkit for creating distinctive patches that stand up to wear.
Viewed through the lens of badge production, this discipline can be described as stitched insignias and textile emblems that convey identity across teams, brands, or communities. Alternative terms for the practice include badge crafting, embroidered patch design, and fabric badge manufacture, all of which point to the same core activity of translating ideas into durable adornments. Whether you call it badge-making, patch creation, or textile branding, the sequence remains: concept, transfer, stitch, and finish to produce a reliable product.
The Essentials of Embroidered Patchmaking: From Concept to Creation
Embroidered Patchmaking blends art and technique to produce durable, decorative badges that identify teams, brands, clubs, or personal style. This guide focuses on creating custom embroidered patches, weaving practical methods with core patchmaking techniques to translate ideas into wearable art. By understanding the craft, you’ll lay a strong foundation for producing professional, long-lasting patches.
A strong concept drives every decision, from size and shape to color and backing. This planning stage is essential to how to design patches, ensuring legibility and visual impact at patch scale. Sketch several concepts, test them on mockups, and select the strongest option to set the course for color choices, stitch density, and backing selection.
How to Design Patches: Translating Ideas into Bold, Legible Artwork
Designing patches begins with a clear concept and quick sketches, then moves to digital formats that can be digitized for embroidery. If you’re exploring how to design patches, start with bold shapes, strong negative space, and a limited palette that reads from a distance. This approach makes it easier to translate ideas into high-quality custom embroidered patches.
In practice, the design process balances machine embroidery patches and hand embroidery patches. For machine work, digitization assigns stitch directions and density, while hand embroidery planning focuses on stitch order and color planning on paper. Both paths benefit from a disciplined design approach that preserves legibility and character across sizes.
Materials, Backing, and Durability for Patchmaking: Choosing for Machine Embroidery Patches and Hand Embroidery Patches
The materials you choose set the tone for finish quality and durability. Stabilizers, fabrics or felt for backing, embroidery threads, and the backing method collectively influence wear, wash resistance, and the patch’s final feel. Thoughtful selection across patchmaking techniques helps ensure that custom embroidered patches hold up under real-world use.
Backing options include iron-on adhesive, sew-on backing, or merrowed edges for a clean, finished border. Your choice affects how the patch is applied and how it wears over time. Beginners can start with simple borders, then advance to merrow edges as skills grow, keeping in mind how backing interacts with the chosen fabric and intended garment.
Digitizing, Stitch Types, and Thread Color for Professional Patchmaking Techniques
Digitizing is the technical backbone that converts artwork into machine-ready data. This step defines stitch types, directions, and density, shaping the final texture of the patch. If you’re curious about patchmaking techniques, learn how to translate a hand-drawn concept into precise embroidery data for high-quality custom embroidered patches.
Color strategy matters as much as line work. Build a palette that respects the artwork and the patch size, then test color samples on fabric swatches to prevent surprises during production. Coordinate colors where both machine embroidery patches and hand embroidery patches share a cohesive look, ensuring consistent results across techniques.
Color Theory, Stitch Types, and Texture: Creating Vivid Custom Embroidered Patches
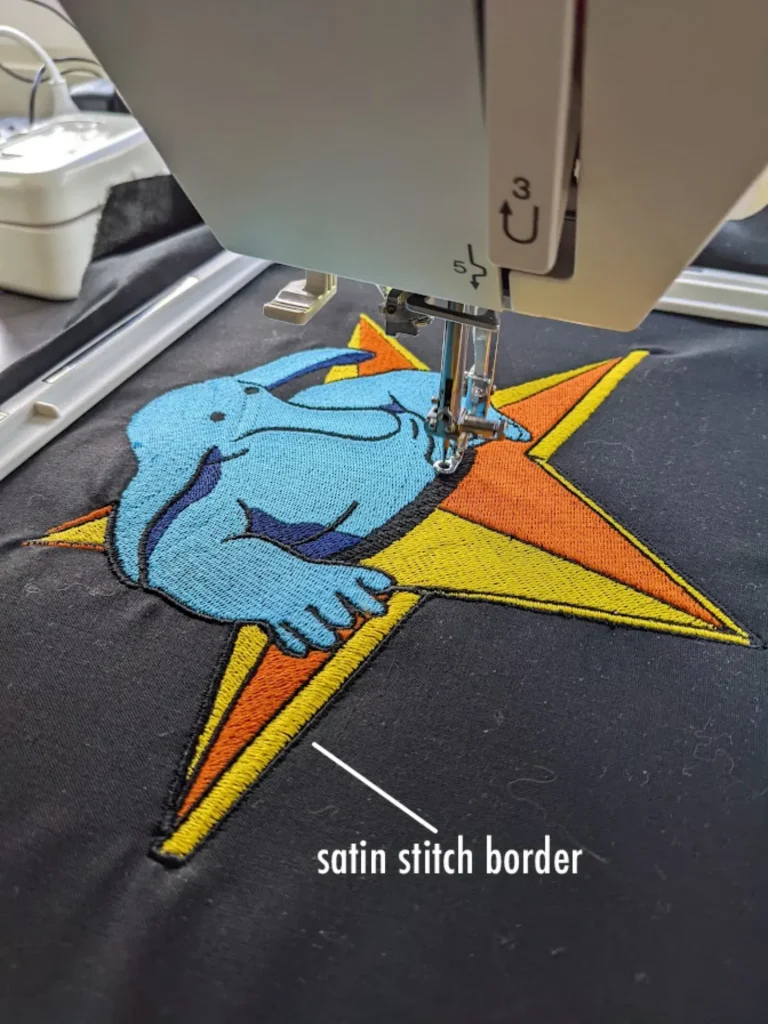
The choice of stitches shapes texture and durability. Typical options include running stitches for outlines, satin stitches for borders and fills, and fill stitches for large color areas. A balanced mix of satin and fill stitches yields patches that pop while staying manageable in production. Studying stitch density helps you avoid fabric bulk or edge wobble.
A thoughtful color strategy, along with tested swatches, ensures the final patch reads clearly on different garments. Dark borders can sharpen edges, while lighter centers offer contrast and depth. This is especially important when creating both machine embroidery patches and hand embroidery patches, where color handling and thread weight influence the final appearance.
Quality, Finishing, and Packaging for Brand-Ready Patches
Quality control begins after stitching and before finishing. Inspect color uniformity, edge cleanliness, and backing stability, resolving any skipped stitches or misalignments. Clear checks help maintain consistent results across a growing line of patches.
Finishing touches include cutting with a precise border, applying a merrow edge or satin finish, and adding backing or branding as needed. Consider labeling, standard sizes, color codes, and packaging that reflects your patchmaking brand. Thorough finishing and thoughtful packaging pave the way for a reliable, market-ready range of custom embroidered patches.
Frequently Asked Questions
What is Embroidered Patchmaking and how do I start creating custom embroidered patches?
Embroidered Patchmaking is the craft of turning ideas into durable badges through stitching, backing, and finishing. To start, define the concept and purpose, choose a backing, and plan how to design patches. Learn core patchmaking techniques and decide whether you’ll create machine embroidery patches or hand embroidery patches, then move from concept to a finished patch.
Which patchmaking techniques are best for durable machine embroidery patches?
For machine embroidery patches, focus on stabilizers, appropriate stitch density, satin borders, and robust backing. Merrowed edges offer a clean, professional finish, while traditional zigzag or satin borders can work for beginners. These patchmaking techniques help ensure wash-fast, durable machine embroidery patches.
How can I design patches effectively for both machine embroidery patches and hand embroidery patches?
Start with a clear transfer of your concept: sketch, scan, or vectorize your design and plan stitch orders. In design transfer and digitization, specify outlines, fills, and stitch directions so lines stay crisp in machine embroidery patches, while hand embroidery patches can still benefit from planned color orders and simple shapes.
What materials and backings should I choose for professional custom embroidered patches?
Choose stabilizers, fabrics or felt, embroidery threads, and a backing that suits the intended wear. Options include iron-on, sew-on, or merrowed edges for a polished finish. Selection of backing and underlay directly impacts wash durability and wear, whether you’re making machine embroidery patches or hand embroidery patches.
What are common mistakes in patchmaking techniques and how can I avoid them?
Common mistakes include overfilled stitch density, misalignment, and inadequate backing leading to puckering. Avoid these by testing on fabric swatches, verifying stitch order in digitization, and choosing appropriate backing. Regular quality checks during stitching help ensure crisp outlines and durable patches.
How do I finish, cut, and apply embroidered patches to fabric?
After stitching, cut the patch with a small border, then apply edge treatments such as merrowed edges or a clean satin border. Finish with the chosen backing (iron-on or sew-on) and test on the target fabric to confirm ease of application and wear resistance, whether you’re producing machine embroidery patches or hand embroidery patches.
| Aspect | Key Points |
|---|---|
| What is Embroidered Patchmaking | A craft blending art and technique to produce durable, decorative badges identifying teams, brands, clubs, or personal style; a step-by-step guide from idea to finished product; suitable for hobby or product line; covers machine and hand embroidery patches. |
| Step 1 — Define concept and purpose | Clarify who the patch is for, color schemes reflect brand/theme, size appropriate for shirt sleeve, backpack, or hat, and symbols recognizable at a distance; ensure design remains legible when scaled; sketch concepts and test on mockups. |
| Step 2 — Gather materials and choose backing | Stabilizers, fabrics or felt for backing, embroidery threads, needles or an embroidery machine, and a backing method that matches use; backing options include iron-on, sew-on, or merrowed edge; backing affects wash durability and wear. |
| Step 3 — Design transfer and digitization | Create high-contrast design; scan hand-drawn sketches or create vector designs; digitization defines stitch types, directions, and density; plan outlines, fill areas, and key stitches; bold shapes work best for smaller patches. |
| Step 4 — Choose stitch types and thread colors | Outline, satin, and fill stitches; balance stitch density to avoid bulk or wobble; select a color palette reflecting the artwork and patch size; test color samples on fabric swatches to prevent surprises. |
| Step 5 — Stitching, layout, and production quality | Ensure proper machine threading and needle for thread weight; use stabilizer and maintain steady machine speed; check for thread breaks, misalignment, and fabric creep; stitch patches in sections for large designs; monitor backing interactions. |
| Step 6 — Cutting, finishing, and edge treatments | Cut with a small border; consider merrow edge or satin border; trim carefully to avoid exposed threads; finish with backing or adhesive as needed; test on the intended fabric for durability. |
| Step 7 — Quality check, labeling, and packaging | Inspect color, edge cleanliness, and backing stability; plan labeling with care instructions or branding; standardize sizes, color codes, and packaging; document thread colors, stabilizers, and backings for scalability. |
| Step 8 — Application methods and practical use cases | Sew-on patches are classic for jackets and bags, while iron-on patches offer quick customization; design patches to work with either method or include detachable backings for versatility. |
Summary
Embroidered Patchmaking is a tactile craft that blends art and technique to create durable badges that identify teams, brands, clubs, or personal style. This descriptive conclusion summarizes the core workflow—from concept through production, finishing, and application—emphasizing practical methods for both machine and hand embroidery patches. It highlights how careful concept definition, material selection, digitization, stitch planning, and finishing choices influence durability, legibility, and aesthetic impact. By following structured steps, testing ideas on mockups or fabric swatches, and performing consistent quality checks, makers can produce patches suitable for hobby projects, clubs, or a growing brand line.