
UV DTF transfer reshapes garment customization by marrying direct-to-film technology with instant UV-curable inks for vibrant, durable results. Understanding the DTF transfer process helps you compare options like UV DTF printing with traditional methods and plan for reliable outcomes. This approach delivers high color fidelity, strong adhesion, and wash-fast performance when cured correctly, making it a popular choice for small runs and custom merch. If you’re wondering how to apply DTF transfers, this guide breaks down the steps, required materials, and practical tips for consistent results. From choosing the right DTF transfer materials to comparing DTF vs traditional transfers, you’ll discover what fits your fabrics and production goals.
From an LSI perspective, the topic can be described as film-based, UV-curable textile transfer that uses a printable sheet and heat-press bonding. Other terms you might encounter include digital textile transfers, UV-curable film printing, and printer-ready transfer sheets that simplify on-demand apparel decoration. This framing helps you compare options without jargon, focusing on outcomes like color richness, durability, and ease of use across cotton, polyester, and blends. Whether you call it UV-curable film transfers, digital garment transfers, or dye-sub alternatives, the core workflow remains the same: design, print, powder, cure, and press. Understanding these related terms can empower you to select compatible materials, avoid misprints, and scale micro-run production.
Understanding UV DTF Transfer: What It Is and How It Works
UV DTF transfer blends UV-curable inks with direct-to-film technology to print on a transfer film, which is then moved onto fabric via heat and pressure. This approach is part of the DTF transfer process and is designed for sharp edges, strong color, and reliable adhesion. The system often uses a white underbase on dark fabrics to boost opacity and color fidelity, along with a compatible adhesive and film.
Compared with traditional methods, UV DTF printing uses inks that cure instantly under ultraviolet light, reducing smearing and misprints. This rapid curing contributes to crisper details, brighter colors, and improved durability in wash cycles, making it a strong choice for sportswear, promos, and custom merch. Understanding these basics helps you decide if UV DTF transfer is right for your project.
The UV DTF Transfer Process: A Step-by-Step Path to Durable Prints
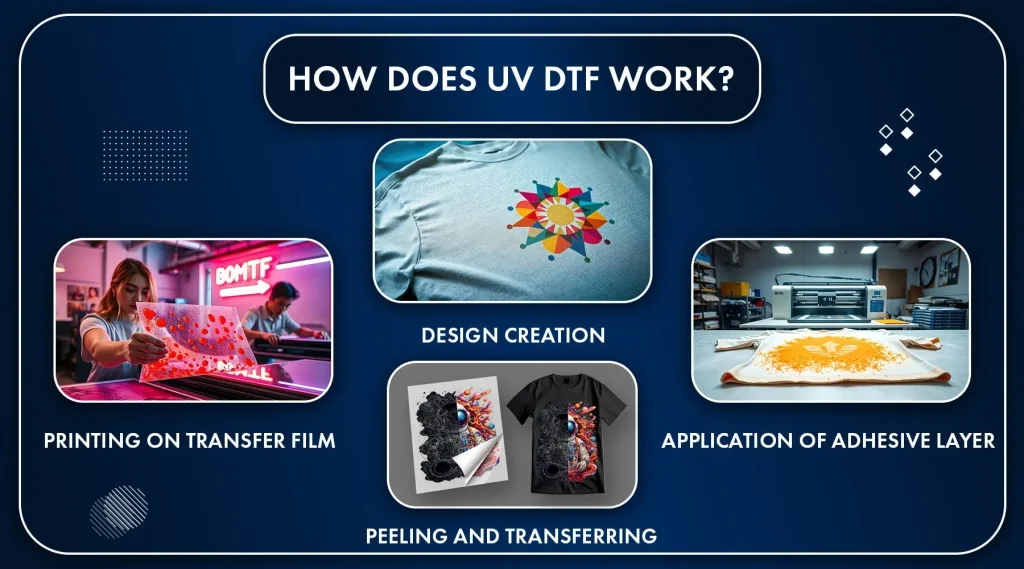
The UV DTF transfer process is a staged workflow: design and color management, printing on DTF film (often with a white underbase), powdering and curing, transfer to fabric, and finishing. This sequence reflects the DTF transfer process but leverages UV curing to speed production and improve edge sharpness. A tightly controlled workflow minimizes variability across runs.
Throughout the process, careful color management, film handling, and proper cure settings are essential. The transfer is applied with heat and pressure, and the bond forms during curing. When you verify cure quality and adhesion, you can catch issues early and adjust ink density, underbase strength, or dwell time to ensure reliable results, consistent with how to apply DTF transfers steps.
Selecting DTF Transfer Materials for Optimal Color and Adhesion
DTF transfer materials matter for consistency and performance. Key components include the DTF film and liner quality, the white underbase, bonding powder, and UV-curable inks. Film thickness, adhesive formulation, and liner type influence release, opacity, and adhesion across cotton, polyester, and blends. Selecting the right materials helps you achieve color brightness and a soft hand while maintaining wash durability.
Testing different materials across fabrics supports predictable results. Look for ink-film compatibility, a strong white underbase for dark garments, and a powder that bonds well without residue. With the right DTF transfer materials, you can improve color fidelity, adhesion, and wash resistance over time.
How to Apply DTF Transfers: A Practical, Beginner-Friendly Guide
How to apply DTF transfers: Start with substrate prep, then alignment and pressing. Pre-press the garment to remove moisture and wrinkles, set the heat press to the recommended temperature (typically around 160–180°C or 320–356°F), and position the printed film face-down on the garment. Use heat-resistant tape to keep edges in place and apply even pressure until the dwell time elapses.
Peel strategy and post-press steps affect final adhesion. Some designs require a warm peel while others benefit from a cold peel; follow the transfer manufacturer’s guidelines. A brief post-press can improve bonding, reduce adhesive residue, and help the print survive repeated wash cycles while maintaining color and detail.
UV DTF Printing vs Traditional Transfers: When to Choose Each Method
UV DTF printing vs traditional transfers: DTF vs traditional transfers provide different advantages. UV DTF prints excel at fine detail, color accuracy, and durable finishes on a wide range of fabrics, with a relatively simple setup for small runs. Traditional transfers (screen or vinyl) can be cost-effective for large quantities but may involve more screens, setup times, and a different feel on the fabric.
Choosing between UV DTF and traditional transfers depends on the project goals. If you need sharp images, intricate color blending, or quick turnarounds, UV DTF printing often wins. For high-volume runs with bold blocks of color, traditional transfers may offer lower unit costs. Always test with swatches and compare color fidelity, adhesion, and finish quality against your specific fabric choice.
Quality Control, Troubleshooting, and Care for UV DTF Transfers
Quality control and troubleshooting: common issues include color bleed, edge artifacts, peeling, or cracking after washing. Start with a solid cure verification, ensure even heat distribution, and confirm underbase opacity and film handling. If problems appear, reprint or re-press with adjusted cure time, temperature, or adhesive application to restore quality.
Care and long-term durability hinge on proper washing, drying, and ironing practices. Turn garments inside out, use mild detergents, and avoid direct heat on the print area. Provide care instructions to wearers, maintain the UV curing light and press platens, and store films properly to preserve consistent results across batches.
Frequently Asked Questions
What is UV DTF transfer, and how does the DTF transfer process work?
UV DTF transfer uses UV-curable inks printed on a DTF film with an adhesive, then heat pressed onto fabric. The DTF transfer process typically includes design and color management, printing on film (often with a white underbase), applying a bonding powder, curing the film, transferring it to the garment with heat and pressure, and finishing by peeling away the liner. When properly cured, the result is crisp edges, bright colors, and strong colorfastness.
How does UV DTF printing differ from traditional transfer methods?
UV DTF printing differs from traditional transfers in its curing method, using UV light for instant curing, which yields sharp edges and vibrant colors. The workflow emphasizes a strong white underbase for dark fabrics, reliable adhesion, and durability, with less reliance on fabric moisture. The result is high detail and ease of use for short runs.
How to apply DTF transfers: step-by-step guidance?
Substrate preparation: prepress the garment to be flat and wrinkle-free and set the heat press to 160–180°C (320–356°F). Position the printed film on the garment and align it. Apply heat and pressure for 10–20 seconds, following the manufacturer’s guidance. Peel and cool as instructed (warm or cold peel). Perform a post-press if required to improve adhesion or remove residue.
What are the key DTF transfer materials, and how should I choose them?
Key materials include DTF film and adhesive, UV-curable inks, bonding powder, a UV curing system, a heat press, and the appropriate transfer film with liner. When choosing, look for a strong white underbase for opacity on dark fabrics, consistent ink performance across runs, adhesive that bonds well to the fabric, and film that releases cleanly. Ensure all materials are compatible with your printer, fabric types, and curing equipment.
DTF transfer materials vs traditional transfers: what differences matter for feel, durability, and cost?
DTF transfer materials often feel softer and can be more durable when properly cured, especially on fabrics with movement. They handle complex images and fine details well and are cost-effective for small runs due to lower setup costs, though large-volume production may favor traditional methods like screen printing. Overall, UV DTF offers stronger color reproduction and flexibility for short to mid runs.
How long does a UV DTF transfer last, and how should I care for it?
With proper curing, heat application, and care, UV DTF transfers can withstand dozens of wash cycles while preserving color fidelity. Care guidelines include turning garments inside out, washing cold to warm with gentle cycles, avoiding harsh detergents, and air drying or using low heat. If ironing, use the reverse side or a protective layer to avoid direct heat on the print.
| Aspect | Summary |
|---|---|
| What is UV DTF transfer | UV-curable inks printed on a DTF film, then transferred to fabric; curing via UV light yields crisp edges, strong color, and good durability—different from standard DTF due to curing tech and final appearance. |
| UV DTF transfer process (in brief) | Design and color management → print on DTF film (often with a white underbase) → powder and cure → transfer to fabric with heat/pressure → finishing and cure verification. |
| Key benefits | Bright, saturated colors; durable and fade-resistant when cured; versatile across fabrics; efficient for short runs with lower setup. |
| Key materials/equipment | DTF film/adhesive, UV-curable inks, UV curing system, heat press, bonding powder, transfer film, compatible fabrics. |
| Role of UV DTF printing | Design is created on film; UV inks cure fast for sharp edges and strong color; white underbase improves opacity on dark fabrics; underbase crucial for color fidelity. |
| Applying DTF transfers | Prepress garment, align transfer, apply heat/pressure, peel and cool, post-press if needed; follow manufacturer timings. |
| Best practices | Test prints for color/opacity; consider fabric type; control temperature/time; keep film flat; maintain press and curing light. |
| Materials vs traditional transfers | UV DTF transfers often feel softer; durable; favorable for small runs due to lower setup; excels at detail and color fidelity. |
| Troubleshooting | Color bleed, adhesion issues, cracking, ghosting, misalignment—adjust curing, temperatures, pressure, and alignment. |
| Care and aftercare | Wash inside-out, cold/warm water, gentle detergents; air dry; avoid direct heat; avoid chlorine bleach. |
| FAQs snapshot | When to use UV DTF transfer; longevity; suitability for dark fabrics with white underbase; UV DTF vs screen printing; key pre-production tests. |