
DTF gangsheet workflow sits at the heart of modern apparel customization, turning ideas into efficiently packed transfer sheets that streamline production and enable consistent results across diverse fabrics. This structured approach guides artwork preparation, color alignment, and printer setup to deliver reliable outcomes across runs, reducing variance and increasing throughput. When the process is clear, fabric choice, ink behavior, and sequencing all align to minimize waste and avoid costly delays in production cycles. A core enabler is a gangsheet builder that automatically arranges multiple designs on a single sheet, saving time and reducing human error while maximizing sheet real estate. By focusing on structure, teams can create scalable workflows that keep quality intact from sketch to sleeve, with clear file protocols, consistent margins, and repeatable checks.
In practice, this workflow can also be described as a structured prepress-to-production process that bundles several designs onto a single film for efficient transfer and transfer sheet optimization. Fabricators think in terms of serialized layouts, sheet packing, color management, and design to print considerations rather than a single step, to optimize throughput. A robust system relies on automation tools, standardized file formats, and clear checkpoints to ensure consistency across batches. By reframing the task as a layout automation challenge, shops can maximize sheet usage, reduce waste, and speed up the path from concept to garment. Adopting these longer-range practices also helps teams align with broader print production goals, including repeatable quality, scalable capacity, and reliable color reproduction.
Frequently Asked Questions
What is the DTF gangsheet workflow and why is it essential for DTF printing?
The DTF gangsheet workflow is the end-to-end process for preparing, arranging, and printing multiple designs on a single transfer sheet. It aims to maximize prints per sheet without sacrificing image fidelity, color accuracy, or the feel of the final transfer. Benefits include faster production, consistent color management, reduced material waste, and easier staff training within print-ready workflows.
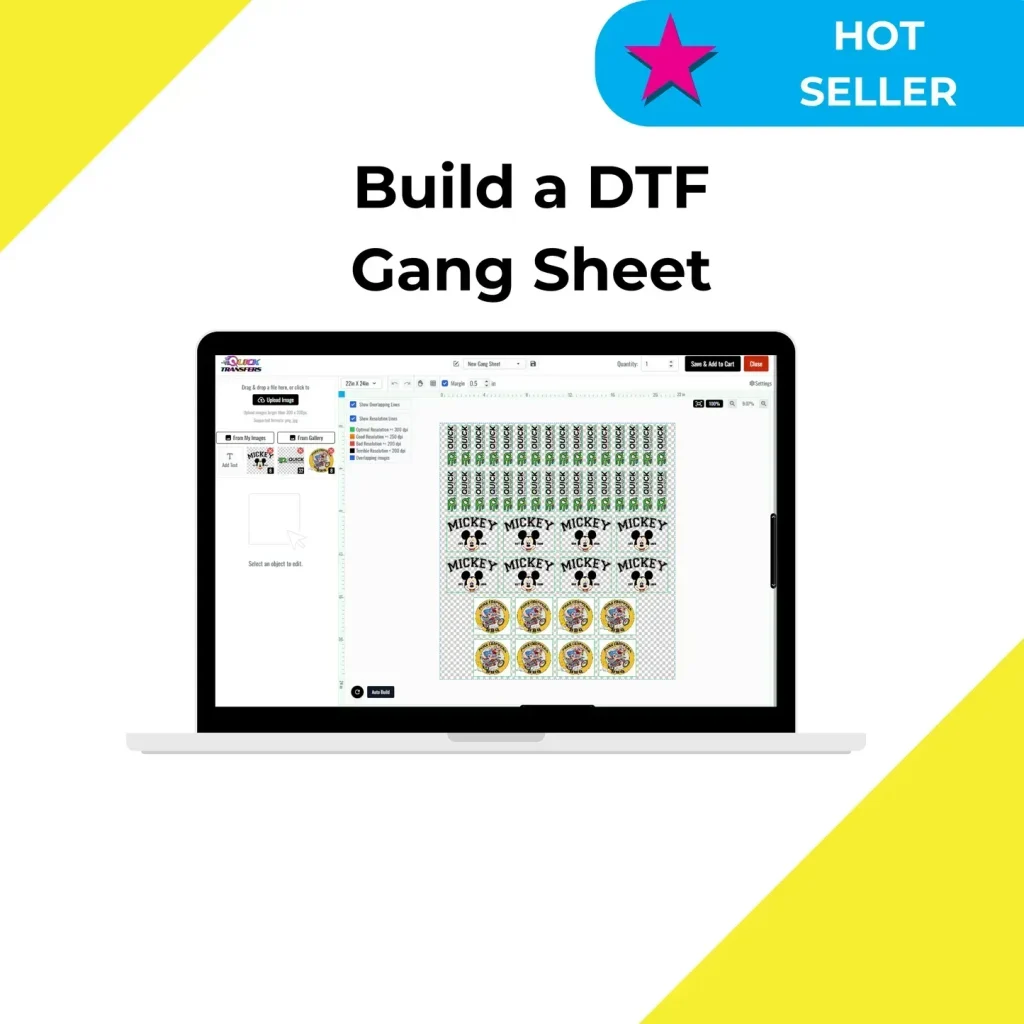
How does a gangsheet builder improve transfer sheet optimization in the design to print process for DTF?
A gangsheet builder automatically lays out multiple designs on one transfer sheet, optimizing spacing, margins, and bleed. It reduces manual layout time and creates consistent results across sheets, which is a core part of transfer sheet optimization and print-ready workflows.
What are the key steps from concept to print in the DTF gangsheet workflow?
Key steps include concept and design preparation, color management and proofs, choosing materials, layout planning with a gangsheet builder, setting margins and safe zones, exporting printer-friendly files, print-job validation and proofs, production printing with quality control, and curing and finishing.
Why is color management critical in the DTF gangsheet workflow?
Color management ensures accurate color reproduction across the transfer film and fabric. It involves calibrating monitors, using ICC profiles, and soft-proofing to anticipate color shifts. If your workflow uses white ink, verify white separation alignment. This keeps results consistent across lots in the DTF gangsheet workflow.
How do margins, bleeds, and safe zones influence print-ready workflows in the DTF gangsheet design to print process?
Margins prevent designs from edge clipping and ensure adhesive transfer accuracy; bleeds accommodate slight misregistration; safe zones protect key artwork. Defining these areas when using a gangsheet builder helps maintain consistent results across designs and keeps the print-ready workflow predictable.
What validation steps help prevent reprints in a DTF gangsheet workflow?
Run a small proof to verify alignment and color accuracy, use a test sheet to confirm the gangsheet layout translates from screen to film, check the white ink path if used, and ensure the color space matches the printer. This validation reduces costly reprints and keeps the print-ready workflow on track.
| Topic | Key Points |
|---|---|
| Definition of the DTF gangsheet workflow (what it is) | End-to-end process for preparing, arranging, and printing multiple designs on a single transfer sheet. Aims to maximize prints per sheet while preserving image fidelity, color accuracy, and the hand feel of the transfer. Requires planning, color management, layout optimization, and precise printer settings. Reduces setup time, minimizes material waste, and ensures consistent results across garments. |
| Benefits | Increased production efficiency by packing more designs per sheet; Consistent color reproduction through standardized color management; Reduced material costs via optimized transfer-sheet usage; Streamlined training through repeatable steps. |
| Core components | Proper design-to-print alignment; Accurate color management; Thoughtful layout and margins; Reliable file formats; Robust quality checks; Use of a gangsheet builder to automate layout and boost throughput. |
| Step 1 — Concept and design preparation | Clear concept for each design; artwork in print-ready formats; high-resolution assets (≥300 PPI); prefer vector designs for scalable edges; plan interactions, color separation, and layering on the sheet. |
| Step 2 — Color management and proofs | Calibrate monitors, use ICC profiles, and soft-proof designs. If white ink is used, ensure white separation is clean and aligned with other colors to prevent surprises in production. |
| Step 3 — Choosing materials | Select compatible transfer sheets, films, and powders. Ensure compatibility with printer paper path, ink formulation, and garment materials. Material selection is key to effective transfer-sheet optimization. |
| Step 4 — Layout planning with a gangsheet builder | Use a gangsheet builder to automatically arrange designs on one sheet, optimize spacing, margins, and bleed. Maximize sheet real estate while preserving safe zones to avoid clipping during trimming or heat application. |
| Step 5 — Margins, bleeds, and safe zones | Specify margins and bleed to prevent edge crowding and accommodate shifts. Define a safe zone around each design to protect artwork from trimming. |
| Step 6 — Preparing the file for the printer | Export layout in a printer-friendly format (PNG or TIFF) with appropriate color depth. Preserve transparency. Use CMYK with ICC profiles; verify white layer data if applicable. |
| Step 7 — Print-job validation and proofs | Run a small proof to verify alignment, color accuracy, and sharpness. Ensure the gangsheet translates from screen to film and that sheet alignment will hold on garments. |
| Step 8 — Printing and quality control | Print with consistent settings, monitor for banding, color shifts, and misregistration. Maintain uniform print quality across multiple designs on a sheet. |
| Step 9 — Curing, heat pressing, and finishing | Cure the film per specifications, apply uniform heat press, and standardize finishing (trimming, cleaning, packaging) to preserve transfer integrity. |
| Best practices | – Use a dedicated gangsheet builder to automate layout and reduce manual errors – Maintain strict color management with regular calibrations and consistent ICC profiles – Design with layout in mind and plan margins/safe zones early – Build repeatable procedures for exports, file naming, and printer parameters – Run frequent test prints to catch issues early – Track performance metrics (material usage, time per sheet, waste, defects) |
| Common pitfalls | – Inconsistent color results without uniform color management – Misalignment and ghosting despite layout checks – Wasted material from poor spacing – Poor handling of white ink path; verify white layer on proofs |
| Practical example | A shop producing 500 designs per week can pack 8–12 designs onto a single sheet using a robust gangsheet workflow, reducing sheets, speeding turnaround, cutting substrate waste, and achieving predictable color outcomes across jobs. |
| QA and quality control | Verify layout integrity, check color with printed swatches, inspect heat-transfer results on representative fabrics, and maintain a post-production log to capture deviations and drive improvements. |
Summary
DTF gangsheet workflow describes a disciplined, end-to-end approach to turning sketches into print-ready transfer sheets with maximum efficiency and consistent quality. Implementing a gangsheet builder to optimize layout, maintaining strict color management, and following a robust design-to-print process yields greater throughput, reduced waste, and reliable outcomes across garments. This workflow supports faster turnarounds, improved profitability, and higher customer satisfaction on every apparel print job.