
Design Your Own Patches is more than a craft—it’s a powerful way to express identity, celebrate a club, or boost a brand, turning ordinary garments into walking conversations that communicate clearly even at a glance. Patches act as small canvases that carry big messages, and the right patch design ideas can transform a simple jean jacket, backpack, cap, or lanyard into a wearable reputation that people notice and remember. This guide offers a practical, step-by-step approach to decisions about aesthetics, materials, production, and finishing, ensuring patches look sharp, wear well, and stay within budget while meeting durability and care requirements. As you explore options like custom embroidered patches and printed patches, you’ll benefit from a design your own patches guide that helps you prepare production-ready files, select suitable borders, choose the perfect backing, and balance color, density, and scale. Whether you’re patching a backpack, a denim jacket, or a cap, starting with a clear concept, testing proofs, and iterating based on feedback sets you up for a successful, satisfying result that lasts.
Framing the topic through badge customization and personalized insignia design helps creators think beyond a single patch to a cohesive collection that reinforces identity across multiple items. Whether you call it DIY patches, badge fabrication, or emblem embroidery, the core ideas remain: clear concept, scalable artwork, and practical production decisions. LSI-style connections emerge when you tie your artwork to backing choices, appearance on diverse fabrics, and suitable finish options like Merrow borders or heat-activated adhesives, helping your custom patches stay cohesive across product lines. By approaching patch creation as small-run product design, you’ll use briefs, proofs, color separations, and size testing to ensure consistency from concept to finished patches. In short, this broader view underpins a reliable process for crafting high-quality, durable patches that customers and wearers will proudly display.
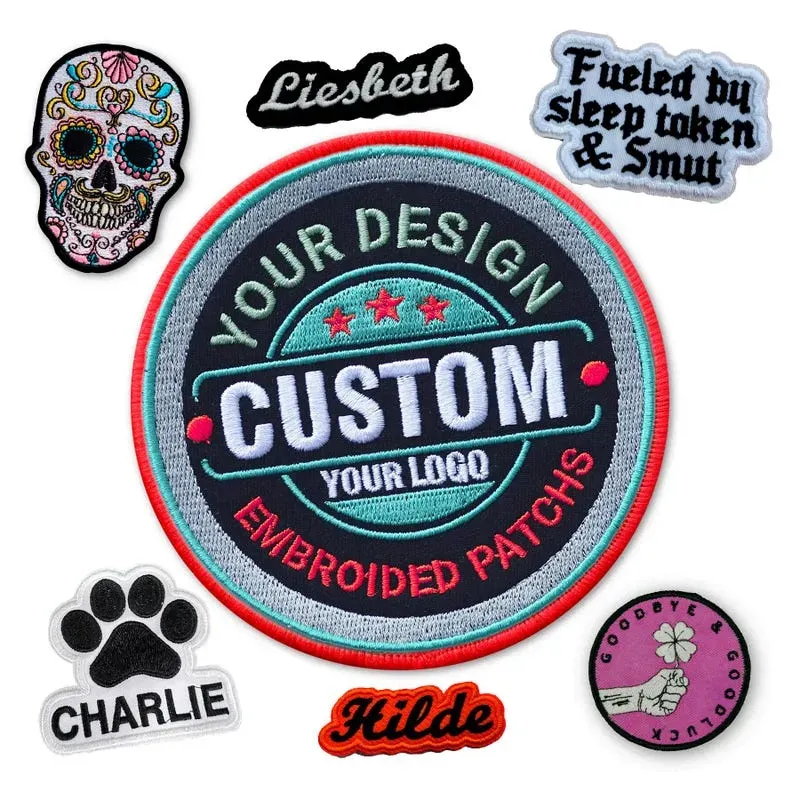
1) Design Your Own Patches: Concept to Creation
Every patch begins with a clear concept that signals the wearer’s identity, club, or brand. Before you touch a stitch or print, sketch the message you want the patch to convey and consider how it will look on the target garment.
Use mood boards, quick sketches, and rough digital layouts to visualize the concept. As you develop the idea, refer to the design your own patches guide to keep you on track, and keep the goal in sight: a durable, wearable symbol built from clear messaging and strong visuals. This is where the path from idea to production starts, with thoughtful choices that support future use as custom patches.
2) Patch Design Ideas: Defining a Motif and Color Story
A strong patch design idea centers on a core motif that reads from distance and across fabrics. Select a shape that complements the garment and a color story that remains legible on multiple backgrounds.
Review existing patch design ideas in your space to understand what resonates with your audience. Start simple and build complexity later; even a few colors can create a striking custom patch, making sure to balance embroidery constraints with the patch’s statement and ensuring the work remains adaptable for DIY patches.
3) Materials, Substrates, and Backing for Custom Patches that Last
Choose substrates such as twill, felt, or a twill with iron-on backing. Each material has a distinct texture and durability profile that will influence the final look of custom patches and the wear on different fabrics.
Backing options—sew-on, iron-on, or Velcro—affect usability and longevity. Selecting appropriate materials is essential for custom embroidered patches that survive washing and frequent use, and this choice often influences comfort and practicality across different garments.
4) Embroidery vs. Print: Selecting the Right Production Method for DIY Patches
Embroidery yields traditional texture and durability, ideal for bold logos with solid shapes and limited colors. Printed patches excel at reproducing gradients and complex scenes, broadening the range of patch design ideas you can realize.
A hybrid approach—embroidered foreground with a printed background—often delivers detail without sacrificing durability. When planning DIY patches, confirm file formats, color separations, and minimums early in your design your own patches guide to avoid delays, ensuring the final patches meet both budget and vision expectations.
5) Borders, Shapes, and Readability: Finishing Your Patch Design
The border defines the silhouette; a Merrow edge offers durability and a clean finish that helps patches lay flat on garments.
Choose shapes that echo the central motif—die-cut silhouettes for bold statements or circular/shield forms for classic badge aesthetics. Test readability on darker fabrics and at small sizes to ensure legibility across use cases and garment types.
6) Final Checks and Launch: A Design Your Own Patches Guide to Quality
Before production, verify color accuracy against Pantone references and check stitch density to avoid gaps or puckering.
Run prototypes and gather stakeholder feedback to refine readability and impact. With a solid design your own patches guide, you can move from concept to mass production and launch patches that wear well and look great.
Frequently Asked Questions
What should I consider first when starting Design Your Own Patches for a club or brand?
Begin with a clear concept that fits your audience and message. Define a core motif, choose a patch shape, and plan a legible color palette. Decide early whether you’ll use embroidery or printing, and consult a design your own patches guide to align production needs with your budget.
How do I decide between embroidered and printed patches in Design Your Own Patches projects?
Embroidered patches offer durability and crisp shapes for solid logos, while printed patches excel at complex artwork and gradients. Consider budget, wear, and audience, and aim for a modest color count to control costs. A design your own patches guide can help you match artwork to the right production method for custom patches.
What production files and formats do I need for Design Your Own Patches?
For embroidery, provide vector files (AI, EPS, or SVG) or a DST stitch file; for prints, use high‑resolution raster art (PNG or TIFF) with proper color separations. Keep the design scalable and test readability at various sizes. The design your own patches guide typically outlines exact file specs for fabric, backing, and borders.
Which backing and border options should I choose for Design Your Own Patches?
Sew-on backs and iron-ons are common, with Velcro for interchangeable patches. A Merrow edge creates a durable, clean outline, and die-cut shapes emphasize the motif. For custom patches, align backing and border choices with the artwork and intended wear to maximize usability.
How can I estimate costs and plan a budget in Design Your Own Patches projects?
Costs depend on patch size, color count, embroidery versus print, backing, and quantity. Get proofs early and consider minimum order quantities. In general, fewer colors and smaller sizes reduce costs for custom embroidered patches, while more complex prints may raise the price.
What mistakes should I avoid and how should I test patches before production in Design Your Own Patches?
Avoid overcrowded designs, illegible text, and color clashes. Test readability at multiple sizes, verify color accuracy against references, and wash-test sample patches to check durability. Involve stakeholders and run a small batch to validate patch design ideas before full production.
| Aspect | Key Points | Notes / Design Considerations |
|---|---|---|
| Concept & Inspiration | Start with a clear concept; define the patch’s audience, message/identity, and emotions; review existing patches for color palettes, shapes, and typography; use mood boards, quick sketches, and rough layouts to visualize the concept; anchor the patch in a story to make it memorable. | Define a core motif, choose a shape that complements the garment, plan a legible color palette, and begin with small, simple designs that can be scaled later. |
| Design Process: Turning Ideas into a Vector | For embroidery, prepare a vector artwork file; for print, high-resolution raster may suffice but vector helps scaling. Opt for a bold, legible central motif and limit colors (4–6 for embroidery; about 6–8 for printed patches). | Test sizes to verify readability; consider stitch density and edge handling; use a Merrow edge for clean borders; ensure artwork aligns with production capabilities and substrate compatibility. |
| Materials, Production, and Finishing | Choose patch substrates (e.g., twill, twill with iron-on backing, felt). Understand backing options (sew-on, iron-on, Velcro) and test durability. Select thread types (polyester for colorfastness, rayon for luster, metallic for premium feel). | Match materials to the intended wear (outdoor, kids, fashion); size patches to garment scale; consider offering more than one backing option to broaden use. |
| Production Methods: Embroidery vs. Print | Embroidery yields durability and texture; ideal for solid shapes and limited color palettes. Printed patches reproduce complex scenes and gradients but may require different file specs and color handling. | Consider a hybrid approach (simple embroidery with printed background); ensure design lines are clean and scalable; verify color separations and file specs before production. |
| Border and Shape Choices | A Merrow edge provides a durable border; die-cut shapes offer bold silhouettes; round or shield shapes convey badges, while irregular shapes echo dynamic logos. | Choose border and shape to complement artwork and intended wear; align with audience (e.g., sports teams vs. streetwear) for visual impact. |
| Quality Checks and Finalization | Verify color accuracy against Pantone references, confirm legibility of any text, and inspect stitch density to prevent gaps. Test durability through washes or UV exposure depending on patch type. | Involve stakeholders for feedback on readability, color balance, and overall impact; approve small batches first to validate production results against concept. |
| Practical Tips for Getting It Right | Start with a clear brief; sketch multiple concepts quickly; limit embroidery color palettes; choose backing based on wear and garment type; request proofs; test a range of patch sizes. | Following these tips helps reduce risk and ensures the final patches meet audience needs and production constraints. |
| Applications and Use Cases | Patches work for clubs, teams, bands, artists, and retailers seeking brand identity or collectible items. Embroidered patches emphasize durability; printed patches enable complex artwork and gradients. | Align patches with wearer lifestyle and fabric type to maximize visual impact and longevity, whether for merchandise, uniforms, or personal expression. |
Summary
Design Your Own Patches is a versatile journey that blends art and production to create wearable storytelling. It starts with a clear concept, then translates that idea into scalable artwork suitable for embroidery or printing, selects materials and backing, and finishes with the right border and quality checks. By balancing a bold central motif with legible typography (when used), a cohesive color story, and practical production decisions, you can ensure patches look great, wear well, and stay within budget. A thoughtful process—from concept to prototype—helps avoid overcrowded designs, color clashes, or unsuitable backing. This Design Your Own Patches guide highlights practical steps for both embroidered and printed patches, explains file requirements and backing options, and offers tips to ensure durability and versatility across applications.