
DTF printing has transformed how designers bring vibrant, durable graphics to fabric, opening new possibilities for apparel and textiles across markets and applications. This method blends digital design freedom with the tactile feel of traditional transfers, enabling bold colors on a wide range of fabrics—from cotton blends to performance textiles—while keeping the process approachable. For those exploring print-on-demand, small-batch runs, or custom apparel, the workflow offers quick setup, scalable production, and reliable color reproduction. As you dive in, you’ll discover how the transfer steps—from ink on film to heat and pressure—contribute to a durable, washable finish that holds up under real-world wear. Throughout this overview, you’ll see why creators turn to this adaptable technique for vibrant, long-lasting designs and expanding product opportunities.
From a film-to-fabric transfer perspective, the method prints artwork onto a PET sheet and then uses heat and pressure to fuse the image with the garment. Viewed through an LSI lens, its design-to-application path resembles other digital textile transfer techniques while emphasizing an ink-on-film workflow, a powder-assisted adhesion stage, and careful color management. Designers can optimize outcomes by selecting compatible films and powders, testing temperatures, and tailoring the cure and press time to fabric type. This approach offers a practical balance of color fidelity, texture, and wash durability, making it a versatile option for hobbyists and small shops alike.
DTF printing Essentials: Understanding Direct-to-Film Transfers and the Transfer Process
DTF printing has emerged as a practical method for high-quality transfers on apparel and textiles. Direct-to-film transfers involve printing a design onto a PET film using water-based inks, applying an adhesive powder, curing the powder, and then transferring the design to a garment with heat and pressure. This approach can minimize the need for a white base on dark fabrics because a white underbase is printed on film when needed, and the finished transfer yields a pliable, durable result that moves with the garment.
DTF printing offers vibrant color reproduction, broad fabric compatibility (including cotton, poly blends, and more), and a workflow that can scale from hobby projects to small runs. Compared with some other methods, DTF can be more forgiving on a wider range of materials and often delivers a lower per-unit cost for small batches, while keeping the design flexible enough to stretch with the fabric.
Choosing the Right DTF Printing Supplies for Consistent Results
A reliable DTF printing setup rests on a core package of supplies that work well together: a DTF-capable printer (or a standard printer modified for DTF workflows), PET film designed for transfers, adhesive powder, a curing/drying system, and a heat press. Managing these DTF printing supplies as a cohesive system helps maintain consistent results from day to day.
When evaluating suppliers, consider ink stability and color longevity, film transparency and surface tack, powder particle size, and compatibility with your curing method and heat press. The quality of these components directly influences color fidelity, adhesion, and wash durability, so budgeting for dependable supplies pays off over time.
DTF Printing Tips for Maximizing Color Fidelity and Durability
DTF printing tips for achieving the best results begin with solid color management and a plan for skin tones, gradients, and sharp detail. Calibrate your printer’s color management, run test prints, and verify that your white underbase (when used) aligns with the final image to preserve brightness on dark fabrics. These practical checks help ensure the design looks right after transfer.
Practice on similar fabrics and maintain a routine for test transfers to dial in temperature, time, and pressure. Manage film tack, powder application, and curing to minimize issues such as color shifts, dull whites, or uneven adhesion, letting your process produce consistent, professional finishes.
DTF Transfer Process: A Step-by-Step Guide from Design to Garment
Design and preparation: create artwork in vector or raster programs and convert colors to CMYK, planning for a white underbase on dark fabrics if needed. Printing on PET film with water-based DTF inks captures the color depth and detail your design requires.
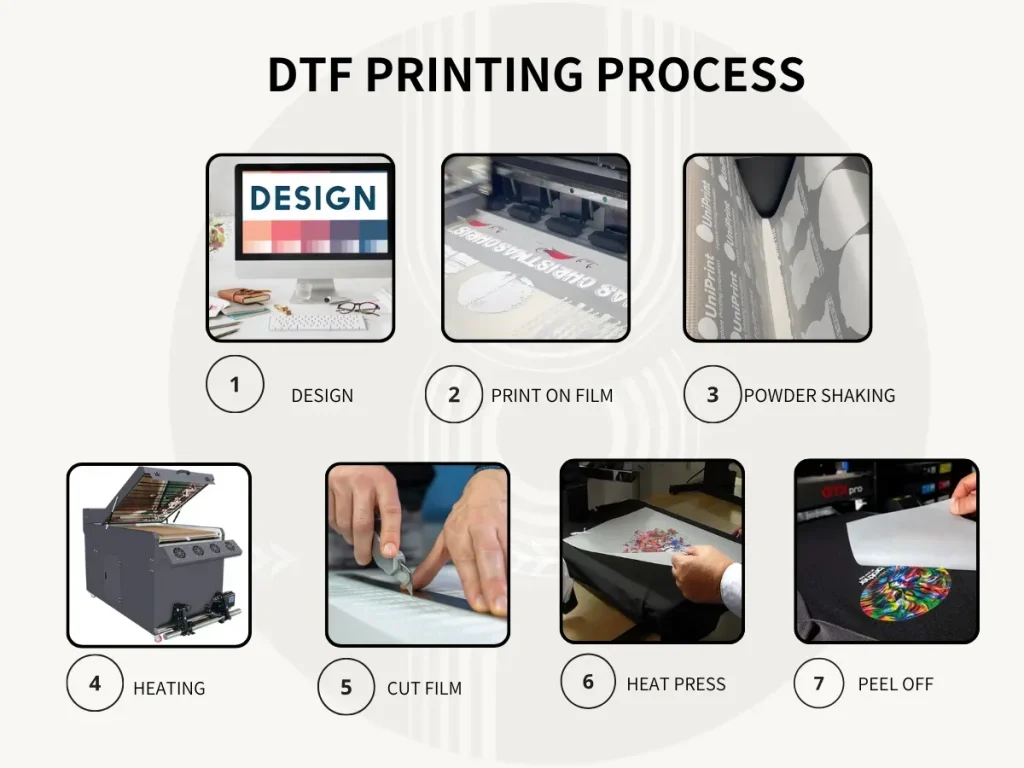
Powder application: while the ink is still tacky, apply a thin, even layer of adhesive powder to the printed film. Cure the powder-coated film to solidify the bond, then transfer to fabric by placing the powder-coated film onto the garment and applying heat and pressure according to the film manufacturer’s guidelines. After the transfer, peel away the film to reveal the finished design. This five-step flow—design, printing, powder, curing, transfer—defines the DTF transfer process.
Color Management in DTF Printing: Achieving Vivid, Wash-Resistant Results
Color management is a critical factor in achieving consistent results in DTF printing. The color reproduced on the film is transferred to fabric, and wash durability depends on the quality of the ink, film, and adhesive powder used. A white underbase strategy helps preserve brightness on dark fabrics and maintain shading during the transfer.
To keep colors vibrant across batches, test prints across different fabrics, monitor lightfastness, and calibrate printer settings to minimize shifts. By controlling color from film printing through the DTF transfer, you can achieve vivid, wash-resistant results with direct-to-film transfers.
Troubleshooting and Best Practices for Beginners in DTF Printing
Common issues include uneven white underbase, powder not sticking, color bleeding after transfer, and poor adhesion on certain fabrics. Practical fixes include ensuring the ink is adequately dry and tacky before applying powder, adjusting powder amount to prevent clumping, and confirming that transfer temperatures and pressures match fabric type.
Develop standardized workflows with checklists for printing, powder application, curing, and transfer, and keep your workspace clean and dust-free to prevent debris from affecting transfers. Regular maintenance of the printer, film handling area, and heat press, along with learning from reputable sources and communities, helps beginners build reliable, repeatable results.
Frequently Asked Questions
What is DTF printing and how do direct-to-film transfers work for apparel?
DTF printing is a method that prints designs onto PET film using water-based inks. A thin adhesive powder is applied and cured, then heat and pressure transfer the image to a garment. Direct-to-film transfers deliver vibrant color, durability, and fabric flexibility, and they often do not require a white base on light fabrics (the white underbase is printed on the film when needed for dark fabrics). This DTF transfer process is well suited for full-color artwork and smooth color blends across fabrics.
Which fabrics work best with DTF printing and why?
DTF printing works on cotton, polyester blends, and many other textiles, making it a versatile choice for apparel. The PET film, adhesive powder, and heat-press combination help the print adhere and stretch with the fabric. Always test on your specific fabric to confirm color accuracy, softness, and wash durability.
What are the essential DTF printing supplies to get started?
Key DTF printing supplies include a dedicated DTF printer, PET film, adhesive powder, a curing/drying system, and a heat press. You’ll also need basic tools like weeding tools, a lint roller, transfer tape, and cleaning supplies. Using reliable DTF printing supplies helps ensure consistent color, strong adhesion, and durable washes.
What are effective DTF printing tips for better color and adhesion?
DTF printing tips: calibrate your printer for accurate color and test prints to lock in skin tones and gradients. Plan a white underbase for dark fabrics to keep colors bright, and verify the film quality and powder application before production. Ensure proper curing and optimize heat, time, and pressure for each fabric to improve adhesion and finish.
Can you outline the DTF transfer process from design to finished garment?
Design and preparation: create artwork with color management in mind, converting to suitable color profiles. Printing on film: print the design onto PET film with DTF inks. Powder application: while the ink is still tacky, apply a thin layer of adhesive powder. Curing the powder: cure the powder-coated film to fix the bond. Transfer to fabric: place the film on the garment and apply heat and pressure per the film guidelines, then peel away the film to reveal the finished design.
What common issues occur with DTF printing and how can I troubleshoot?
Common DTF printing issues include uneven white underbase, powder shedding, color bleeding, and poor adhesion on certain fabrics. For an uneven white underbase, ensure the white layer prints first and covers evenly. If powder does not stick, confirm the ink is dry and adjust the powder amount. If colors bleed or shift, revisit color management and transfer parameters (temperature, time, and pressure). For difficult fabrics, fine-tune heat and pressure during transfer and test on similar materials.
| Topic | Key Points |
|---|---|
| What is DTF Printing? | DTF printing involves printing on PET film with water-based inks, applying an adhesive powder, curing the powder, and transferring the design to fabric with heat and pressure; it creates a durable image that can stretch and withstand washing; unlike some methods, a white base coat is not required on dark fabrics—the white underbase is printed on film when needed and transferred with the design. |
| Equipment and Materials You’ll Need | DTF printer capable of water-based inks on PET film; PET film; adhesive powder; curing/drying system; heat press; weeding tools, lint roller, transfer tape; cleaning and maintenance supplies. |
| Understanding the DTF Transfer Process | Five core stages: 1) Design and preparation; 2) Printing on film; 3) Powder application; 4) Curing the powder; 5) Transfer to fabric (with heat/pressure) and final peel. |
| Tips for a Smooth DTF Transfer Process | – Choose the right film and powder combination to minimize powder shedding and maximize color fidelity; – Calibrate color management with test prints for skin tones and gradients; – Perform test transfers on similar fabrics to tune temperature, time, and pressure; – Keep the workstation clean and dust-free; – Use a lint roller before transfer to remove stray fibers. |
| Color Management and Design Considerations | Color management is critical for consistent results: plan white underbase on dark fabrics; ensure sharpness and detail with high-resolution artwork; verify clean color separations and optimize artwork by flattening layers and avoiding ultra-wide gradients. |
| Materials and Quality Control: DTF Printing Supplies | DTF printing supplies vary by brand; a reliable setup includes inks, film, and powders that work together; evaluate ink stability, film transparency/tack, powder size/adhesion, and printer maintenance requirements. |
| Troubleshooting Common Issues | Common issues and fixes: uneven white underbase (check coverage/order), powder not sticking (ensure ink is dry and tacky; adjust powder), color bleed or shift (revisit color management and curing), poor adhesion on fabrics (adjust heat/pressure for fabric type). |
| DTF vs Other Methods: Pros and Cons | Pros: versatile across fabrics; strong color reproduction; moderate startup costs for small operations. Cons: adds film/powder handling steps; color matching can be more complex; wash durability depends on film/ink quality and requires testing. |
| When to Choose DTF Over DTG or Sublimation | Opt for DTF when you need full-color artwork with fine details on various fabrics (especially cotton blends), for small batches or personalized orders, and when you want a workflow that scales with demand. |
| Cost Considerations and Return on Investment | Initial investment covers the DTF printer, film, powders, ink, and a heat press. Ongoing costs include consumables and maintenance. Structure pricing by cost per transfer, throughput, waste management, and using quality as a differentiator. |
| Practical Best Practices for Beginners | Start with a small, curated design range; create standardized workflows and checklists; maintain a moisture-free environment and proper storage; learn from reputable sources and communities; document settings and adjust per fabric and design. |
| Safety and Maintenance Considerations | Follow safety instructions: ensure ventilation when curing inks and powders; use protective equipment if recommended; clean equipment regularly; store powders and films in a cool, dry place. |
Summary
DTF printing offers a flexible, scalable approach to producing vibrant, durable transfers on a wide range of fabrics. By leveraging direct-to-film transfers, designers gain color-rich images with a forgiving workflow that suits hobbyists, small businesses, and print-on-demand shops. Understanding the process—from design to transfer—and investing in reliable supplies and solid color management can deliver consistent, market-ready results. Whether you’re building a home-based setup or expanding a small shop, DTF printing can bridge your creative vision with commercially viable products. Start with solid fundamentals, test across fabrics, and refine your process to achieve dependable, high-quality results.