
Remove Patches Without Damaging Fabric is a practical skill for repairing, personalizing, or upcycling garments while keeping the fabric intact. In this guide, you’ll learn Patch removal techniques that minimize stress on fibers and prevent fraying, including ideas like Remove patches without damaging fabric when appropriate. You’ll also discover How to reuse patches safely, including considerations for different fabrics and backing materials. We’ll share Remove fabric patches without tearing techniques for glued, heat-pressed, or stitched patches. Finally, the guide offers Fabric preservation tips for patches to extend life and maintain garment integrity.
From a broader textile perspective, carefully detaching decorative patches aims to preserve fabric integrity and allow garment repurposing. Techniques for releasing embroidery, appliqués, or heat-activated motifs rely on gentler methods that protect fibers, backing, and stitch work. By focusing on gentle detachment, you can prevent pulls, tears, or distortion and keep options open for reattachment or reuse. This approach aligns with fabric stewardship, emphasizing planning, appropriate tools, and surface-friendly methods. In practice, readers gain a framework for patch removal and fabric care that supports sustainable fashion and wardrobe flexibility.
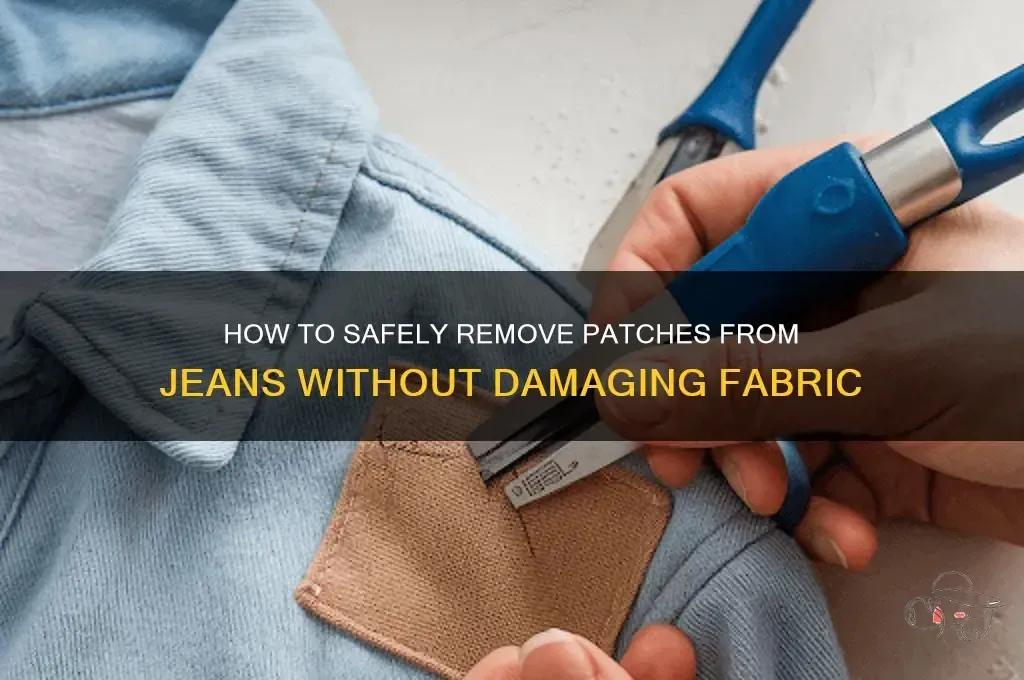
Remove Patches Without Damaging Fabric: Core Techniques and Tools
Patches can be functional or decorative, but removing them without damaging the fabric requires a calm, planned approach. The core idea behind Remove Patches Without Damaging Fabric is to minimize stress on fibers while detaching threads and any glue or backing. Start by identifying how the patch is attached—stitched, glued, heat-activated, or a combination—and tailor your patch removal techniques to that method. By understanding attachment styles, you can preserve the garment’s integrity and keep surfaces clean for reuse.
With the right toolkit and mindset, you can lay a solid foundation for successful patch removal. Gather a small seam ripper or embroidery scissors, fine tweezers, a damp cloth, and a fabric-safe solvent if residue remains. An iron or heat press may be needed for heat-activated patches, but only after a careful test on a hidden area. Planning ahead also means preparing a flat, protected workspace and keeping the fabric taut to avoid unintended stretching as you work.
Patch Removal Techniques by Fabric Type: Denim, Silk, Knit, and More
Fabrics vary in how they respond to patch removal techniques. Denim and heavy cotton tolerate slightly more aggressive seam work, allowing you to follow the edge of the patch with a steady hand and slowly release stitches. For dense embroidery or sturdy thread, this approach reduces edge fraying and preserves the surrounding fabric. By considering the fabric type first, you can choose the most effective patch removal techniques while protecting structural integrity.
Delicate fabrics—such as silk, lace, fine knits, or voile—demand a lighter touch. Work from the patch’s back when possible, minimize heat exposure, and limit solvent use to gentle, fabric-safe options. Testing on a hidden seam helps ensure you won’t cause tears or surface wear. Adapting your method to each fabric type is a key part of safeguarding fiber health during removal.
How to Reuse Patches Safely: Reattachment Options and Prep
How to reuse patches safely begins with careful inspection and cleaning. If you plan to relocate a patch, assess the embroidery and backing for durability and colorfastness. This stage also includes deciding whether to reuse the original backing or replace it with a stabilizer to maintain fabric integrity. Proper preparation helps ensure that reattachment delivers a neat finish and long-lasting wear.
Once you’ve prepared the patch, choose your attachment method—sewing, heat-activated adhesive, or a combination—that matches the receiving fabric. For sewing, select a thread color and stitch pattern that mirrors the original edge to preserve aesthetics. If using adhesive, verify heat tolerance and media compatibility, and always test placement on a scrap piece before committing to the garment. A thorough test fit reduces distortion and helps you achieve a clean, durable result.
Remove Fabric Patches Without Tearing: Gentle Removal Strategies
Gentle removal is essential when working with fragile fabrics or patch edges that are prone to fraying. Begin by supporting the back of the fabric and using a slow, patient motion to lift threads away from the surface. A careful approach to the stitching line helps prevent tearing and keeps the surrounding fiber structure intact. This step-by-step mindset is central to successful, tear-free patch removal.
As you progress, use the appropriate tool for the job—a fine seam ripper for tight stitches or a dull blade to ease adhesive edges. Lift patches gradually, keeping tension even on the fabric to avoid distortion. If you encounter resistance, pause, reassess, and consider performing smaller sections to prevent unintended damage, then inspect the area for any frayed threads that may need reinforcement.
Fabric Preservation Tips for Patches: Extending Life of Garments
After removing a patch, the garment and the remaining fabric deserve careful care to extend life and maintain appearance. This is where Fabric preservation tips for patches come into play—gentle washing, air drying, and avoiding high heat help preserve fibers and color. Turn the garment inside out before washing and use a mild detergent to minimize abrasion on delicate areas. Thoughtful handling during cleaning reduces the risk of weakening the fabric over time.
Storage and post-removal maintenance are also part of fabric preservation. Store patches flat or in a clean, dry container to prevent distortion, and consider using acid-free tissue for light fabrics that yellow with age. Periodically inspect the repaired area for loose threads or thinning fibers, and reinforce as needed with a subtle stitch or stabilizer. Following these tips helps ensure the garment remains wearable and the patches stay ready for future reuse.
Common Mistakes and Quick Fixes in Patch Removal and Reattachment
Even experienced sewists can trip over common mistakes when removing or reattaching patches. Rushing the removal on delicate fabrics can lead to tears or pulled threads, while skipping a test patch may reveal color bleed or adhesion issues after the fact. Keeping a calm pace and using deliberate, measured motions are crucial—these are core elements of good patch removal techniques.
Quick fixes can save a project. If edges pucker after reattachment, re-stitch with a lighter tension or re-seal with a stabilizer behind the patch. For stubborn adhesives, retreat with a fabric-safe solvent and re-test before committing to full application. Anticipating potential problems and applying careful corrections helps you maintain fabric integrity and achieve a durable, visually pleasing result.
Frequently Asked Questions
How can I remove patches without damaging fabric and what are the best patch removal techniques?
First identify how the patch is attached (stitches, glue, or heat-activated backing). Test your method on a hidden area to see how the fabric reacts. Gently release stitching with a seam ripper and lift threads away from the fabric rather than pulling the patch off. If adhesive is present, apply moderate heat to soften the backing and carefully lift the edge with a dull tool. Clean any residue with a mild solvent tested on a hidden spot and inspect the fabric for pulled threads.
Remove fabric patches without tearing: what techniques work best for denim vs delicate fabrics?
Denim and other sturdy fabrics tolerate more aggressive seam work; work slowly and use a seam ripper to cut threads around the patch. For knit, silk, or other delicate fabrics, support the back of the fabric and work in small sections to avoid unraveling. If the patch is glued, apply heat only briefly and test first; avoid excessive force that can cause tearing.
How to reuse patches safely after removal?
Gently hand wash the patch if needed and let it air dry. Inspect the backing and consider whether the patch still has adhesive or embroidery that works on a new fabric. Prepare the receiving fabric with a clean surface and stabilizer if needed, then attach with sewing, heat-activated adhesive, or a combination. Always test fit before final attachment.
What should I do if a patch is heat-pressed or fused to remove it without damaging fabric?
Try to soften the glue backing with a low-temperature iron or heat press and gently lift the edge. If the backing resists, work around the patch rather than pulling through the surface. In some cases, cutting around the patch and repurposing the fabric is more practical than forcing removal.
What fabric preservation tips for patches should I follow to keep the garment intact during removal and reuse?
Handle the garment with both hands to distribute tension. Reinforce vulnerable areas with a small stabilizer after removal. Turn washed items inside out and use a gentle cycle, avoiding high heat. Store removed patches flat in a dry, acid-free environment if you plan to reuse them.
What common mistakes should I avoid when removing patches to prevent fabric damage?
Rushing removal on delicate fabrics, using harsh solvents, ignoring backing integrity near seams, and failing to test methods can cause tears or fraying. Skipping a hidden-area test may lead to unexpected damage. Not planning how you’ll reuse the patch can result in misalignment or weak attachment later.
| Aspect | Key Points |
|---|---|
| Purpose | Remove patches without damaging fabric; preserve integrity for reuse or repurposing. |
| Fabric assessment | Identify fabric type and patch attachment. Denim, canvas, and other sturdy fabrics tolerate more aggressive methods; delicate fabrics require gentler approaches. |
| Tools | Small seam ripper or embroidery scissors; Tweezers or fine needle-nose pliers; Fray check or fabric-safe remover; Iron and ironing board or heat press (if patch is heat-activated); Nylon or silicone seam roller (optional); Clean cloth, mild detergent, and/or fabric-safe solvent. |
| Step-by-step method | Inspect stitches and edges around the patch; Test a hidden area for heat/solvent reactions; Gently cut threads around the patch with a seam ripper; If adhesive or backing is present, apply moderate heat to soften and lift the edge; Remove residual glue with a mild solvent on a cloth (test first); Inspect surface for pulled threads or damage and reinforce as needed. |
| Fabric types and techniques | Denim/Heavy cotton: tolerate slightly more aggressive edge work; Knit fabrics/Jerseys: work in small sections, support back of fabric; Silk/Lace: use the lightest touch, remove from the back if possible; Wool/Felt: test heat on a hidden area; wool may fuzz—trim edges or cover with a patch or embroidery if needed. |
| Reuse patches safely | Clean the patch gently and air-dry completely; Inspect patch backing and reuse with appropriate adhesive or stabilizer; Prepare receiving fabric with a clean, dry surface; Attach via sewing, heat-activated adhesive, or a combination; Test fit before final attachment. |
| Fabric preservation tips | Handle fabric with care; Reinforce vulnerable areas after removal; Wash gently and inside out on a low-heat cycle; Store patches or garments properly (acid-free tissue for light fabrics); Regularly inspect for wear or thinning. |
| Common mistakes | Rushing removal on delicate fabrics; Using harsh solvents; Ignoring backing integrity near seams; Failing to plan for reuse and reintegration. |
| Fused/permanently adhered patches | If fused, lift with heat and gentle method; in some cases, cut around the patch and reuse the fabric for a new design or appliqué layout; inspect for scorching or residue. |
| Quick checklist | Identify attachment method; Gather appropriate tools and test on a hidden area; Remove patch with minimal tension; Clean and inspect fabric surface; Decide on reuse or new attachment; Follow preservation best practices. |
Summary
Remove Patches Without Damaging Fabric is a skill that improves with practice and patience. By understanding patch removal techniques, choosing the right tools, and tailoring your approach to fabric type, you can preserve the garment’s integrity while freeing up or reusing patches. The ability to reuse patches safely not only saves money but also supports sustainable fashion—an important consideration in today’s wardrobe choices. Whether you’re working with denim, knitwear, or delicate fabrics, the core principle remains the same: approach the task with care, test your method, and prioritize fabric preservation. With these strategies, you can confidently Remove Patches Without Damaging Fabric and continue to enjoy the versatility and longevity of your clothing.