
DTF transfers file preparation and resolution form the cornerstone of reliable, vibrant prints on fabrics. The process aligns artwork, margins, and color management with DTF transfer resolution guidelines to ensure sharp edges and consistent color. Understanding DTF printing file formats helps preserve detail when converting designs to print-ready assets. Smart DTF design prep tips, such as color layering and proofing, reduce surprises at the heat press. Even the final step—DTF heat press best practices—depends on solid file prep and accurate resolution, underlining the workflow’s interconnected nature.
Beyond the explicit terminology, the idea centers on getting artwork print-ready and aligned with the chosen substrate. This prepress phase emphasizes image clarity, color management, and precise rasterization to translate designs faithfully to fabric. In LSI terms, you’re optimizing the file for production through prepress planning, recommended DPI targets, and compatible print formats that minimize artifacts. Practically, to ensure consistency across batches, teams focus on scalable assets, standardized ICC profiles, and careful bleed and safe-zone setup before any press. When you speak the language of prepress and production readiness, you’re addressing the same goals with alternative phrasing that resonates with designers and print operators alike.
Mastering DTF Transfers File Preparation and Resolution: From Artwork to Print Quality
DTF transfers file preparation and resolution work as a single, cohesive workflow that starts long before any heat is applied. By ensuring artwork is clean, properly scaled, and correctly positioned with margins and bleed, you set the printer up for faithful reproduction. Adhering to a solid file preparation routine—retaining a high-quality master file and exporting print-ready assets—helps you control how colors, lines, and textures render on fabric, reducing surprises during production.
In practice, you’ll manage canvas size, target final print dimensions, and a dependable resolution baseline (commonly 300 DPI at final size). Color management becomes a core capability: calibrating monitors, using printer-specific ICC profiles, and soft-proofing before printing. When you treat DTF transfers file preparation and resolution as intertwined steps, you unlock consistency across batches and fabrics, leading to predictable, high-quality results.
DTF Transfer Resolution Guidelines: DPI, Scaling, and Print Fidelity
Clear DTF transfer resolution guidelines help you balance image clarity with file size and workflow speed. The central rule of thumb is to aim for sufficient sharpness at the final print size, with 300 DPI as a solid baseline for most designs. If you’re working with large prints or textured fabrics, testing at 250–300 DPI can yield the right balance between detail and file manageability.
Beyond DPI, resolution management includes bitmap scaling practices, avoiding upscaling small assets, and maintaining edge fidelity for fine lines and textures. By standardizing how you calculate output resolution and validating it with proofs, you reduce reprints and color drift, ensuring the final transfer looks as intended on a range of garments.
DTF Printing File Formats: Preserving Detail with the Right Choices
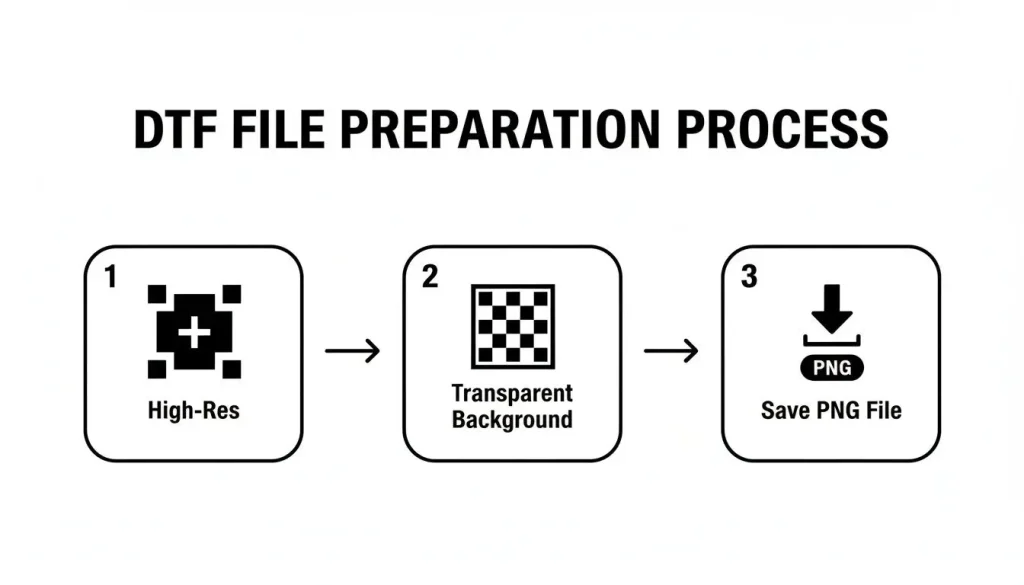
DTF printing file formats play a critical role in preserving detail and color. Maintaining a lossless master (TIFF or PDF) and generating final print-ready files in formats favored by your printer—such as PNG for images with transparency or EPS/PDF for vector elements—helps protect detail during rasterization and transfer. This approach minimizes compression artifacts and color shifts that degrade quality on fabrics.
Understanding how each format handles transparency, color space, and compression lets you tailor the workflow to your printer’s capabilities. A disciplined file setup that includes working copies in lossless formats, paired with correctly prepared output files, supports accurate color reproduction and clean edges when the transfer is applied to textile substrates.
DTF Design Prep Tips: Color Management, Layering, and Design for Fabric
DTF design prep tips emphasize clean typography, deliberate color choices, and thoughtful layering. Reducing color count or simplifying textures can prevent clipping and color banding after transfer, while keeping essential detail intact on fabric. Strategic layering helps printers separate elements for better color control, ensuring sharper edges and richer tones after heat application.
Color management is a core consideration—use monitor calibration and ICC profiles tailored to your printer and film, and soft-proof against the intended media. By aligning design intent with production realities, you can preserve brightness, contrast, and texture through the printing process, delivering designs that appeal to customers and withstand wash testing.
DTF Heat Press Best Practices: Aligning Pressing, File Prep, and Output
DTF heat press best practices are intertwined with how you prepared the artwork. Temperature, dwell time, and even pressure affect how the transfer accepts color and detail; missteps here can reveal issues rooted in the digital stage. Planning a test run allows you to verify alignment, substrate compatibility, and color integrity before large batches are produced.
Heat pressing also highlights the importance of proper file prep and resolution. A well-prepared design printed with accurate color and correct resolution will yield reliable results under the press, while ensuring that margins, bleed, and safe zones translate cleanly to the garment. Following best practices helps you predict performance across fabrics and finishes, reducing post-press adjustments.
A Reproducible DTF Workflow: From Canvas Setup to Proofing and Final Run
A reproducible DTF workflow begins with a scalable master design and a clearly defined export plan. Start with vector for logos and type when possible, or create high-DPI raster assets, then set up your canvas to reflect final print size, including margins and bleed. Saving a lossless master (TIFF or PDF) ensures you have a reliable reference for future edits, while generating print-ready files in PNG or TIFF keeps the workflow efficient.
Proofing is a critical step in ensuring consistency across batches. Digital soft-proofs and physical proofs on test garments help you validate color accuracy, edge quality, and alignment before a full run. By documenting settings, maintaining a library of ICC profiles, and archiving completed print-ready files, you build a repeatable process that scales with demand and fabric variety.
Frequently Asked Questions
How can I optimize DTF transfers file preparation and resolution for vibrant, durable prints?
Optimize DTF transfers file preparation and resolution by starting with a clean, print-ready design. Use a scalable master design, set the final print size, and target 300 DPI at that size. Employ a color-managed workflow with ICC profiles, calibrate your monitor, and include bleed and safe zones. Save a lossless master (TIFF or PDF) and generate final print-ready files (PNG or TIFF) for production.
What are the DTF transfer resolution guidelines I should follow for different garment sizes and fabrics?
DTF transfer resolution guidelines emphasize 300 DPI at the final print size for most designs. For very large prints or fabrics with texture, 250–300 DPI can balance detail with file size. Always proof at print scale and adjust based on viewing distance and fabric texture.
Which DTF printing file formats best preserve detail and color during transfers file preparation?
DTF printing file formats matter for preserving detail. Maintain a lossless master (TIFF or PDF) and export final files as PNG or TIFF per your printer’s requirements. Use PDF or EPS for vector elements when possible and avoid compression artifacts that degrade sharpness.
What are essential DTF design prep tips to improve color accuracy and edge sharpness?
DTF design prep tips focus on color management, clean lines, and mindful layering. Convert colors to the printer profile, minimize color counts to prevent banding, and maintain safe margins and bleed to ensure edge-to-edge sharpness.
How do DTF heat press best practices influence file preparation and resolution decisions?
DTF heat press best practices are intertwined with file preparation and resolution because pressing can reveal issues in artwork and color management. Plan for test runs, verify alignment, and ensure the design was prepared with proper resolution and bleed before the final batch.
What is a reproducible workflow for DTF transfers file preparation and resolution I can apply to every project?
A reproducible workflow starts with a scalable master design, exporting at high DPI (minimum 300 at final size), and converting colors to the printer’s ICC profile. Save a lossless master (TIFF or PDF), create print-ready files with proper bleed and margins, proof digitally and on fabric if possible, and adjust colors as needed before the final run.
| Aspect | Summary | Practical Tip |
|---|---|---|
| What DTF Means | Direct-to-film printing transfers artwork to fabric using heat and pressure; versatile across fabrics and colors. | Define artwork clearly; confirm transfer compatibility with your fabrics. |
| Two Pillars | Artwork creation and rasterization/resolution determine print quality. | Prepare clean art and establish print-ready resolution from the start. |
| Resolution Guidelines | Baseline 300 DPI at final print size; 240–600 DPI for large or textured fabrics. | Start with vector where possible; verify output resolution before printing. |
| File Formats | PDF, TIFF, PNG, EPS; maintain a lossless master for archival. | Use printer-recommended formats; keep a lossless master (TIFF/PDF). |
| Color Management | ICC profiles, monitor calibration, and soft-proofing to ensure color fidelity. | Calibrate monitors, use printer ICC profiles, soft-proof before printing. |
| Bleed & Safe Zones | Margins and bleed prevent white edges and crowding after transfer. | Design with proper bleed and safe zones to protect important elements. |
| Workflow Steps | Master design → export/rasterize → color convert → save master → create print-ready files → proof → final check. | Follow a repeatable, documented process for consistency. |
| Common Mistakes | Over/under-saturation, miscalibrated color, wrong resolution, missing bleed/safe zones, low-res images. | Use templates, profiles, and proofs to minimize these issues. |
| Practical Tips | Standardized templates, ICC profile library, regular test prints, organized archive. | Document processes and keep a design/file library for repeatability. |