
In your setup, custom screens for screen printing are more than just frames and mesh; they act as a carefully tuned conduit between your artwork and the ink, determining edge sharpness, color fidelity, ink deposition, and the overall durability of every print. This guide highlights two essential pillars—image prep for screen printing and exposing screens—as the foundation for reliable, repeatable results across substrates from cotton tees to totes and posters, while also keeping future projects predictable, scalable, and easy to document for reference. You’ll find practical steps for planning color separations, choosing mesh counts, managing halftones, preparing film positives, and keeping production notes, so each stencil transfers cleanly from digital design to the physical screen without surprises. A clear, repeatable workflow reduces guesswork, improves ink deposition and edge definition, and ensures that a design scaled from concept to fabric retains the intended shade, density, texture, and durability through repeat runs—the essence of the custom screen printing process. With a deliberate DIY screen printing setup and patient practice, you’ll move from a digital mockup to a vibrant, durable print, gaining confidence as you refine spacing, registration, curing, and maintenance alongside your evolving toolkit.
Viewed through an LSI lens, the screen becomes a transparent stencil that translates your artwork onto substrates with consistent opacity and edge integrity. Related concepts such as image transfer, emulsion coating, mesh count selection, and precise registration connect the design intent to the final look. If you’re framing this as silk screen or stencil work, you’ll still follow the same steps—prepare art, coat the mesh, burn the image with exposure, and wash out the non-print areas. This broader framing helps DIY enthusiasts and professional printers align goals like sharp lines, clean separations, and reliable ink flow, regardless of scale. By focusing on materials, workflow, and quality checks, you can apply flexible strategies that support home setups and small shops while preserving print longevity.
Custom Screens for Screen Printing: Core Concepts, Image Prep, and Exposing
Custom screens for screen printing are more than frames and mesh—they’re engineered conduits between your artwork and ink. When you invest in durable, well-tuned screens, you improve image sharpness, ink deposition, and color accuracy across runs and substrates. The choice of frame material, mesh count, emulsion type, and tension determines the stencil’s fidelity and durability. In practice, reliable custom screens enable consistent results from first print to last, whether you’re printing on cotton tees, tote bags, or posters. This emphasis on quality screens anchors the entire workflow and sits at the core of what many printers call the custom screen printing process.
Two essential pillars support that process: image prep for screen printing and exposing. By planning separations, halftone strategy, and dot trapping during image prep for screen printing, you set yourself up for clean edges and predictable ink coverage. Outputting sharp positives and managing color channels translate directly into a robust stencil once you move to exposing. During exposing, the prepared image is transferred into the emulsion-coated mesh, creating a stencil that can withstand multiple prints without losing definition. When done well, the combination of careful image prep for screen printing and precise exposing yields reliable results garment after garment.
Image Prep for Screen Printing: From Artwork to a Sharp Stencil
Image prep for screen printing begins the translation of your artwork into a stencil-ready file. Start with a high-resolution digital asset, decide on color separations, and choose a mesh count that will faithfully reproduce lines and halftones. Keeping line work clean and opting for vector edges when possible helps sharpness, while planning underbases, highlights, and trapping ensures proper ink balance once the stencil is applied. This stage sets up the stencil’s structure and determines how each color will print on cotton, fabric, or paper.
During image prep for screen printing, halftone planning and dot frequency are critical for achieving smooth gradients. Determine the dot size that your mesh can support and map gradients to halftone screens with appropriate angles to minimize moiré. Output the separations to clear film positives or other positives—stable transparency film helps preserve edge integrity during exposure. As you finalize the artwork, you’ll have prepared data ready for the next step, with a clear sense of where underbase and color areas will appear on the substrate. These steps are foundational screen printing tips that carry through to the exposing stage.
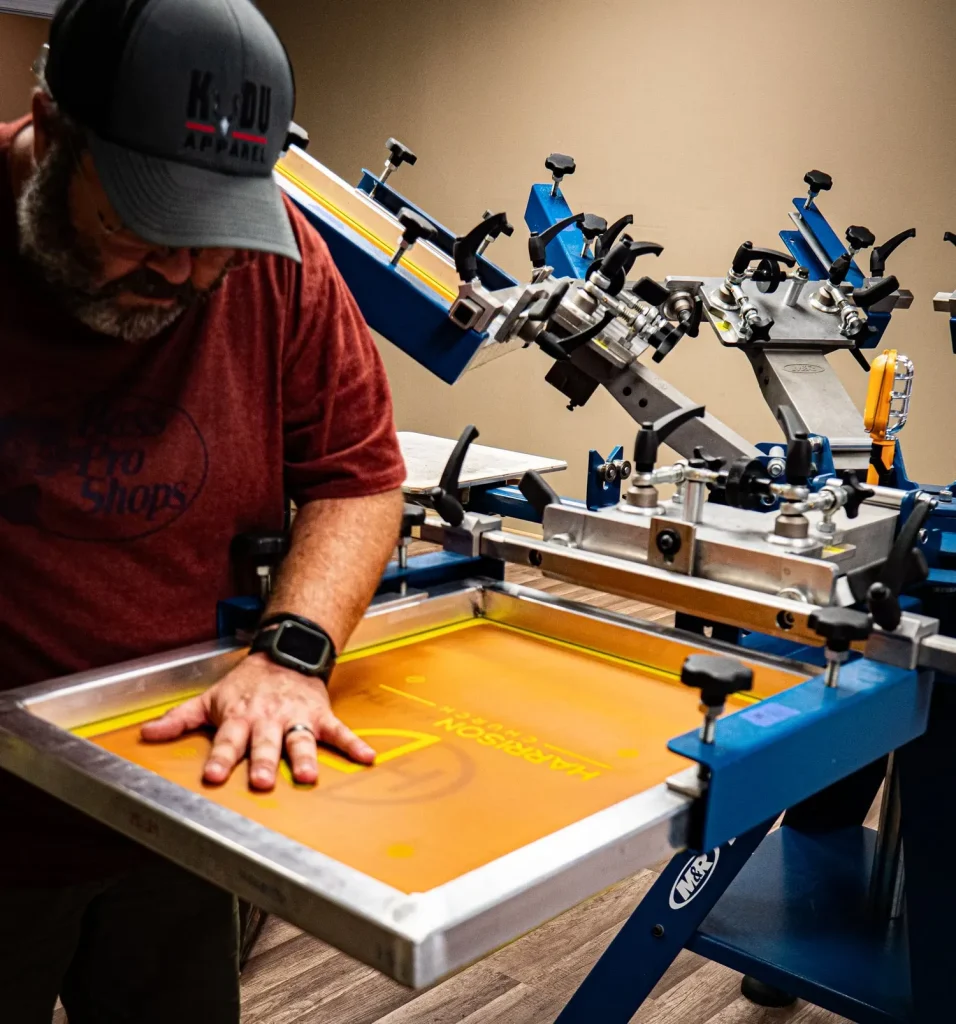
Exposing Screens: Turning Prepared Artwork into a Durable Stencil
Exposing screens is where your prepared artwork becomes a physical stencil. Use a controlled light source, a known exposure distance, and a clean frame to avoid misalignment. A vacuum frame or contact frame helps keep the film positives flat against the emulsion-coated mesh during exposure, ensuring sharp edges and consistent transfer once you flood ink across the screen. Protecting the stencil with proper emulsion handling and a clean work area is essential for durable, repeatable results.
Make a test strip before exposing the full design to dial in the exact exposure time. Underexposed screens retain residual light, leading to faint stencils, while overexposed screens can develop a polymerized surface that crackles and blocks ink flow. Both issues compromise edge definition and durability. After exposing, rinse the screen with cool water to wash away unexposed emulsion and verify that the image transfers cleanly. Document your exposure settings so you can reproduce successes in future runs.
Integrating Image Prep and Exposing into a Smooth Workflow
A successful run rests on how well image prep and exposing integrate into your workflow. Document every step—from artwork files and mesh counts to emulsion brands and washout results—so you have a dependable playbook for future jobs. Calibrate your equipment so your exposure unit, screen tension, and ink materials align with the chosen mesh count, because mismatches drive inconsistent results from run to run.
Test on real substrates to account for differences in fabrics and papers, and adjust your process accordingly. Calibrate regularly to keep results predictable, whether you’re printing on cotton tees, posters, or bags. Maintaining a consistent routine helps ensure your custom screen printing process remains efficient and reliable, turning digital designs into vibrant prints with minimal surprises.
DIY Screen Printing Setup Essentials for Reliable Results
If you’re building a DIY screen printing setup, focus on layering dependable tools with a straightforward workflow that centers image prep for screen printing and exposing. A practical home setup might include a frame and mesh suitable for your intended work (e.g., 305–355 mesh for cottons, higher for finer details), reliable emulsion and hardener with clear mixing instructions, a basic exposure unit or sun exposure setup, film positives, a clean workspace free of dust, a washout tray, and a dedicated curing area for inks.
Creating a stable, dust-free workspace minimizes contamination and leads to tighter, more repeatable results. Regularly check that your screen tension remains consistent and that your light source and exposure distance stay within tested parameters. A well-planned DIY screen printing setup, combined with disciplined image prep for screen printing, makes it possible to produce professional-quality work at home or in a small shop.
Troubleshooting and Quality Control: Common Issues and Practical Fixes
Quality control in screen printing starts with recognizing typical issues like faint details, poor edge definition, ink bleed, or uneven print areas. These problems often reflect imbalances in exposure, emulsion coating, or misaligned film positives. Use targeted screen printing tips to diagnose whether you need to adjust your halftone angles, improve frame flatness, or re-check your mesh count and underbase strategy before committing to a full run.
When issues arise, apply a structured approach: re-check exposure times with test strips, recoat with a fresh emulsion layer if needed, and reseal frames to prevent warping. Calibrate ink viscosity and squeegee pressure for the substrate, then run a small test print to confirm before scaling up. By maintaining a documented process and following consistent quality checks, you’ll strengthen the reliability of your custom screen printing process and keep results vibrant and durable across jobs.
Frequently Asked Questions
What is the role of image prep for screen printing when creating custom screens for screen printing?
Image prep for screen printing translates your artwork into a stencil for custom screens for screen printing. Start with a high‑resolution file, plan color separations, decide on halftone settings, and output clean positives to ensure sharp edges once you expose the screen.
How does exposing relate to the custom screens for screen printing?
Exposing turns the prepared image into a durable stencil on the emulsion-coated mesh. Maintain a controlled exposure setup, run a test strip, and avoid under- or overexposure to keep the detail intact in your custom screens for screen printing.
What would a simple DIY screen printing setup look like for reliable custom screens for screen printing?
A practical DIY setup includes a sturdy frame and mesh, reliable emulsion, a basic exposure unit or sun exposure, film positives, a washout tray, and a curing area. This supports consistent image prep for screen printing and exposing in your workflow.
What are some essential screen printing tips to prevent edge blur or ink bleed on custom screens for screen printing?
Useful screen printing tips include choosing the right mesh count for your ink and substrate, planning halftone dots during image prep for screen printing, ensuring precise film alignment during exposure, and maintaining steady squeegee pressure and flood spacing.
What are common troubleshooting steps for issues like faint details or ghosting in custom screens for screen printing?
For faint details or ghosting, check exposure time, emulsion coating, and film positives. Re-test with adjusted exposure, verify screen tension and flatness, and ensure clean positives to restore edge clarity in your custom screens for screen printing.
How can I integrate image prep for screen printing and exposing into a smooth workflow for custom screen printing?
Document each step, calibrate equipment (exposure unit, mesh, ink), and test on real substrates. A repeatable workflow that links image prep for screen printing with exposing reduces variability and improves consistency across runs for custom screens for screen printing.
| Topic | Summary | Key Details |
|---|---|---|
| Core idea (What custom screens for screen printing are) | Custom screens for screen printing are more than just a frame and mesh: they’re a prepared conduit between artwork and ink, with two anchors—image prep for screen printing and exposing. | This determines whether prints are crisp and durable or blurry; image prep makes lines/halftones print cleanly, and exposing transfers the image into the emulsion-coated mesh. |
| Image Prep for Screen Printing: Getting the Artwork Ready | Workflow to translate artwork into a stencil | – Prepare high-res design; plan color separations; use vector for sharp edges; consider halftone for mesh count. – Set final size, correct color mode, and printable area. – Separate each color onto film positives; plan underbases, highlights, trapping. – Halftone planning: choose dot size/frequency for your mesh. – Output positives on stable transparency film; ensure sharp edges. – Tone control and halftone angles to minimize moiré. |
| Exposing: Turning Image Prep into a Physical Screen | This step makes the prepared artwork into a stencil and requires accuracy and consistency. | – Build a clean exposure setup with controlled light and proper alignment. – Coat the screen evenly with emulsion. – Use a test strip to dial in exposure time. – Document exposure time and materials; adjust for substrate variations. – Guard against underexposure and overexposure; both hurt sharpness. – Post-exposure rinse and dry the screen before use. |
| Tying Image Prep and Exposing to a Smooth Workflow | Integrate image prep and exposing into a repeatable process. | – Document every step (artwork files, mesh counts, emulsions, exposure times, washouts). – Calibrate equipment: exposure unit, screen tension, ink/materials. – Test on real substratess to verify color, opacity, edge definition. – Continuously tune the process for predictability. |
| Common Troubleshooting Scenarios | Identify and fix common print defects. | – Faint or missing details: check exposure time, emulsion, film positives; retest with adjusted exposure. – Poor edge definition: recheck halftone settings and screen flatness. – Ink bleed/ghosting: verify mesh count, squeegee stroke, and flood spacing. – Uneven prints: ensure uniform emulsion thickness and consistent coating; check screen tension. |
| A Simple Home Setup for DIY Screen Printing | Basic gear to start with. | – Frame and mesh suitable for intended work (e.g., 305–355 mesh for cottons). – Reliable emulsion/hardener with mixing guidelines. – Basic exposure unit or controlled sun exposure. – Film positives and a clean workspace. – Washout tray and water for cleanup. – Heat source or curing area for inks. |
| Best Practices for Quality and Longevity | Habits that sustain print quality over time. | – Maintain climate and lighting consistency in the workspace. – Clean screens promptly after use. – Store screens dry and flat to prevent warping. – Test new inks/recipes on a small sample before committing to big jobs. |
| Conclusion (summary of the topic) | A concise wrap-up of the process and outcomes. | The core idea is that reliable custom screens for screen printing stem from disciplined image prep and precise exposing. By planning artwork separations, halftones, and film positives, and by exposing under controlled conditions with proper emulsion handling, you build a foundation for sharp, durable prints. This disciplined approach makes workflows predictable whether you’re printing a small run at home or managing larger batches in a shop. With patient practice, you’ll master turning digital designs into tangible, lasting visuals through consistent image prep and exposing. |
Summary
Conclusion: Custom screens for screen printing are the foundation of reliable, high-quality prints. By aligning artwork preparation with precise exposure, you create strong, durable stencils that translate digital designs into tangible results. Maintain consistency, document your process, and iterate to improve color accuracy and edge sharpness across runs. This approach supports both hobby projects and professional shop production, delivering vibrant results print after print.