
DIY screen printing for beginners opens a doorway to turning ideas into tangible prints right at home. This approachable guide covers screen printing basics and helps you establish a home screen printing setup with a simple, reliable workflow. You’ll learn about essential screen printing supplies for beginners, how to prepare a design for printing on fabric, and the steps to execute your first print on fabric. We’ll walk you through choosing a safe workspace, basic equipment, and the core stages of emulsion, exposure, printing, and curing, including how to set up a screen printing studio. With practical tips and friendly explanations, you’ll gain confidence to start small projects and expand to simple multi-color designs.
Think of this as an entry-level silkscreen journey, where you turn ideas into bold impressions with a stencil-based printmaking approach. We describe the process using alternative terms like home printmaking, beginner serigraphy, and simple screen workflows so you connect with similar concepts across content. The focus remains practical: choosing safe inks, setting up a compact studio corner, and following a repeatable sequence from design to dry. As you gain confidence, you’ll master color layering, precise alignment, and curing techniques that apply to textiles and paper alike.
DIY screen printing for beginners: from concept to first print on fabric
DIY screen printing for beginners opens a practical path from idea to tangible wearables and decor. By starting with the core screen printing basics, you can build confidence while gradually expanding your home screen printing setup into a comfortable, repeatable workflow. This approach emphasizes hands-on learning, safe handling of materials, and a clear sequence from design to final print, making the craft approachable for newcomers.
Leaning into a simple, repeatable process helps you master the essentials of screen printing supplies for beginners, choose a suitable mesh count, and understand how your ink choice affects results on fabric or paper. As you explore your first projects, you’ll gain insight into exposure timing, curing methods, and how to coordinate design scales with the printing surface. This foundation supports steady progress from initial sketches to finished prints.
Screen printing basics for newcomers: concepts, materials, and technique
Understanding screen printing basics means translating artwork into stencils, preparing screens, and managing ink with predictable results. This section covers critical concepts such as emulsion preparation, exposure, stencil creation, and the role of mesh count in balancing detail with ink coverage. Grasping these ideas helps you troubleshoot early prints and plan more complex runs in the future.
A practical path through the basics also includes choosing between water-based and plastisol inks, selecting a compatible squeegee, and recognizing why print registration matters even on simple designs. By starting with a single-color approach, you can refine your technique before layering multiple colors, which reduces confusion and speeds up learning while reinforcing the core workflow.
Setting up your home screen printing setup: workspace, lighting, and safety
A well-organized home screen printing setup is essential for consistent results and enjoyable practice. Create a flat, level workspace with easy access to inks, screens, and cleaning supplies, and designate a dedicated drying area to prevent cross-contamination of inks. A calm, controlled environment reduces variables that can affect print quality and helps you stay focused on the process.
Lighting and ventilation play pivotal roles in safe, effective screen printing. Establish a safe-light area for emulsion handling, ensure adequate airflow when using solvents, and maintain clean surfaces to limit dust that can cause pinholes. A thoughtfully arranged space supports efficient workflows from design and exposure to printing and curing.
Essential screen printing supplies for beginners: must-have tools and materials
Starting with the right tools matters as much as learning the technique. Essential screen printing supplies for beginners include a few sturdy screens, a dependable squeegee, emulsion and sensitizer (or a pre-sensitized screen), and a selection of inks suitable for your surface. A scoop coater, a light-safe workspace, and basic cleaning materials round out the core kit that supports steady progress.
Beyond the basics, consider additional items that improve consistency, such as different mesh counts for future projects, spare screens for quick color changes, and a basic exposure setup. Keeping a small inventory of curing materials and protective gear helps you stay focused on the craft rather than constantly shopping for replacements.
How to set up a screen printing studio: workflow, stations, and storage
How to set up a screen printing studio involves designing a logical workflow that moves from design to exposure, printing, and curing with minimal disruption. Establish distinct stations for artwork preparation, screen coating and drying, exposure, printing, and post-print finishing. Clear separation between these zones reduces cross-contamination and confusion during multi-color projects.
Organization is key to long-term success. Implement a simple labeling system for inks, screens, and emulsions, and store supplies in accessible containers to minimize setup time. A compact but efficient studio layout supports consistent results while keeping your space safe, well-ventilated, and easy to maintain as you scale your projects.
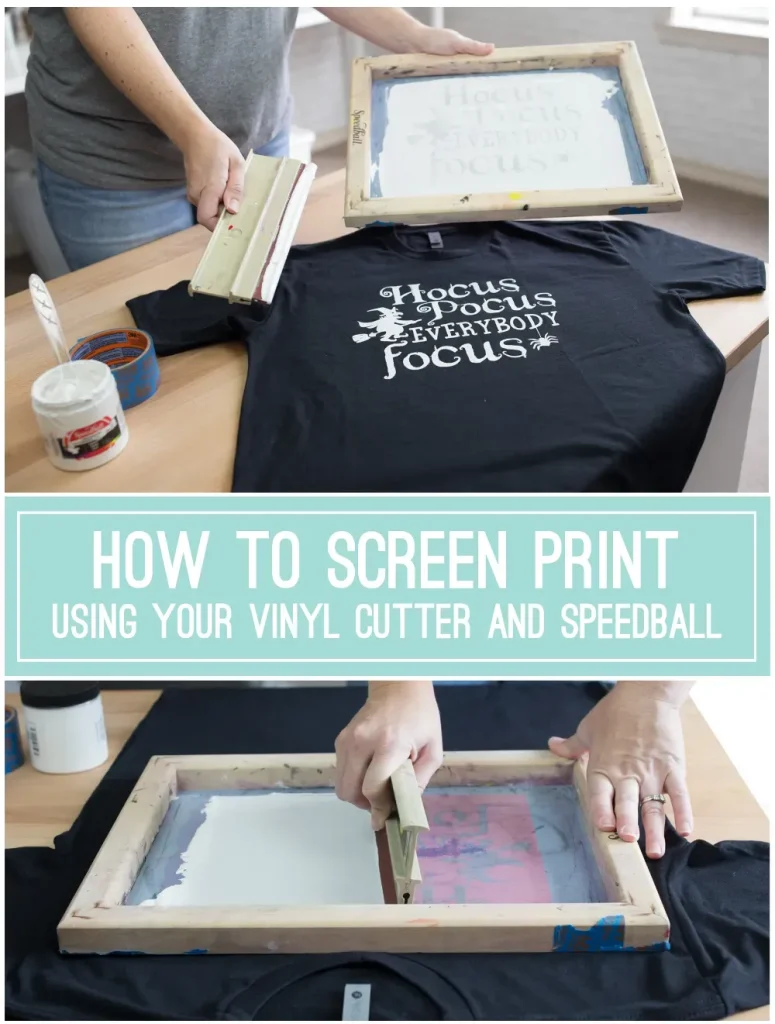
Executing your first print on fabric: design to curing and beyond
Executing your first print on fabric marks a tangible milestone. Begin with a high-contrast design, prepare your image, and ensure your screen is properly aligned before applying ink. Use a steady, even squeegee stroke and maintain consistent pressure to push ink through the stencil, achieving crisp edges and even coverage.
After printing, follow a reliable curing method—heat-setting for fabrics or air-drying for paper—to ensure durability. Document your process, note ink behavior, and evaluate how the color sits on the fabric or substrate. This reflective practice, paired with ongoing attention to screen printing basics and the steps of the workflow, will help you iterate toward better results with every new project.
Frequently Asked Questions
What are the essential screen printing supplies for beginners, and how do they fit into DIY screen printing for beginners?
Key items include a screen (230–305 TPI is common for beginners), a squeegee suited to your ink, emulsion and sensitizer (or a pre-sensitized screen), water-based ink for easy cleanup, a scoop coater, a drying rack, and basic safety gear. For DIY screen printing for beginners, start with a dependable, beginner-friendly kit and establish a calm, repeatable workflow to avoid overwhelm.
How do I set up a home screen printing setup for my first print on fabric?
Set up a home screen printing setup on a flat, level surface with a dedicated drying area and good ventilation. Create a light-safe exposure zone and prepare your design on film or transparency as a positive for exposure. Start with a simple, single-color first print on fabric to learn the process without complications.
What are the core screen printing basics I should know when starting as a DIY screen printer?
Core screen printing basics include using high-contrast designs, selecting an appropriate mesh count, starting with a single color, and understanding exposure and curing. Focus on building a simple, reliable workflow before adding more colors or complexity.
How should I choose mesh counts and inks when learning how to set up a screen printing studio for beginners?
For beginners, aim for mesh counts around 230–305 TPI to balance ink flow and detail. Water-based inks are generally easier and safer for beginners, while plastisol requires more curing and equipment. Test a small setup to find the right combination for your designs and surface.
What does a simple 1-color workflow look like for your first print on fabric in a DIY screen printing for beginners guide?
A simple 1-color workflow: finalize a bold, high-contrast design; coat the screen with emulsion; expose and rinse to create the stencil; dry the screen; set up and print with a single color; then cure the print according to ink guidance. Keeping to one color helps you learn exposure, ink flow, and curing more clearly.
What common issues do beginners encounter in DIY screen printing for beginners and how can I troubleshoot them?
Common issues include uneven ink deposition, blurry edges, pinholes, and misregistration. Troubleshoot by checking ink viscosity, ensuring proper exposure and washout, keeping the screen clean, drying between colors, and using registration marks. Document what you change so you can reproduce successful results.
| Section | Key Points |
|---|---|
| Introduction |
|
| Tools and Materials |
|
| Design, artwork, and preparation |
|
| Choosing a screen and mesh count |
|
| Setting up your DIY screen printing space |
|
| Emulsion coating, exposure, and screen preparation |
|
| Printing your first press: the fundamentals |
|
| Color, layering, and registration considerations |
|
| Maintenance and troubleshooting: common issues |
|
| First print projects for beginners |
|
| Tips to accelerate learning and keep it enjoyable |
|
| Budgeting your beginner project |
|
| Conclusion |
|
Summary
DIY screen printing for beginners is a rewarding journey that unlocks your ability to turn ideas into tangible prints. With a solid starter kit, a well-organized workspace, and steady practice, you’ll move from trial and error toward consistent, high-quality results. By mastering the core workflow, selecting reliable supplies, and refining your technique, you’ll gain confidence to create custom tees, posters, bags, and home décor that express your unique vision.