
DTF transfers have rapidly become a go-to method for vibrant, durable designs on apparel, bags, and fabrics. This introductory guide covers DTF transfer techniques, essential DTF supplies, and practical DTF printing tips to help hobbyists and small businesses start strong. By outlining the core concept and proven steps, you can save time, money, and frustration when choosing between heat-transfer methods. With a clear focus on color management, white underbase, and reliable equipment, the approach remains accessible whether you’re decorating a single tee or launching a shop. Newcomers will walk away with a practical sense of how to do DTF transfers efficiently, including setup, workflow, and aftercare.
Beyond the shorthand name, this approach is often described as direct-to-film printing, a film-based transfer process that uses a printable sheet to embed color onto textiles before application. Designers and printers regard it as a flexible alternative to DTG or vinyl, especially on cotton blends and dark fabrics when paired with a white underbase. Its appeal lies in reliable color reproduction, a softer hand-feel, and the ability to handle small batches with consistent results. Understanding the workflow—artwork setup, film preparation, curing, and heat-press parameters—helps creators turn ideas into durable, wearable graphics.
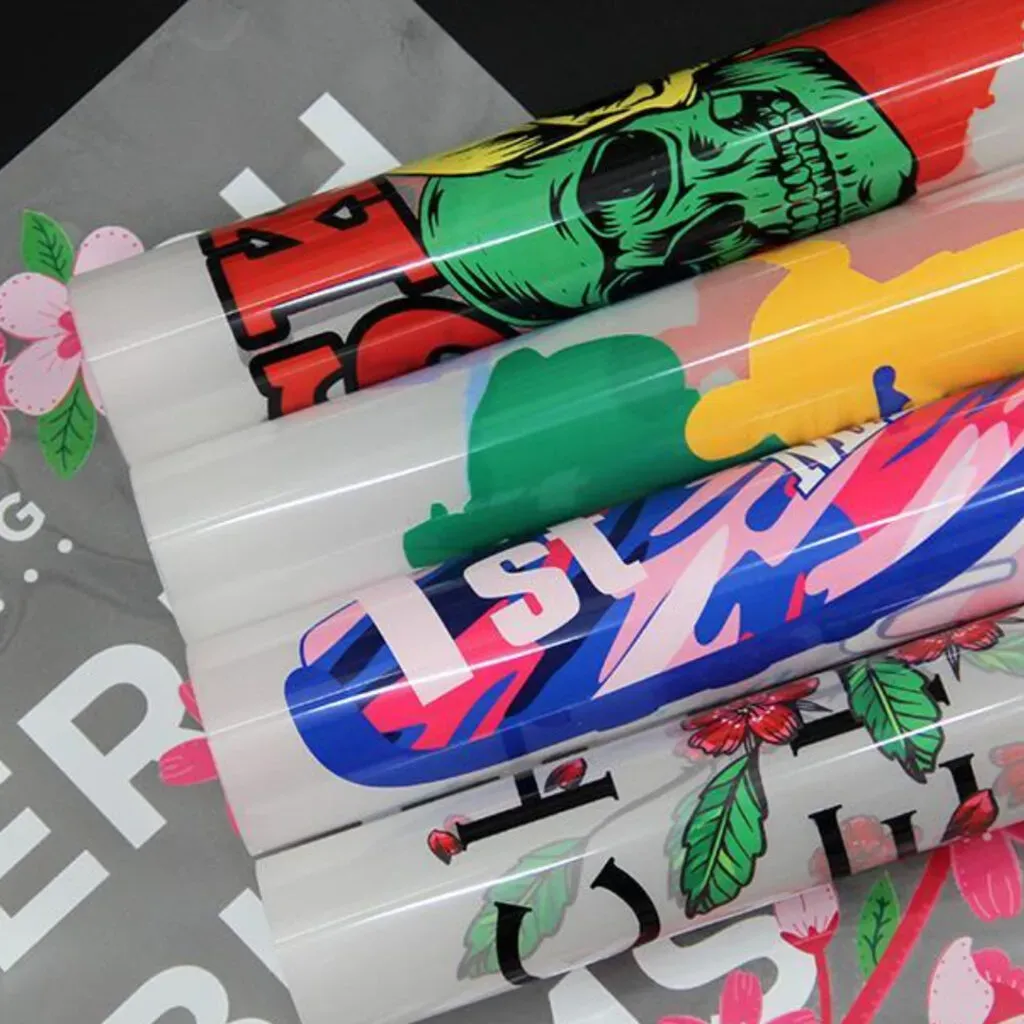
Understanding DTF transfers: What they are and why they matter
DTF transfers, short for Direct-to-Film, are a versatile method for applying full-color designs to garments, bags, and fabrics. In a DTF workflow, artwork is printed onto a special film using CMYK inks, often with a white underbase to ensure opacity on dark fabrics. After printing, an adhesive powder is applied and melted to bond the image to fabric, resulting in a durable, soft-hand print that behaves similarly to vinyl or DTG while offering its own strengths.
Understanding the core concepts—film, ink, powder, curing, and heat-press parameters—helps you decide when DTF transfers are the right tool for a project. DTF transfers are flexible across many fabrics and are cost-effective for small runs, making them popular with hobbyists, clubs, and on-demand shops. By mastering DTF transfer techniques, you can achieve consistent color, strong adhesion, and durable wear over time.
Essential DTF supplies for beginners
A solid DTF setup starts with a printer that supports CMYK inks plus a white ink channel, compatible DTF film, and adhesive powder designed for film-to-fabric transfer. You’ll also need a reliable heat press with adjustable temperature and pressure, heat-resistant tape, lint-free wipes, gloves, and a suitable release liner to protect the film during the transfer. Having these essentials on hand helps establish a smooth, repeatable workflow.
Beyond the printer and powder, plan for a dedicated curing or drying area and design software that supports layered CMYK and white underbase files. Investing in quality DTF supplies helps ensure predictable color fidelity, easy workflow, and long service life. Regular maintenance—cleaning the print head, film path, and curing station—keeps results consistent across runs.
Mastering DTF transfer techniques for durable results
Mastering DTF transfer techniques means focusing on color management, accurate white underbase handling for dark fabrics, and reliable heat and pressure control. Stable transfer films, correct curing of the adhesive powder, and precise timing during press cycles all contribute to minimizing cracks, misregistration, or color bleed. When you nail these elements, your prints look sharp and stay vibrant through washing.
Printer calibration, proper powder distribution, and thoughtful design preparation are also part of the equation. Test prints on your target fabric help you adjust temperatures, times, and pressure before production runs. Following proven techniques reduces common issues and yields a professional finish that lasts through many washes.
How to do DTF transfers: a practical step-by-step guide
DTF transfers follow a typical workflow used by professionals: design with a white underbase for dark fabrics, print on DTF film, apply and cure adhesive powder, and prepare the garment with pre-press before transferring at the recommended temperature and time. This sequence helps ensure color richness, adhesion, and a smooth hand feel on a variety of fabrics.
Carefully align the film, secure it with heat-resistant tape, and press with even, firm pressure. Peel the film according to the product’s instructions (warm, cold, or dry peel) and allow the design to cure before washing. Following these steps, along with manufacturer guidelines and your own test prints, helps ensure reliable results.
DTF printing tips for vibrant, long-lasting results
Color accuracy starts with printer calibration, ICC profiles, and a calm print workflow that minimizes color shifts between runs. Use white underbase correctly to maximize opacity on dark fabrics, and ensure your transfer film handling preserves print sharpness. These DTf printing tips set the foundation for repeatable, high-quality results.
Run small test prints on the target fabric and adjust heat, time, and pressure as needed. Manage layering carefully in multi-color designs to maintain alignment, and avoid overloading the powder, which can dull colors or create a rough hand feel. Regularly maintain your printer and cleaning routines to prevent ink buildup that could impact final output.
Care, maintenance, and sustainability of DTF designs
Post-press care increases longevity: wash inside out, use cold water, and follow gentle cycle guidance to reduce wear on the print. Avoid direct ironing over the print and store garments away from direct sunlight to prevent fading. These practices help your designs endure repeated wear and washes.
Sustainability can be supported by choosing eco-friendly inks and films, recycling used liners, and selecting suppliers with responsible production practices. Optimize your workflow to minimize waste, reuse design files when possible, and monitor material usage to keep DTF projects both profitable and environmentally mindful.
Frequently Asked Questions
What are the essential DTF transfer techniques beginners should master?
Key DTF transfer techniques include color management, white underbase handling for dark fabrics, stable transfer films, precise heat and pressure control, printer calibration, powder distribution, and proper timing during the heat-press step. Mastering these DTF transfer techniques helps you achieve vibrant colors, strong adhesion, and durable results.
Which DTF supplies are must-haves for successful transfers?
Essential DTF supplies include: a DTF printer with CMYK and white inks, compatible DTF film, adhesive powder, a reliable heat press with adjustable temperature and pressure, heat-resistant tape, lint-free wipes, gloves, a release liner, cleaning supplies, a curing or drying option, and design software for color management. Using quality DTF supplies reduces errors and improves transfer consistency.
How to do DTF transfers: a step-by-step overview?
Here’s how to do DTF transfers: 1) Prepare your design at high resolution and include a white underbase for dark fabrics; 2) Print onto the DTF film, using white ink for the underbase followed by CMYK colors; 3) While warm, apply adhesive powder evenly and remove excess; 4) Cure the powder to melt and bond; 5) Pre-press the garment and secure the film with heat-resistant tape; 6) Transfer with the recommended temperature, time, and pressure; 7) Peel the film warm or as directed; 8) Let it cool and cure before washing.
What DTF printing tips can improve color vibrancy and durability?
DTF printing tips: Calibrate your printer and monitor using ICC profiles to maintain color accuracy. Use a proper white underbase for vibrancy on dark fabrics. Run small test prints on the target fabric and adjust heat, time, and pressure. Ensure you use the right film and powder, and cure the powder thoroughly to improve adhesion and hand feel.
How can I troubleshoot common issues in DTF transfers?
Troubleshooting common issues with DTF transfers includes addressing faded colors, cracking, misregistration, or a sticky hand. Recheck white underbase printing and curing, verify even powder distribution, confirm correct temperature and pressure, realign using alignment marks or a jig, and test on the exact fabric before a full run.
How should I care for DTF transfers to maximize longevity?
DTF transfers care: Wash inside out in cold water and avoid high-heat tumble drying. Do not iron directly over the print; if ironing is needed, use a barrier cloth or low heat. Avoid fabric softeners and store garments away from direct sunlight to maintain color and durability.
| Aspect | Key Points |
|---|---|
| Introduction | DTF transfers are a go-to method for vibrant designs on apparel, bags, and fabrics. Core concept: design printed on film with CMYK inks, often with a white underbase for opacity on dark fabrics, followed by adhesive powder and heat pressing for a durable, soft hand-feel. |
| What are DTF transfers? | DTF stands for Direct-to-Film. Designs are printed on film with CMYK inks (plus white for opacity on dark fabrics). A bonding powder is applied and melted to form a transfer that can be heat-pressed onto textiles. Compatible with a wide range of fabrics. |
| DTF transfer techniques | Key elements: color management, white underbase handling for dark fabrics, stable transfer films, precise heat and pressure, printer calibration, powder distribution, and timing to minimize cracking, misregistration, or color bleed and maximize durability. |
| DTF supplies you need | DTF printer with CMYK and white inks; DTF transfer film; adhesive powder; reliable heat press; heat-resistant tape; lint-free wipes; gloves; release liner; cleaning supplies; curing/drying area; design/color-management software. |
| How to do DTF transfers: steps | 1) Prepare design at high resolution (≥300 DPI); include white underbase for dark fabrics. 2) Print on film with white underbase and CMYK; test print if possible. 3) Apply adhesive powder evenly; shake off excess. 4) Cure powder to melt onto the film. 5) Pre-press garment; secure film with heat-resistant tape. 6) Transfer to fabric at recommended temp/time/pressure. 7) Peel: warm, cold, or as instructed. 8) Post-press care: cool and wash cold; turn inside out. |
| Tips for success | Color management and calibration; use white underbase for vibrancy; run test prints; ensure proper alignment for multi-color designs; avoid excessive adhesive powder. |
| Troubleshooting | Faded colors: verify white underbase; cracking/peeling: adjust heat/pressure; powder not bonding: ensure proper curing; sticky feel: check curing temps/times; misregistration: use alignment marks. |
| Care and longevity | Wash inside-out in cold water; use mild detergents; avoid fabric softeners; do not iron over print; store away from direct sunlight. |
| DTF transfers vs. other methods | Sits between DTG and sublimation in versatility and price. Generally more durable on a wider fabric range; favorable for dark fabrics and cotton blends; cost-effective for small runs; consider fabric type, hand feel, durability, volume, and cost. |
| Common mistakes | Skipping tests; overloading powder; inadequate curing; poor fabric prep; neglecting post-press care. |
| Sustainability | Consider environmental impact of inks, films, and consumables; choose eco-friendly options where possible; recycle or dispose liners properly; optimize workflows to minimize waste. |
| Conclusion | DTF transfers offer a flexible, accessible path to vibrant, durable designs across a wide range of fabrics. By following the Direct-to-Film workflow—printing on film with CMYK (and white underbase), applying and curing adhesive powder, and pressing with proper temperature, time, and pressure—you can achieve consistent color, soft hand-feel, and long-lasting wear. Whether decorating a single shirt or building an on-demand business, DTF transfers empower creators to turn ideas into tangible, durable products through careful technique and reliable supplies. |
Summary
DTF transfers offer a flexible, accessible path to vibrant, durable designs across a wide range of fabrics. With a Direct-to-Film workflow, you print on film using CMYK (and white for opacity on dark fabrics), apply adhesive powder, cure it, and press the design onto garments with careful temperature, pressure, and timing. By following best practices from design to post-press care, you can achieve consistent color, soft hand-feel, and long-lasting wear, whether you’re decorating a single shirt or building a small on-demand business. The key is investing in quality supplies, calibrating your setup, testing thoroughly, and maintaining your equipment to minimize issues and waste. In this way, DTF transfers blend creativity with practical production, enabling you to turn ideas into tangible, durable products.