
DTF Transfers have transformed garment decoration by combining vibrant color, durability, and a simpler workflow, making them a popular choice for both small shops and local events. From selecting high-quality materials to optimizing heat press practices, this guide covers practical DTF printing tips that help you achieve consistent results. Understanding the DTF transfer design process is key, with attention to color management, mirroring, and edge crispness to prevent banding. By dialing in heat press settings for DTF and refining preparation steps, you can improve adhesion, color fidelity, and durability. A proactive DTF troubleshooting mindset, combined with careful QC, helps reduce waste and ensures repeatable results.
From a terminology perspective, this technique is often described as direct-to-film printing, a film-based transfer method that uses an adhesive powder to lock vibrant designs into fabrics. Think of it as a digital-to-film workflow for apparel, where color management, substrate compatibility, and precise curing ensure lasting, bright results. Using these LS I-aligned terms helps you reach audiences searching for film transfers, direct-to-film processes, or garment decoration solutions while staying consistent with the tips and practices discussed earlier.
DTF Transfers: Core Principles for Crisp, Durable Prints
DTF Transfers have transformed garment decoration by combining vibrant color, durability, and a simpler workflow compared to traditional methods. Whether you’re building a small print shop or printing for a local event, mastering DTF Transfers is essential for consistent, professional results.
The foundation of reliable DTF prints is quality materials and substrate compatibility. Invest in dependable DTF film, adhesive powder, and inks, and always consider the fabric you’ll print on to avoid adhesion issues and color shifts.
A lightweight QA routine helps you keep prints repeatable: test on representative swatches, check adhesion after pre-press, and document outcomes. This practice is central to DTF troubleshooting and improves transfer design consistency.
DTF Printing Tips: Materials, Prep, and Process Consistency
Tip 1 stresses starting with high-quality materials. The right combination of DTF film, adhesive powder, and inks sets the baseline for color richness, durability, and consistency.
Tip 2 and Tip 3 emphasize fabric preparation and pre-press. Pre-pressing to remove moisture and testing on target fabrics reduces surprises and aligns with DTF printing tips for clean results.
A consistent workflow—clear steps, times, and temperatures—improves yield and makes it easier to reproduce results across multiple items.
DTF Transfer Design: Color Management, Mirroring, and Edge Clarity
Design quality begins at the outset. Use high-resolution artwork (300–360 dpi) and keep file formats printer-friendly. Remember to mirror the image for transfer to ensure it reads correctly on the garment.
The DTF transfer design should emphasize sharp edges, solid fills, and accurate color management to avoid banding or halos. Plan color separation carefully, and save with correct color profiles to preserve fidelity.
A well-documented design workflow reduces waste and speeds production. Keeping design assets organized and noting color settings helps you reproduce successful transfers and scale up.
Heat Press Settings for DTF: Temperature, Pressure, and Timing
Heat Press Settings for DTF deliver the core of print quality. A practical starting point is about 320°F (160°C) with a medium to firm press and a 12–15 second dwell, while always following manufacturer guidelines and validating with test swatches.
Fabric type and garment construction affect recommended time and pressure. Test on representative stock and adjust accordingly to optimize edge clarity and color accuracy, a common concern in heat press settings for DTF.
Ensure even heat across the transfer area and maintain steady pressure—avoid rocking the press or lifting mid-press, which can distort the image. A consistent pressing technique underpins repeatable, vibrant results.
DTF Troubleshooting: Diagnosing Issues and Implementing Fixes
DTF Troubleshooting focuses on diagnosing issues such as color separation gaps, ghosting, scorching around edges, or poor adhesion. Start by checking print density, powder adhesion, and that the design was mirrored correctly.
If you encounter color gaps or misalignment, verify print density, adjust the adhesive powder, and confirm transfer timing. Ghosting often signals misalignment or incorrect heat/pressure settings; scorching points to fabric compatibility or pre-press duration.
A robust QC process—testing on representative fabrics and documenting every variable—reduces waste and helps you refine DTF printing tips and the overall process.
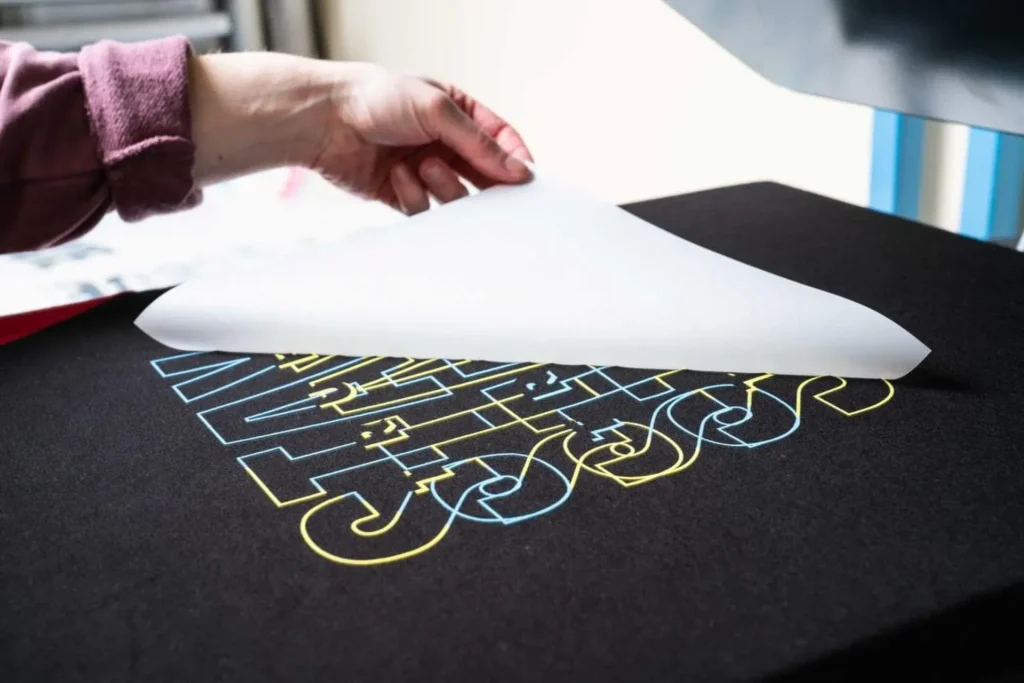
Post-Process Care and Quality Control for DTF Transfers
Post-Process Care and Quality Control help preserve color, adhesion, and print integrity. After peeling, allow the transfer to cool completely on a flat surface and consider a brief post-press cure to strengthen adhesion.
Provide clear washing and care instructions to customers to maintain colors and prevent edge curling. Ongoing care guidance protects the perceived quality of your DTF transfers and reduces returns.
Frequently Asked Questions
What are DTF transfers and how do they work for garment decoration?
DTF transfers are designs printed on a carrier film using adhesive powder, then heat-pressed onto fabric. They deliver vibrant color, good durability, and a simpler workflow, making them a popular option for small shops and custom prints. Understanding DTF transfers is the foundation of reliable results.
What are essential DTF printing tips to ensure high-quality transfers?
Start with high-quality materials—DTF film, adhesive powder, and inks compatible with your substrate. Proper fabric prep and pre-press help moisture removal and adhesion, while mirroring and color management keep designs accurate. Following these DTF printing tips reduces waste and improves yield.
How should I design for DTF transfer to maximize print quality?
Focus on DTF transfer design: use high-resolution artwork (300–360 dpi), clean solid fills, sharp edges, and color separation. Mirror the image before printing and use correct color profiles to preserve accuracy. Good design decisions minimize banding and ghosting.
What heat press settings for DTF should I start with, and how can I dial them in?
A common starting point is around 320°F (160°C) with a medium to firm press for 12–15 seconds, ensuring even pressure across the transfer area. Always follow manufacturer guidelines and run test samples on your stock to dial in your process.
How do I troubleshoot common problems with DTF transfers?
Use a structured DTF troubleshooting approach: check powder adhesion and curing, confirm proper mirroring, verify print density, and review heat/pressure settings. Look for issues like color gaps, ghosting, or scorching, and adjust materials or timing accordingly. Document results to refine your process.
What post-press finishing steps and care improve DTF transfers?
After peeling, allow the transfer to cool fully and perform a brief post-press cure (1–2 minutes). Provide clear care instructions to customers to preserve colors and prevent edge curling. This finishing step, together with consistent DTF printing tips, helps extend the life of the transfer.
| Tip | Key Point | Notes |
|---|---|---|
| Tip 1: Start with high-quality materials. | Foundation of reliable DTF project | Select dependable DTF film, adhesive powder, and compatible inks; match fabric type and substrate; avoid clumping and poor adhesion. |
| Tip 2: Match fabric and garment preparation. | Fabric compatibility matters | Pre-press to remove moisture; test on target fabric to confirm adhesion and color fidelity. |
| Tip 3: Pre-press and garment prep. | Stabilize while removing moisture | Pre-press 3–5 seconds; use even heat and pressure; place protective sheet to prevent scorching. |
| Tip 4: Design and printing considerations. | Design quality and print readiness | Use 300–360 dpi, mirror as needed, save with proper color profiles; ensure sharp edges and solid fills. |
| Tip 5: Print settings and drying. | Maintain color fidelity and dry properly | Manage printing speed, ink density, drying time; allow drying before curing; layer print path to prevent smudges. |
| Tip 6: Powder application and curing. | Even powder and proper curing | Apply adhesive powder evenly, brush off excess, cure per material guidelines; adjust if color shifts occur. |
| Tip 7: Transfer settings and heat control. | Temperature, pressure, and dwell | Common starting point: 320°F (160°C), medium-firm pressure, 12–15 seconds; test materials; ensure even pressure. |
| Tip 8: Peel method and cooling. | Peel strategy for best release | Test warm/hot and cold peels on swatches; record results to refine process. |
| Tip 9: Post-press finishing and care. | Care extends durability | Cool on flat surface; post-press cure 1–2 minutes; provide care instructions to customers. |
| Tip 10: Troubleshooting and quality control. | Quality control to reduce waste | Address color gaps, ghosting, scorching; verify mirroring; implement a robust QC process with documentation. |
Summary
DTF Transfers offer a compelling path for garment decoration, combining vibrant color, durability, and a streamlined workflow that can scale from a home shop to a small print business. By following the Top 10 Tips for Perfect DTF Transfers Every Time, designers and printers can achieve consistent results, reduce waste, and improve yield across a range of fabrics. The DTF Transfers process hinges on quality materials, careful garment preparation, thoughtful design decisions, and precise heat pressing. With disciplined testing, documentation, and ongoing refinement, mastering DTF Transfers leads to repeatable, professional outcomes that satisfy clients and drive repeat orders.