
Embroidered clothing DIY invites you to personalize your wardrobe with handmade flair. Whether you’re a beginner or returning to the craft, this guide blends practical tips with project ideas. From fabric choices to thread selection, you’ll find approachable steps that grow with your skills. A quick look at stitches and embellishment options helps you plan wearable designs you’ll love. We close with practical tips and tricks you can try this weekend to build confidence.
In other words, this topic can be seen as textile decoration that personalizes apparel through careful stitching. You can approach it as hand embroidery for garments or as machine embroidery projects, blending traditional needlework with modern tools. A practical guide to embroidery stitches list and garment embellishment ideas helps you plan motifs that fit your fabric and style. Along the way, DIY embroidery tips and tricks emerge, alongside care guidelines to keep your creations looking crisp.
Embroidered clothing DIY: Personalize Your Wardrobe with Handmade Flair
Embroidered clothing DIY makes it possible to tailor outfits to your taste, extend the life of favorite pieces, and proudly wear handmade artwork. Whether you’re starting with a small monogram or a decorative motif, this approach helps you control design, fabric, and color in ways that store‑bought items can’t match. It’s approachable for beginners yet flexible enough to evolve as your skills grow, turning ordinary garments into wearable art.
From fabric selection to thread choice and placement, Embroidered clothing DIY blends patience with creativity. You’ll discover practical steps that apply to both hand embroidery for garments and machine embroidery projects, plus simple garment embellishment ideas you can tackle this weekend. With careful planning and steady practice, you’ll gain confidence to expand from simple stitches to bolder designs.
Choosing Fabrics and Stabilizers for Garment Embroidery
Selecting the right fabrics and stabilizers sets the foundation for successful garment embroidery. Cotton, linen, denim, and lightweight knits each respond differently to stitches, so choose stabilizers accordingly—tear-away for stable weaves and wash-away for delicate silhouettes—to prevent puckering and distortion.
Pairing fabric with appropriate stabilizers also influences what stitches you’ll choose, and it helps you move beyond trial and error. A quick reference to an embroidery stitches list will guide you toward reliable starter stitches that read well on garments, while you plan your next project.
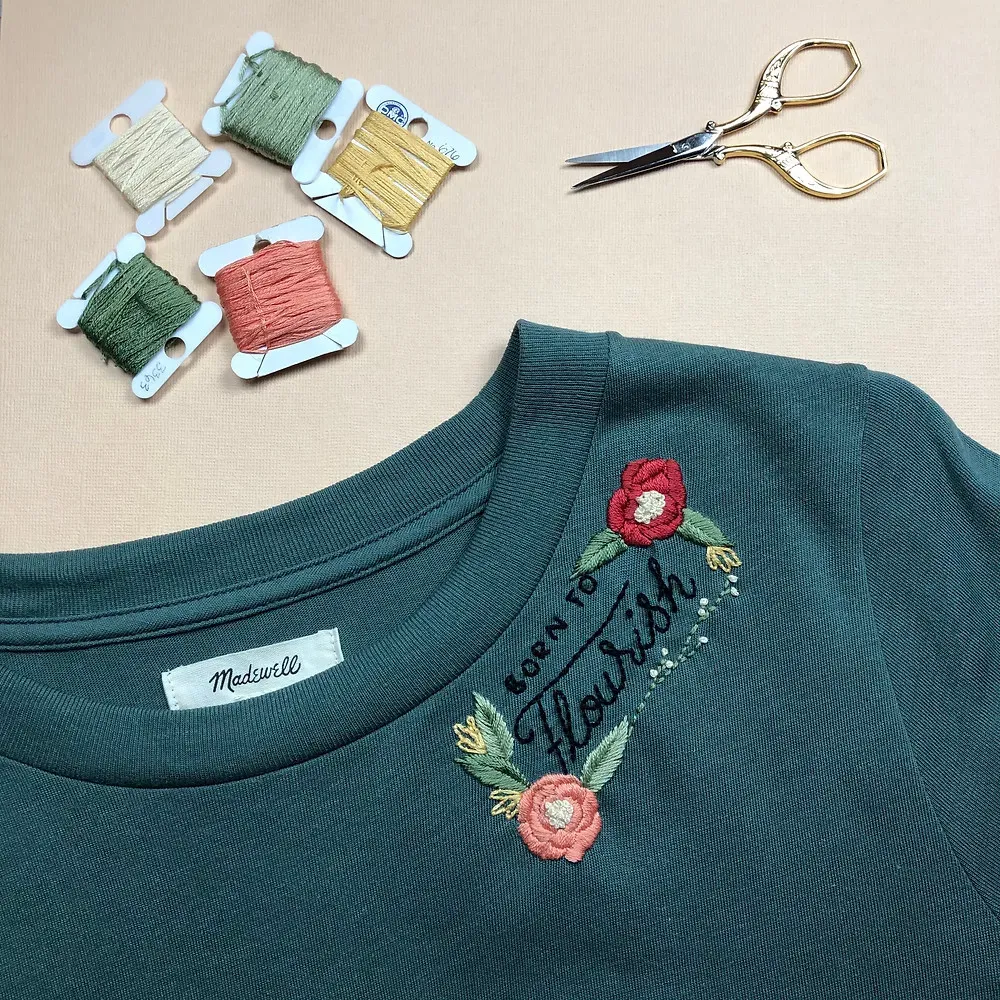
Hand Embroidery for Garments: Essential Stitches to Learn
Hand embroidery for garments offers a tactile, intimate way to decorate fabric. Start with a concise embroidery stitches list: running stitch for outlines, back stitch for defined borders, satin stitch for fills, chain stitch for texture, plus French knots and lazy daisies for small details.
Practice is essential before you embellish a whole piece. Work on scrap swatches to gauge fabric weight, thread thickness, and how stitches sit on the surface. When you’re ready to apply to a garment, begin with a small motif and scale up as you gain confidence in your garment embellishment ideas.
Machine Embroidery Projects: Quick Garment Details and Tips
Machine embroidery projects provide speed and repeatability that can boost your wardrobe updates. Start with simple motifs, borders, or monograms that fit common garment panels, then move to larger designs as you refine your technique. This approach makes it easy to realize garment embellishment ideas with consistent results.
To keep results sharp, pay attention to hooping, stabilizer choice, and thread selection. Practice proper maintenance, clean bobbins, and gentle finishing to prevent puckers or thread breaks, all of which are practical facets of DIY embroidery tips and tricks that transfer across hand and machine methods.
Design Ideas and Projects for Garment Embellishment
Design ideas and projects for garment embellishment ideas range from subtle to statement. A monogrammed denim jacket, floral accents on a tee, or embroidered pockets can transform a basic piece into personal art. Consider scale, color contrast, and how the design will interact with seams and closures for a polished finish.
If you’re short on time, start with a small project and gradually tackle more ambitious designs. Upcycling an old tote or denim bag with machine embroidery can yield bold results while building confidence, and you can translate those ideas into wearable garments through careful planning and fabric choices.
Care, Maintenance, and Troubleshooting for Embroidered Garments
Care and maintenance for embroidered garments keeps your stitches vibrant for years. Pre-treat stains, wash on gentle cycles, and air dry when possible to minimize wear on threads and fabric. Iron on the reverse side with a pressing cloth to protect embroidery from heat damage.
Troubleshooting common issues is part of the process. Puckering, loose stitches, thread breakage, or color bleed can be addressed by adjusting tension, re-threading, using appropriate stabilizers, and testing threads on swatches before embroidering your final piece—an essential mindset in DIY embroidery tips and tricks.
Frequently Asked Questions
What is Embroidered clothing DIY and what beginner-friendly hand embroidery for garments project can I start with?
Embroidered clothing DIY is the practice of personalizing clothes with embroidery to create wearable art, using hand embroidery for garments or machine methods. For a beginner, start with a simple denim jacket monogram using hand embroidery for garments: plan placement, apply a stabilizer, and use a satin stitch for bold letters. This builds confidence with basic stitches before advancing to more complex garment embellishment ideas.
In Embroidered clothing DIY, how should I choose fabrics and stabilizers for machine embroidery projects?
Choose fabrics that take well to embroidery, like cotton, linen, denim, or lightweight knits. For machine embroidery projects, use appropriate stabilizers (cutaway for woven fabrics, tear-away for light knits), hoop fabric taut but not overtension, and select machine-friendly threads. Finish by removing stabilizers after washing and pressing gently from the back.
What stitches are in the embroidery stitches list, and how can I practice them for Embroidered clothing DIY?
The embroidery stitches list includes running stitch, back stitch, satin stitch, chain stitch, French knot, and lazy daisy. Practice these on small samplers before applying them to garments, then choose stitches that suit your design—outlines with back stitch, fills with satin, accents with French knots—to build confidence.
What are some garment embellishment ideas for Embroidered clothing DIY that are beginner-friendly?
Try monogrammed denim jackets, floral accents on tees, embroidered pockets, cuffs or hems borders, or upcycled tote bags. When designing, consider scale and color contrast so the embroidery moves with the fabric and remains wearable.
What are some DIY embroidery tips and tricks to improve Embroidered clothing DIY results?
Plan your design before stitching, stabilize properly, and keep tension consistent. Use the right hoop technique, choose appropriate thread weights, and test on scrap fabric. A blended approach—combining hand embroidery for garments with machine embroidery projects—can yield textured garment embellishment ideas.
How should I care for embroidered garments from Embroidered clothing DIY to keep them looking fresh?
Pre-treat stains and wash on a gentle cycle with cold water; use a mesh bag for delicate items. Air dry when possible and iron from the back with a pressing cloth. Remove stabilizers after finishing and use colorfast threads on dark fabrics to prevent bleed.
| Topic | Key Points | Notes / Examples |
|---|---|---|
| What Embroidered clothing DIY is | Personalize wardrobes, extend garment life, showcase handmade art; suitable for beginners and experienced alike | Focus on practical, realistic, approachable projects. |
| Materials & Tools | Fabrics suitable for embroidery; stabilizers; threads (hand and machine); needles; hoops/frames; marking tools | Stabilizers prevent puckering; choose thread types based on hand vs machine embroidery. |
| Planning | Sketch/print design; consider garment shape, seams, folds; plan placement for best effect | Placement matters; plan to improve final polish. |
| Hand Embroidery Stitches | Running, Back, Satin, Chain, French knot, Lazy daisy | Start small; practice on samplers before larger garments. |
| Machine Embroidery | Stability, hooping, simple motifs first, machine-friendly threads, finishing touches | Combine hand and machine embroidery for layered textures. |
| Design Ideas / Projects | Monogram denim jacket; Floral accents on tee; Embroidered pockets; Cuffs/Hems; Upcycled tote | Consider scale and color contrast; suitable for beginners to intermediate. |
| Step-by-Step Project (Monogram) | Plan/mark; Stabilize; Stitch choice; Thread/tension; Finishing; Care | Durable satin stitch for letters; maintain even tension. |
| Care & Maintenance | Pre-treat stains; gentle washing; cold water; air dry; reverse-side ironing | Care extends life of embroidery. |
| Troubleshooting | Puckering, loose stitches, thread breakage, dye migration | Use stabilizers, re-thread, proper needle size, colorfast threads. |
| SEO & Keywords Strategy | Weave related keywords naturally: hand embroidery for garments, machine embroidery projects, embroidery stitches, garment embellishment ideas, DIY embroidery tips and tricks | Focus on tutorials, project rundowns, care guidance. |