
Hand-Embroidered Gifts turn a simple thread into a keepsake that lasts a lifetime. There’s something magical about turning thread into a personal treasure, and it starts with thoughtful hand embroidery ideas that guide your design. Whether you’re crafting DIY embroidery gifts for a loved one or testing beginner embroidery stitches, the thrill is in the process. With quality fabrics, a few reliable stitches, and a design that speaks to the recipient, you can create custom embroidered gifts that feel truly personal. Let this guide walk you from simple supplies to finished pieces that celebrate memory, artistry, and care.
Viewed through an alternative lens, this craft becomes stitched keepsakes, embroidered textiles, and hand-stitched presents—terms that resonate with how people search for attractive, handmade gifts. LSI-friendly language connects related ideas such as needlework keepsakes, personalized stitching, and textile gifts, helping readers discover broader possibilities without redundancy. So, as you plan your first project, think in concepts: pattern, thread, and sentiment, not just a single label, to keep content fresh and accessible.
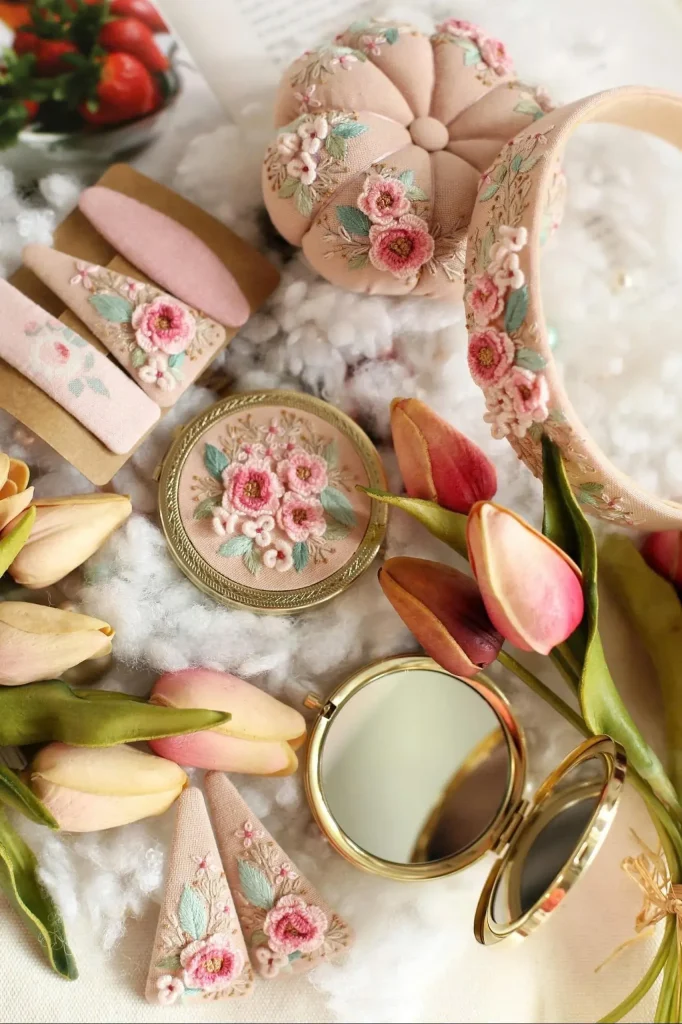
Hand-Embroidered Gifts: Personal Touches That Tell a Story
Hand-embroidered gifts carry a personal touch that store-bought items can’t match. When you choose a motif inspired by the recipient’s hobbies or memories, you turn ordinary fabric into something truly special. If you’re collecting hand embroidery ideas, start with simple shapes and a cohesive color palette to keep the process enjoyable while delivering a meaningful keepsake.
The journey from thread to treasure is about intention as much as technique. For anyone exploring DIY embroidery gifts, begin with a modest project such as a monogram on a napkin or a small floral motif on a tote bag, then layer in color and texture to tell a unique story.
Quality Materials and Tools for Beautiful DIY Embroidery Gifts
Quality materials set the foundation for enduring hand stitched gifts. Choose stable fabrics such as cotton or linen, a reliable embroidery hoop, and a limited color palette to keep stitches even and neat. Good tools help beginners’ stitches look polished and professional.
Pair durable threads like DMC cotton floss or perle cotton with a comfortable needle and clear transfer methods. A thoughtful approach to setup helps you create custom embroidered gifts that feel premium, whether you’re making a single item or a small gift collection for friends and family.
Starter Stitches for Quick Wins: Beginner Embroidery Stitches That Wow
Master a handful of beginner embroidery stitches and you unlock thousands of hand stitching ideas. The core stitches such as backstitch, satin stitch, and French knot are workhorses that yield clean outlines, solid fills, and tiny textures. Practicing these steps builds confidence for crafting DIY embroidery gifts that wow.
As you gain comfort with the basics, you can add stem stitch and lazy daisy to broaden texture and style. With steady practice, you’ll be ready to tackle larger pieces or even start a small line of custom embroidered gifts for holidays and celebrations.
Designing Meaningful Embroidered Gifts: From Monograms to Floral Motifs
Designing meaningful embroidered gifts starts with knowing the recipient. Monograms offer timeless personalization, while floral motifs add soft beauty to towels, pillow covers, or tote bags. If you’re collecting hand embroidery ideas to mix and match, keep motifs simple and scale them to the fabric to avoid crowding.
Color theory and fabric background influence the final vibe. A warm palette on natural linen or a cool palette on cotton denim can shift the mood from playful to refined. This is how custom embroidered gifts become more than decor; they become tokens of care and memory.
Step-by-Step Project Ideas: Easy DIY Embroidered Gift Projects
Step-by-step projects provide a friendly path from beginner to maker. A classic DIY embroidered gift bookmark lets you practice with minimal fabric while producing a cherished present. Follow a simple sequence of preparing fabric, transferring a pattern, outlining shapes with backstitch, filling with satin stitch, and adding tiny details with French knots.
Other quick ideas include embroidered napkins, tea towels, or a small tote bag. These projects translate well into DIY embroidery gifts when you pair a personal message or a monogram with a coordinated color scheme, expanding your collection of hand embroidery ideas and keeping the process enjoyable.
Finishing, Presenting, and Caring for Your Handcrafted Treasures
Finishing touches protect your work and sharpen its appeal. A neat edge, backing, and careful pressing help pieces stay attractive through use and washing. For gifts, include a care card that explains washing instructions and the story behind the design, turning care into a part of the gift itself and lifting the experience of custom embroidered gifts.
Presentation matters as much as stitch count. Consider packaging in a simple linen wrap, with a handwritten note that explains the inspiration or memory behind the design. When you present your hand stitched treasure with care, the recipient feels seen and valued, and your DIY embroidery gifts earn lasting appreciation.
Frequently Asked Questions
What are Hand-Embroidered Gifts and why are they special?
Hand-Embroidered Gifts are textiles stitched by hand to become personalized, one-of-a-kind keepsakes. They’re special because you can tailor them with initials, motifs, or memories, turning thread into a meaningful present.
Which beginner embroidery stitches are best for creating DIY embroidery gifts?
Try backstitch, satin stitch, and French knot—the core beginner embroidery stitches that work well for outlines, filled shapes, and small details. These stitches are ideal for hand-embroidered gifts and keep the process approachable for DIY embroidery gifts.
What materials do I need to start making hand-embroidered gifts?
Essential supplies include linen or cotton fabric, an embroidery hoop, DMC floss or perle cotton, an embroidery needle, transfer tools, and scissors. With these basics, you can begin crafting high-quality hand-embroidered gifts and experiment with DIY embroidery gifts.
How can I design personalized Hand-Embroidered Gifts that feel meaningful?
Choose patterns that reflect the recipient—monograms, floral motifs, or meaningful dates. Transfer the design carefully and select a color palette that enhances the message; these steps help you create custom embroidered gifts with a personal touch.
What easy projects can I start with for DIY embroidery gifts?
A bookmark, napkin, or tote bag makes a perfect beginner project. They let you practice beginner embroidery stitches and build confidence while creating a thoughtful Hand-Embroidered Gift.
How should I finish and present Hand-Embroidered Gifts to wow the recipient?
Finish with clean edges, gentle washing, and proper framing or packaging. Include a care card and thoughtful presentation to elevate the handmade gift from Thread to Treasure.
| Section | Key Points | Notes / Examples |
|---|---|---|
| Introduction |
Turning thread into a keepsake; hand-embroidered gifts carry a personal touch that store-bought items can’t match. They are ideal for a thoughtful hobby, a side hustle, or adding a personalized finish to special occasions. Start with quality materials, learn a few reliable stitches, and design a pattern that speaks to the recipient. From thread to treasure, you’re crafting a memory as well as a piece of fabric. |
Note: Emphasizes intention and personal meaning behind a handmade gift. |
| Why Hand-Embroidered Gifts Wow |
|
Note: Focus on personalization, reflection of the recipient, and the mindful process. |
| Materials and Tools: Getting Started the Right Way |
|
Note: Quality tools and materials impact stitch quality and enjoyment. |
| Basic Stitches for Beginners |
|
Note: Start with core stitches; expand as you build confidence. |
| Design Ideas for Hand-Embroidered Gifts |
|
Note: Personalization elevates meaning and keeps the gift relevant to the recipient. |
| Step-by-Step Project: DIY Embroidered Gift Bookmark (Beginner-Friendly) |
|
Note: A beginner-friendly project to practice basic stitches and create a meaningful gift. |
| Finishing and Caring for Hand-Embroidered Gifts |
|
Note: Finishing and care extend life and preserve embroidery quality. |
| Gifting and Presentation: Making the Moment Special |
|
Note: Presentation helps elevate perceived value and meaning. |
| Trends and Tips: Keeping It Fresh |
|
Note: Community sharing helps grow interest and inspiration. |
| Common Mistakes and How to Avoid Them |
|
Note: Anticipating common issues helps achieve cleaner results. |
Summary
Hand-Embroidered Gifts are more than stitched fabric; they are personal narratives sewn with care, patience, and imagination. By starting with quality materials, mastering a handful of reliable stitches, and designing patterns that speak to the recipient, you can craft pieces that wow and become treasured keepsakes. Whether you pursue hand embroidery as a hobby, a side hustle, or a thoughtful way to celebrate holidays and milestones, each piece carries meaning beyond its threads. With mindful finishing and presentation, your hand-embroidered gifts will carry stories long after the fabric wears, turning everyday textiles into lasting memories.