
If you’re exploring ways to decorate apparel, UV DTF transfer stands out as a versatile option that delivers vibrant colors and durable results. In the UV DTF printing process, designs are printed on a clear film using UV-curable inks that cure instantly, producing sharp details and strong wash-fastness. This guide to the UV DTF transfer process follows a DTF transfer step-by-step workflow designed for beginners. Compared with traditional DTF, UV DTF transfer can offer quicker curing and a smoother, more flexible finish on a wider range of fabrics. With practical tips and common pitfalls addressed, this approach is popular with crafters and small businesses looking for reliable, scalable results.
Viewed through an alternative lens, this technique is often described as UV-curable film printing for textiles, a direct-to-film method that uses UV inks to create durable designs. What makes it appealing for newcomers is the same principle of printing to a carrier sheet and transferring with heat, but described with different terms like UV-based transfer on fabric or film-to-textile printing. LSI-friendly descriptions include indirect color application on textiles, digital transfer media, and crafts-focused print finishing that emphasize ease of use and quick curing. Discussing it as a modern transfer process, UV-ink on film, or UV-inkjet transfer helps readers connect it to related ideas such as dye-sub comparisons, traditional DTF, and the importance of correct heat settings. Overall, the concept remains the same: print on a coated film, apply adhesive, cure or dry, and press to reveal a vibrant, flexible design.
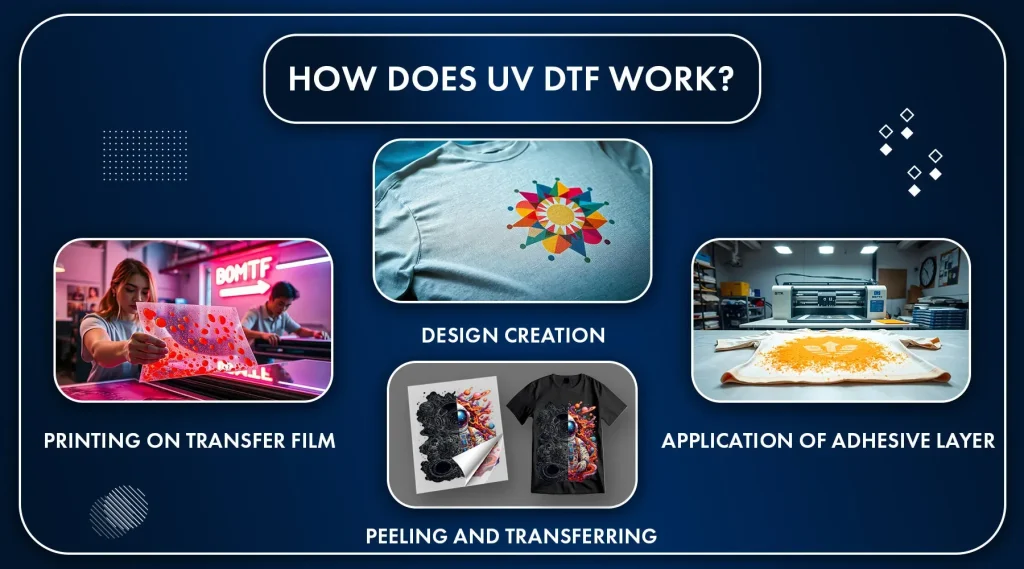
1. What is UV DTF Transfer? Understanding the UV DTF Printing Process
UV DTF transfer is a Direct-to-Film technique that uses UV-curable inks printed onto a transparent film. In the UV DTF printing process, designs are printed onto the film, then a layer of adhesive powder is added, cured, and finally transferred to fabric with heat and pressure. The inks cure instantly under ultraviolet light, producing vivid colors, sharp details, and strong wash-fastness. This combination makes the method particularly appealing for home crafters and small businesses seeking professional-looking results with modest equipment.
The result is a print that feels soft and flexible on fabric, blending well with the garment rather than sitting on top of it. Because the process leverages digital design, it supports gradients, fine lines, and complex imagery without the setup required by traditional screen printing. This makes UV DTF transfer a versatile option for a wide range of apparel projects and small-run orders.
2. A Beginner’s Guide to UV DTF: Getting Started with the UV DTF Printing Process
If you’re new to UV DTF, this beginners guide to UV DTF emphasizes a straightforward, scalable workflow. Start with a basic kit that includes a UV DTF printer, UV-curable inks, DTF film designed for UV inks, adhesive powder, a curing device, and a reliable heat press. A clean workspace and proper safety gear help ensure consistent results and fewer mishaps during the learning phase.
In this beginner-friendly approach, focus on mastering color management, mirroring, and test prints before scaling up. Understanding how white ink layers behave on darker fabrics and how to balance saturation will help you produce vibrant, print-ready designs that translate well from screen to garment.
3. UV DTF Transfer vs DTF: Key Differences and Practical Implications
When comparing UV DTF transfer vs DTF, the most noticeable differences lie in ink chemistry and curing. UV DTF uses UV-curable inks that set instantly under ultraviolet light, reducing handling time and helping preserve color integrity. This can result in sharper edges and brighter colors compared to some traditional DTF setups.
Other factors, such as substrate compatibility, film behavior, and care requirements, also influence how each method performs on different fabrics. UV DTF transfer vs DTF often means different workflow timings and post-press steps, so choosing between them depends on your project needs, fabric types, and production speed requirements.
4. DTF Transfer Step-by-Step: From Design to Finished Garment
A typical DTF transfer step-by-step workflow starts with designing or arranging your artwork and preparing a mirrored print for garment placement. You then print onto UV DTF film with the appropriate settings, apply adhesive powder, cure, and prepare the garment for transfer. This sequence mirrors traditional DTF processes while leveraging UV curing to speed up the overall timeline.
Next comes the garment preparation and heat press transfer, followed by peeling the film to reveal the design. Finishing steps may include a post-press coat or additional curing to maximize durability. By documenting settings for each fabric type, you can create a reliable, repeatable process for future projects.
5. Materials and Equipment for a Smooth UV DTF Printing Process
A well-equipped UV DTF printing process starts with a reliable UV DTF printer, UV-curable inks, and DTF film designed for UV inks. You’ll also need adhesive powder, a curing tool compatible with UV inks, and a heat press with controllable temperature and pressure. A clean workspace, release paper or transfer tape, and protective gear help maintain print quality and user safety.
Beyond the basics, having a stable press mat, thermometer or timer tools, and spare consumables like powder and films will reduce downtime between projects. As you build your kit, keep manufacturer recommendations handy for curing times and temperatures to ensure consistent results across different fabrics.
6. Care, Troubleshooting, and Pro Tips for UV DTF Prints
Care for UV DTF prints starts with proper washing guidelines: turn garments inside-out, use cold water, and avoid high-heat dryers to preserve color and adhesion. Do not iron directly on the print; use a pressing cloth if needed. Storing printed garments away from direct sunlight also helps minimize fading over time.
When things don’t go as planned, a quick troubleshooting approach can save a project. Common issues include incomplete curing, powder not sticking, or edge lifting after transfer. Revisit cure settings, ensure the powder adheres evenly, and re-press with appropriate pressure and time. Regular maintenance of your heat press and curing equipment will also reduce downtime and improve consistency across UV DTF prints.
Frequently Asked Questions
What is UV DTF transfer and how does the UV DTF printing process work?
UV DTF transfer is a direct-to-film method that uses UV-curable inks printed on a clear film, which is then heat-pressed onto fabric. In the UV DTF printing process, the inks cure instantly under UV light, delivering vibrant colors and sharp details, followed by applying adhesive powder and a final heat press to transfer the design. This approach blends digital design flexibility with the durability and feel of a traditional heat transfer, making it ideal for small runs and custom apparel.
How does UV DTF transfer compare to traditional DTF, i.e., UV DTF vs traditional DTF?
UV DTF transfer uses UV-curable inks that cure during printing, reducing post-print handling, while traditional DTF typically requires separate curing steps after printing. This can offer faster production, strong wash-fastness, and bright, detailed results, though outcomes depend on film, ink chemistry, and substrate. Overall, UV DTF often delivers more vivid colors and flexibility on a wider range of fabrics.
What is a beginners guide to UV DTF and where should a beginner start?
A beginners guide to UV DTF covers the essential workflow and starter setup: a UV DTF printer with UV-curable inks, DTF film, adhesive powder, heat press, and a clean workspace. Start with simple designs, make a few test prints on scrap fabric, and calibrate temperature, pressure, and cure times before tackling complex artwork. As you gain confidence, you can experiment with gradients and more intricate designs.
What is the DTF transfer step-by-step workflow for a first project?
This DTF transfer step-by-step workflow begins with designing and testing a print, then printing on UV DTF film, curing the ink, applying adhesive powder and curing again, prepping the garment, and performing the heat press transfer. After pressing, peel the film carefully and complete any required finishing steps to maximize durability. Always follow manufacturer guidelines for best results.
What are common issues in the UV DTF printing process and how can I troubleshoot?
Common issues include incomplete curing, powder not sticking, white ink problems on dark fabrics, color bleed, and film delamination. Troubleshoot by verifying cure time and energy, reapplying and recuring the powder, using a proper white underbase for dark fabrics, controlling room temperature, and ensuring even pressure during transfer. Documenting settings helps reproduce consistent results.
How to choose fabrics and substrates for UV DTF transfer and maximize durability?
Start with light fabrics like cotton or cotton blends to learn the process, then expand to other substrates while testing color management and adhesion. UV DTF works on many fabrics, but dark fabrics may require careful underbase planning and appropriate film/adhesive. Pre-press to remove moisture, use the correct film and powder, and follow care instructions (wash cold, inside-out) to maximize durability.
| Topic | Key Points |
|---|---|
| What it is: Direct-to-Film (DTF) printing using UV-curable inks on a clear film, cured instantly under ultraviolet light, then heat-pressed onto fabric. The UV cure yields vivid color and sharp details. |
|
| Why choose UV DTF transfer for beginners? |
|
| Materials and equipment you’ll need |
|
| Step-by-step process for beginners |
|
| Common mistakes and troubleshooting |
|
| UV DTF vs traditional DTF: key differences |
|
| Care and maintenance for UV DTF prints |
|
| Tips for beginners to accelerate learning |
|
Summary
UV DTF transfer is a versatile method for decorating apparel that blends digital color fidelity with durable, soft-to-the-touch transfers. This guide explained the UV DTF transfer process, from design preparation to curing, powdering, and heat pressing, while highlighting common pitfalls and how UV DTF compares to traditional DTF. By following the step-by-step workflow and using the right materials, crafters and small businesses can achieve professional-quality results without large-scale equipment. The method’s instant UV curing and strong color fidelity make it particularly appealing for small runs, customized apparel, and items with intricate details. With practice, you’ll refine your settings for different fabrics, manage white ink on dark substrates, and improve wash-fastness through proper curing and finishing. Overall, UV DTF transfer stands out as a flexible, efficient solution for on-demand printing that balances ease of use with durable results.