
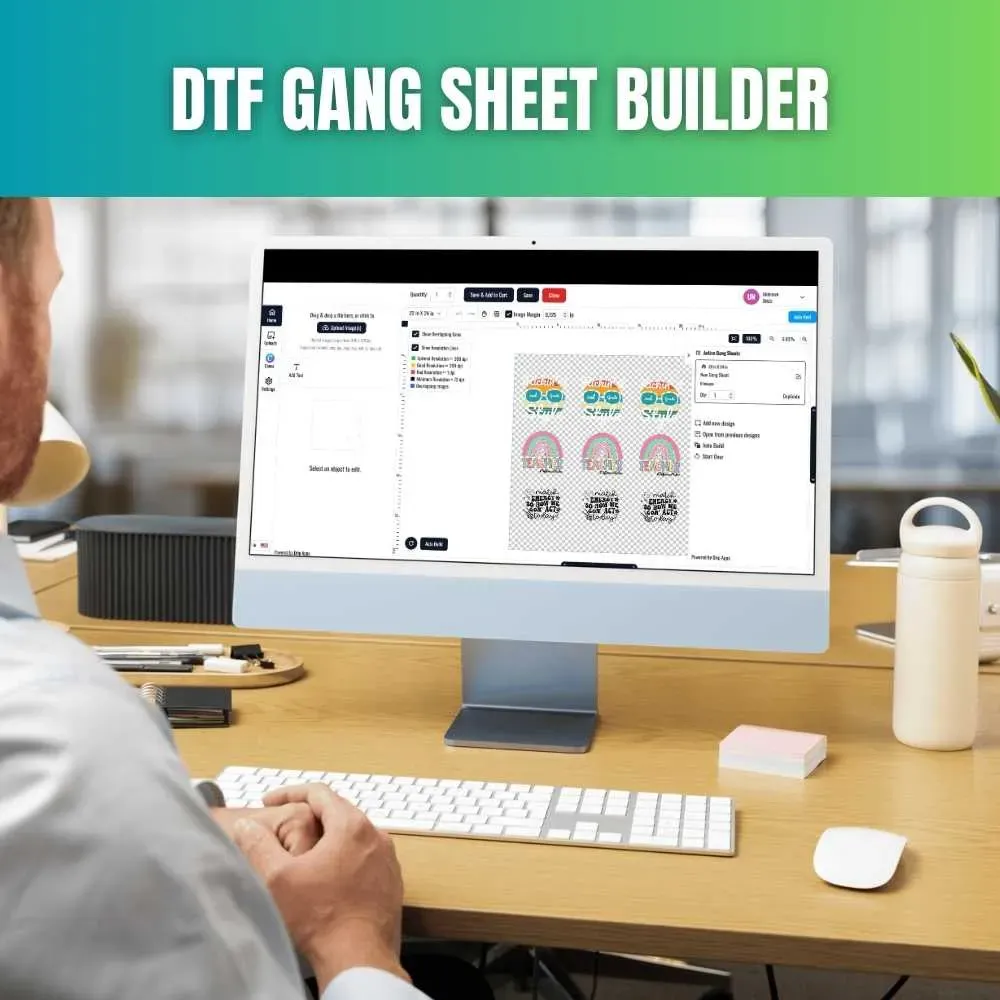
DTF gangsheet builder has emerged as a game-changing tool that streamlines the entire process of planning, arranging, and color-tuning when producing multiple designs on a single garment transfer, ultimately reducing downtime and material waste while helping operators maintain consistent margins across runs. By integrating this software into your DTF printing workflow, teams can visualize layouts, automate spacing, and enforce repeatable margins, which translates into faster setup, fewer manual adjustments, and a smoother handoff from design to production on every sheet. Learn how to create gang sheets with the DTF gangsheet builder software, a dedicated solution that consolidates art files, color constraints, and alignment guides so you can fit more designs into optimal positions on a single sheet without sacrificing image fidelity. From planning and design to export-ready files, this approach supports color management and best practices for DTF heat transfer sheets, ensuring that color profiles stay consistent through to the press and that safe margins preserve legibility and finish quality. The result is faster production, consistent results across garments, and a scalable workflow that lends itself to gang sheet design tips and repeatable success across a wide range of orders, brands, and production environments, while also providing a clear framework for training new staff and documenting proven layouts for future use.
Viewed through an LSI lens, this topic can be framed as a multi-design layout tool that streamlines the creation of garment transfer sheets by grouping artwork, color blocks, and cut paths into a cohesive print plan. Alternatively, you might call it a sheet-based layout planner for heat-applied graphics, a printer workflow helper that optimizes spacing and alignment, or a production grid that standardizes how designs are positioned on one substrate. By using these related concepts, shops can pursue the same goals of efficiency, accuracy, and repeatable results, while also benefiting from cross-functional terminology that supports training, documentation, and vendor-neutral communication.
Frequently Asked Questions
What is the DTF gangsheet builder software and why should I use it?
The DTF gangsheet builder software is a dedicated tool for arranging multiple designs on a single sheet, managing spacing, margins, color, and export-ready files. Using it can reduce setup time, minimize material waste, and ensure consistent alignment and color reproduction, aligning with the DTF printing workflow.
How to create gang sheets using the DTF gangsheet builder?
To create gang sheets: plan your designs and sheet size, set up grid and margins in the builder, import designs, arrange them in a logical order, adjust spacing, add safe margins and cut lines, manage color profiles, preview, and then export a print-ready file.
How does the DTF gangsheet builder improve the DTF printing workflow?
It streamlines the DTF printing workflow by automating layout, spacing, and color management, reducing rework and head moves, and providing a single source of truth for production files.
What should I consider when designing DTF heat transfer sheets with a gangsheet builder?
When designing DTF heat transfer sheets with a gangsheet builder, ensure proper color management with printer profiles, account for bleed and safe margins, consider how colors separate across passes, and verify readability of any text; these practices maintain print quality on heat transfer sheets.
What are some essential gang sheet design tips?
Gang sheet design tips: use a consistent grid and margins, group similar sizes to minimize printer motion, maintain orientation, leave breathing room around text, place high-priority designs in accessible areas, and include clear cut lines and registration marks.
How can I validate and export gang sheets for production with the DTF gangsheet builder software?
Validate by previewing the sheet, run a test print, check color accuracy and alignment, then export as PDF or high-res PNG/TIFF with embedded fonts and cut lines; store color profiles in the export and ensure the file is ready for the DTF printer RIP, following the DTF gangsheet builder software workflow.
| Topic | Key Points | Notes / Impact |
|---|---|---|
| What is a gang sheet & why use a DTF gangsheet builder? |
|
Improves production efficiency, ensures consistent margins, and delivers reliable cut lines; standardizes processes across teams. |
| Getting started: planning your gang sheet project |
|
Planning reduces backtracking, speeds up layout, and lowers error-prone steps; color management considerations influence how many designs fit and color vibrancy. |
| Step 1: Prepare artwork |
|
Cleaner assets lead to smoother subsequent steps and fewer adjustments during layout. |
| Step 2: Set up your sheet & grid |
|
A consistent grid and margins enable quick snapping and reliable trimming; supports color planning. |
| Step 3: Import designs & establish order |
|
Order design placement to align with production priorities and minimize printer head movement. |
| Step 4: Layout optimization & spacing |
|
Maintains uniform margins and consistent orientation, reducing post-print trimming complexity. |
| Step 5: Add safe margins & cut lines |
|
Ensures no critical details are trimmed and trimming is predictable. |
| Step 6: Color management & profiles |
|
Improves color accuracy and repeatability across runs. |
| Step 7: Preview & validation |
|
Early detection of issues reduces waste and rework. |
| Step 8: Export & file preparation |
|
Produces clean, ready-to-send files that support a smooth workflow. |
| Step 9: Print test & quality check |
|
Catch issues before full production to ensure consistency. |
| Step 10: Final production & post-processing |
|
Increases reproducibility and speed for future jobs. |
| Common pitfalls & troubleshooting |
|
Improves reliability and helps train staff more quickly. |
| Real-world example: case study |
|
Demonstrates faster turnaround, lower material waste, and consistent transfer quality in high-volume runs. |
Summary
DTF gangsheet builder is a practical framework for planning, designing, and producing multiple designs on a single sheet. By emphasizing careful planning, grid-based layout, color management, and thorough validation, you can achieve a faster, more reliable workflow for creating perfect gang sheets. Key steps include preparing artwork, configuring a precise sheet grid, arranging designs with consistent margins, managing color with appropriate profiles, previewing thoroughly, exporting clean print-ready files, and performing a test print before full production. To optimize your operations, embrace the concept of how to create gang sheets using a dedicated DTF gangsheet builder software, which can deliver measurable improvements in throughput and quality. Practice with templates and apply the approach to both small runs and large batches, so you can consistently produce high-quality, market-ready garments with confidence.