
Custom banner and roll-up banner sizes set the stage for how your message lands with audiences at a glance. When you choose dimensions with care, readability, viewing distance, and image clarity align with banner resolution guidelines. Whether you lean toward custom banner sizes or standard roll-up banner sizes, planning ahead helps you fit venues, budgets, and production realities. This approach also supports enduring image quality for banners by setting the right bleed, color mode, and file type from the start. By following banner printing best practices and keeping content concise, you maximize impact from the first glance.
In other words, banner sizing becomes a flexible tool that adapts to space, lighting, and audience reach. Using alternative terms such as display width, format, and proportion helps align content with search intent and related topics. For trade shows, storefronts, and corporate lobbies, selecting the right proportions supports legibility and brand coherence. Key elements—resolution, print-ready assets, color fidelity, and material choice—remain central to successful signage. LSI-friendly terms such as signage dimensions or asset specifications can improve discovery while keeping the focus on practical print results.
Custom banner and roll-up banner sizes: Aligning Impact with Space
In events, exhibitions, and storefronts, the banner size you choose is the first silent salesperson. Custom banner and roll-up banner sizes let you tailor the display to venue constraints, audience distance, and branding needs. By planning around both custom banner sizes and standard roll-up banner sizes, you can maximize visibility without crowding your message.
To hit the right balance, think in terms of viewing distance and layout. Large, bold typography and high-contrast colors improve readability, while bleed and safe margins prevent unexpected trimming. Understanding banner resolution guidelines at the design stage helps ensure your final print looks sharp whether viewed from across a room or up close.
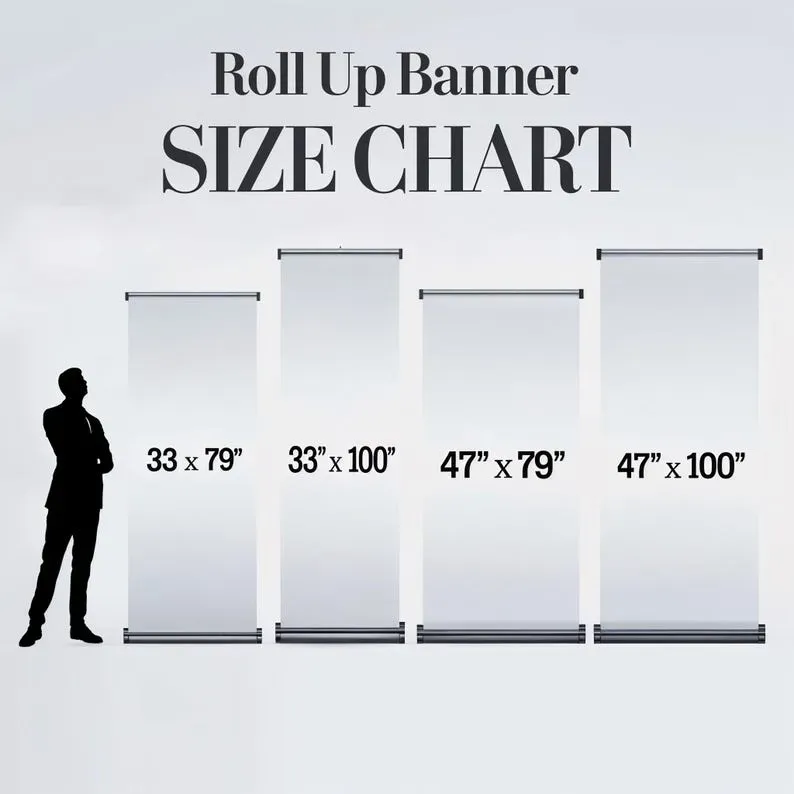
Roll-Up Banner Sizes: Standard Dimensions and Practical Considerations
Roll-up banners are designed for portability and quick setup. Typical widths range from 33 to 36 inches with heights around 78 to 80 inches, creating tall, legible graphics that can anchor a booth from a short distance. These roll-up banner sizes are common because they balance visibility and transportability.
Even within standard sizes, venues vary. For tighter spaces, compact versions (24–27 inches wide) can still convey key messages if the type is large and the layout simple. Following banner printing best practices—clear typography, strong contrast, and proper image resolution—prevents distortion and pixelation.
Banner Resolution Guidelines: Maximizing Sharpness Across Distances
Resolution is the backbone of print quality. For banners viewed up close, aim for 150–300 DPI at the final print size; for distant viewing, 100–150 DPI may be acceptable as the eye resolves less detail at distance. Calculating final dimensions and ensuring raster assets meet this threshold protects image quality for banners.
Keep logos as vector assets (AI, EPS, PDF) and use high-resolution images for photos (JPEG, TIFF, PNG) at the target DPI. Color mode should be CMYK in print workflows to avoid shifts, and you should export with bleed and crop marks when needed. This is part of banner resolution guidelines.
Image Quality for Banners: From Logos to Large Photos
Your brand logos should be vector wherever possible so edges stay crisp at any size, reducing the risk of blurring on large prints. For photos and textures, supply high-resolution raster images that meet the target DPI at the final size to maintain image quality for banners.
Color accuracy comes from proper color management and proofing. Design in CMYK where possible, and request soft or hard proofs from your printer to confirm image quality for banners before full runs. Consistency in color helps reinforce branding across events.
Banner Printing Best Practices: File Setup, Proofing, and Materials
Provide print-ready files: PDFs with embedded fonts or vector artwork for logos, and ensure you include bleeds and crop marks if required by the printer. This aligns with banner printing best practices and reduces rework.
Ask about material options—vinyl, fabric, or mesh—and choose based on durability, indoor/outdoor use, and print quality. Matching your banner’s environment to the coating and finish ensures the final product looks consistent with proofs and maintains readability.
Layout Essentials: Bleed, Safe Margins, and Color Management
Bleed is essential to avoid white edges during trimming, so extend important artwork beyond the final trim by at least 0.125 inches (3 mm). Safe margins keep critical text and logos away from the edge, preserving legibility in case of misalignment.
Consistent color requires careful color management, monitor calibration, and proofing. Work in CMYK, compare proofs to printed samples, and embed or outline fonts to avoid substitution. These practices tie into banner printing best practices for reliable results.
Frequently Asked Questions
What should I consider when selecting Custom banner and roll-up banner sizes for a trade show?
When choosing Custom banner and roll-up banner sizes for a trade show, start with viewing distance, booth layout, and venue constraints. Decide between standard roll-up banner sizes (for example, 33×80 inches) and truly custom banner sizes to fit walls or stands. Align the size with your message length and readability to follow banner printing best practices and banner resolution guidelines.
How do banner resolution guidelines affect image quality for banners at different sizes?
Banner resolution guidelines say: for banners viewed up close, target 150-300 DPI at the final print size; for longer viewing distances, 100-150 DPI may be acceptable. Use vector assets for text and logos and high‑resolution raster images for photos. Calculate the final dimensions to avoid pixelation, in line with banner printing best practices and banner resolution guidelines.
Why is bleed and safe margins important in Custom banner sizes, and how should I set them?
Bleed prevents white edges after trimming; include 0.125 inches (3 mm) of bleed and keep important content in safe margins. Set up your files with bleed in your artwork software and provide crop marks if required by the printer. This is a core banner printing best practice and aligns with banner resolution guidelines.
What file formats and color settings maximize crisp text and logos for custom banner sizes?
Provide vector files for logos (AI, EPS, or PDF) and embed or outlines for fonts. Design in CMYK if possible and export print-ready files with bleed and crop marks. Supply both the source files and a print-ready PDF to satisfy banner printing best practices and preserve image quality for banners.
What common mistakes should I avoid when planning banner sizes for storefront signage?
Avoid poor image quality by not using low-resolution assets, neglecting bleed or safe areas, and ignoring color calibration. Overcrowding text or imagery reduces legibility, especially at longer viewing distances. Follow banner printing best practices and refer to banner resolution guidelines to prevent these issues.
How do I decide between custom banner sizes and standard roll-up banner sizes for a corporate event?
Evaluate venue constraints, viewing distance, portability, and budget. Roll-up banner sizes offer quick setup and consistent results, while custom banner sizes fit unique spaces and branding needs. In all cases, apply banner printing best practices and banner resolution guidelines to optimize impact.
| Topic | Key Points |
|---|---|
| What sizes matter | Sizes influence readability, viewing distance, and perceived value; align to venue/space and viewing distance; balance text, contrast, and layout. |
| Roll-up banners | Typically 33–36 in wide; 78–80 in tall; portable and tall; viewed from short distance; common variants include 33×79, 34×80, 36×78. |
| Custom banner sizes | Flexible to fit spaces; consider viewing distance, venue constraints, budgets; include bleed and safety margins. |
| Resolution & file setup | For short-distance viewing: 150–300 DPI at final size; for farther viewing: 100–150 DPI. Use vector for logos; CMYK color; include bleed (0.125 in) and crop marks; embed fonts or outline text. |
| Practical guidelines by use case | Trade shows: tall back banner with concise messaging; retail: larger banners (e.g., 4×8 ft or 5×10 ft); corporate: durable materials and clear CTAs. |
| Common mistakes | Bleed and safe areas ignored; low-res images; poor color management; overcrowded designs. |
| Working with printers | Provide print-ready files (PDF with fonts embedded or vector logos); request proofs; choose materials (vinyl, fabric, mesh); specify mounting (grommets, pockets) and other production details. |
Summary
Table of key points about banner sizes and print preparation.