
Custom Embroidered Patches have become a go-to branding tool for clubs, teams, schools, organizations, and independent creators. Custom patches and embroidered patches provide a durable, professional way to display logos, slogans, and identifiers on jackets, hats, bags, uniforms, and more. If you’re in the market for patches, knowing how to buy patches online and navigate patch customization options can save you money, time, and headaches. This descriptive buying guide highlights what to look for, how to compare vendors, and practical steps to ensure you receive quality embroidered patches that meet your needs. Whether you’re outfitting a team, supporting a club, or launching merchandise, choosing the right patch supplier helps your branding stay cohesive.
Think of these as fabric badges, logo emblems, or textile patches that attach to jackets, caps, bags, and uniforms. The idea is the same: durable stitching, clear imagery, and versatile backings—whether you’re choosing iron-on, sew-on, or hook-and-loop options. Understanding the mechanics of embroidery, backing types, and border finishes helps you compare vendors using different terminology. LSI-friendly searches often group terms like customization, branding patches, sew-on patches, and patch designs under the same product category to help buyers find what they need. By speaking the language of related terms, you can navigate suppliers more confidently and land a high-quality result that supports your brand.
1) Why Custom Embroidered Patches Elevate Brand Identity
Custom Embroidered Patches offer a durable, professional branding solution for clubs, teams, schools, organizations, and independent creators. By incorporating logos, slogans, and identifiers directly into a high-density stitch, these patches become a visible extension of your brand that endures through wear and wash. They are a practical way to unify uniforms, gear, and merchandise while maintaining a polished, cohesive look across your materials.
For organizations seeking impact, Custom Embroidered Patches translate your brand story into tangible, wearable art. They’re versatile across jackets, hats, bags, and uniforms, turning everyday apparel into recognizable branding assets. When you compare options such as other patches or printed patches, the embroidery’s longevity and legibility often make custom patches the preferred choice for lasting visibility.
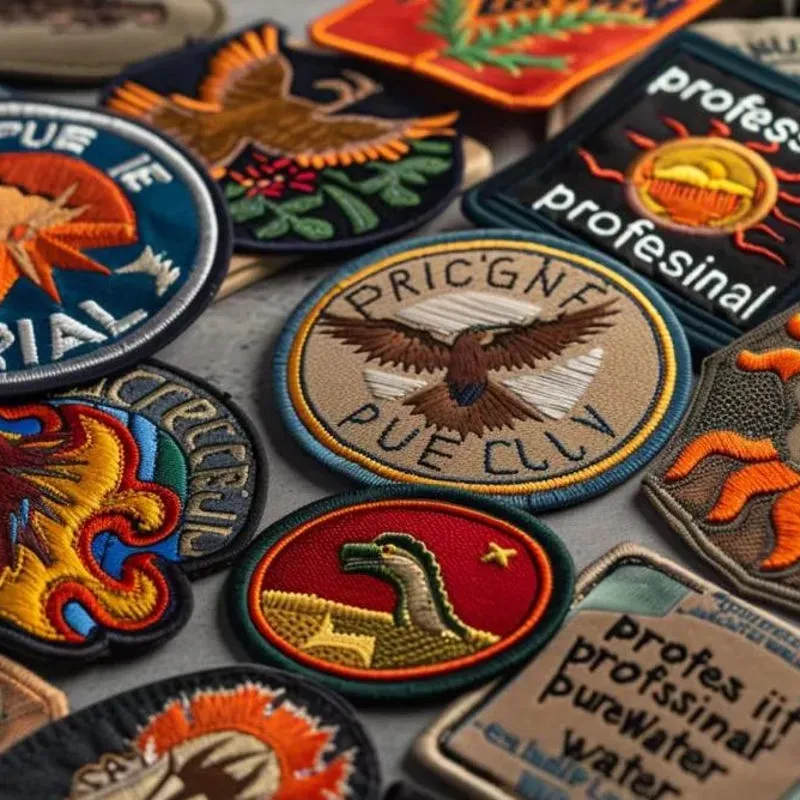
2) Understanding Patch Materials and Borders for Longevity
The material choice—canvas, twill, or felt—significantly affects texture, durability, and the overall impression of quality embroidered patches. Twill patches with dense embroidery are a common choice for logos and text, providing a sturdy base that holds up under frequent washing. The Merrow border is the standard finish, delivering a clean edge that resists fraying and enhances the professional appearance.
Thread density, stitch types (satin, fill, or combined), and border treatment all influence how bold and legible your design remains over time. Higher stitch counts can yield crisper images but may increase cost, so you’ll want to balance detail with wear expectations. This is where patch customization starts—selecting fabrics, borders, and stitches that align with your brand’s durability and look.
3) Backing Options That Suit Different Uses
Backings determine how patches attach to garments and gear. Iron-on patches offer convenience for quick applications, but may not withstand heavy use or frequent laundering as reliably as sew-on patches. Velcro or hook-and-loop backs provide remove-and-reuse flexibility, ideal for jackets, bags, or items that change design with seasons.
For uniforms or high-wear environments, sew-on patches deliver the strongest attachment and the longest lifespan. Some projects benefit from a no-back or direct-sew finish for a classic, durable look. When planning your order, think about the end-use and laundering conditions to choose backing types that maximize longevity while meeting practicality and cost targets.
4) Design Best Practices for Quality Embroidered Patches
Effective patch design starts with clean, vector-based artwork. Providing AI, EPS, or SVG files helps ensure crisp embroidery and minimizes redraw fees. Color accuracy matters too; PMS color matching helps the thread colors closely align with your brand palette, though some variation is natural due to thread limitations. Simple, bold designs translate best to patches, especially at smaller sizes.
To preserve legibility, avoid intricate details that blur at reduced dimensions. Limit gradients or shading, and consider a two-tone approach for strong contrast. Plan the layout with the patch shape in mind, ensuring the edge is well-defined and borders stay clean during embroidery. This is where patch customization shines—tailoring color, density, and shape to fit your brand’s visual language.
5) How to Buy Patches Online: A Practical, Step-by-Step Guide
Buying patches online starts with prepared vector artwork and clear specs (size, shape, backing, thread colors). Request quotes from multiple vendors and compare MOQs, proof options, and sample costs. Always ask for a digital proof before production to confirm color, layout, and placement. This pre-production step helps prevent costly reprints and ensures alignment with your brand identity.
If possible, obtain physical fabric swatches or patch samples to assess embroidery quality before committing to a large run. Review the final proof carefully, confirm the shipment method and delivery timeline, and check return policies. When you scale to ongoing needs, consider whether you’ll need reorders or seasonal designs, and discuss how the vendor handles reworks or new art assets as part of your patch customization strategy.
6) Budgeting, Lead Times, and Quality Assurance for Your Patches
Budgeting for patches involves understanding how MOQs, size, color count, backing type, and order quantity influence unit price. Larger orders typically yield better per-piece pricing, but you should also account for artwork redraws, color matching, proofs, and potential setup charges in the total delivered cost. Planning ahead helps you optimize value without compromising on quality embroidered patches.
Quality assurance is essential: request proofs, review samples, and understand the vendor’s QC processes, warranty, and return policy. A robust approach includes physical samples, pre-production proofs, and clear acceptance criteria. By emphasizing these checks, you ensure that the final patches meet your standards and brand expectations, delivering consistent color, durability, and legibility across every application.
Frequently Asked Questions
Why are Custom Embroidered Patches a smart choice for branding?
Custom Embroidered Patches offer durable, professional branding for clubs, teams, schools, and brands. They stay legible after washing and can be applied to jackets, hats, bags, uniforms, and more. When you explore patch customization, choose vendors that provide proofs and samples to ensure you get quality embroidered patches.
How do I decide the right size and shape for embroidered patches?
Common sizes range from 1 to 3 inches; larger patches are more eye-catching but cost more and may limit placement. Shapes can be standard or custom-cut to mirror your logo, with Merrow borders for a clean edge. Simple, bold designs typically yield better embroidered results, a key consideration in patch customization.
What backing options should I consider when buying patches online?
Backings include iron-on, sew-on, Velcro, or no backing for sewing. Iron-on is convenient but may be less durable than sew-on in high-wear settings. For online orders, request backing options and a proof to confirm fit for your usage.
How important is artwork quality when ordering quality embroidered patches?
Vector-based artwork (AI, EPS, SVG) yields the cleanest embroidery; PMS color matching helps ensure your thread colors align with your brand. If you only have a raster image, be prepared for redraw fees. Simple designs translate best at smaller sizes; request a digital proof before production.
How can I ensure color accuracy during patch customization for quality embroidered patches?
Request a color-tested proof or swatch to verify thread colors against your brand. Ask about color-matching samples and consider a mockup. This reduces surprises when you place larger orders and helps deliver high-quality embroidered patches.
What should I look for in a vendor when buying patches online?
Review portfolios or case studies and ask about their quality control process, warranty, and return policy. Check MOQs, lead times, and whether they provide samples or physical swatches. Request digital proofs, compare total delivered costs (including shipping and setup), and ensure the vendor can handle patch customization reliably.
| Aspect | Key Points |
|---|---|
| What are Custom Embroidered Patches? | – Fabric-based embellishments created by stitching thread into a base material to form a design. – High-density embroidery yields a crisp, durable image. – Common Merrow or overlock border to prevent fraying, with backings such as iron-on, sew-on, Velcro, or no backing for sewing. – Longevity and legibility even after repeated washing and wear. |
| Design and artwork quality | – Vector-based artwork (AI, EPS, or SVG) yields the cleanest embroidery; raster images may incur conversion/redraw fees. – PMS color matching helps align thread colors with brand; expect minor variations and request color-match proof when precision matters. – Simple, bold designs translate best; intricate details can blur at smaller sizes. |
| Size and shape | – Common patch sizes range from 1 to 3 inches in height or width; larger patches are more striking but cost more and may limit placement. – Shapes can be standard circular/rectangular or custom-cut to mirror the logo; edges should be clean and defined for a professional look. |
| Backing and attachment method | – Iron-on patches are convenient but may be less durable in high-wear environments. – Sew-on patches offer strongest attachment and longevity, ideal for uniforms or heavy-use gear. – Velcro or hook-and-loop backs enable removability on jackets/bags. – Some patches have no backing and require sewing for a classic finish. |
| Material and border | – Patch fabric (canvas, twill, felt) affects texture and durability; twill with dense embroidery is common for logos/text. – Merrow borders are standard for a clean, finished edge and added durability; satin stitch density and underlay stitches influence look. – Thread count and stitch types (satin, fill, or both) determine boldness; more stitches = crisper image but higher cost. |
| Quality indicators and vendor reliability | – Request a digital proof before production to ensure color accuracy. – Look for vendors offering physical samples or swatches, especially for large orders. – Review portfolio/case studies showing patches on similar fabrics. – Inquire about quality control, warranty, and return policy. |
| Production and lead times | – MOQs vary; small buyers should inquire about lower MOQs or sample runs. – Turnaround depends on artwork complexity, backing type, and capacity; communicate deadlines and request firm dates. – Rush options may be available but often incur a premium. |
| Pricing and budgeting | – Price is influenced by size, color count, backing type, shape, and quantity; larger orders generally lower per-piece cost. – Some vendors charge for artwork redraws, color matching, or proofs; clarify all potential fees in writing. – Compare total delivered cost (including shipping, taxes, and setup charges), not just unit price. |
| Customization options and future needs | – Consider reorders, seasonal designs, and additional patches for future campaigns. – Discuss how the vendor handles logo changes or new art assets for reworks. |
| Where to buy patches online: a practical approach | – Prepare vector artwork and gather specs (size, shape, backing, thread colors). – Request quotes from multiple vendors; compare MOQs, proofs, and sample costs. – Ask for a digital proof before production to approve colors/layout. – If possible, obtain a fabric swatch or patch sample to assess embroidery quality. – Review the final proof and agreement, then place the order with a clear delivery timeline. – Confirm shipment method and tracking; inspect patches upon arrival. |
| Production tips for the best results | – Start with a simple, bold design; fine details can blur on small patches. – Confirm color accuracy with a proof or swatch before full run. – For gradients or subtle shading, discuss translation to embroidery or consider a two-tone approach. – Choose a backing that suits usage; sewn or Velcro-backed options last longer than iron-on for washed garments. – Consider packaging/presentation (blister packaging, sleeves, labeling). |
| Common mistakes and how to avoid them | – Underestimating the size can render text unreadable and logos unclear. – Ignoring thread color accuracy can dilute brand identity; always request a color-tested proof. – Overlooking fabric compatibility can cause patches to detach or irritate wearers. – Skipping samples increases risk; consider a small sample run for large orders. |
Summary
Conclusion