
The UV DTF Transfer Tutorial offers a practical, beginner-friendly roadmap for designers and printers seeking durable, vibrant transfers that stand up to washing, sunlight, and everyday wear, while staying cost-effective for small runs. From design to finish, it outlines how to set up transfer workflows, a DTF transfer tutorial for beginners, choose the right film and substrate, optimize color management, and master heat-press timing, including recommended dwell times, pressure profiles, and post-press inspection steps. This guide also covers how to apply UV DTF transfers across fabrics of different blends and textures, with tips on ensuring white underbase where needed, edge preservation, and curing considerations that affect durability. Readers will learn about the practical aspects of printing on film, including ink behavior, film handling, and safe heat settings to avoid scorching. By following the step-by-step approach, you’ll minimize common mistakes, maximize color accuracy, and decide the best method for your budget and production pace.
Looking at the topic through a broader lens, this method can be described as UV-curable ink transfers on DTF film for textiles. Other related phrases include UV printing on textiles and film-based transfers for fabrics. Understanding these terms helps readers see how the core idea connects to color management, substrate choices, adhesion strategies, and production workflow.
1. Understanding UV DTF Transfers: What Sets UV DTF Printing Apart
UV DTF transfers rely on UV-curable inks printed directly onto a transfer film, then heat-activated to bond the artwork to fabric. This approach tends to deliver bright colors, crisp edges, and strong durability, especially when compared to some traditional printing methods. The core difference between UV DTF transfer and standard DTF printing is in the ink chemistry and the curing process, which can influence color density and finish.
For many applications, UV DTF printing offers faster curing and vibrant results on select materials. However, it may require specialized curing equipment, film, and ink systems to achieve optimal adhesion and longevity. When weighing DTF vs UV DTF, consider your production environment, substrate compatibility, and the desired level of color vibrancy to determine the best fit for your project.
2. Designing for UV DTF Transfers: Color, Bleed, and Underbase Considerations
Design preparation is the foundation of a successful UV DTF transfer. Start with scalable artwork (vector is ideal for line art) and optimize the design for fabric printing. Focus on color management by choosing a profile that matches your printer and inks, and plan for a small bleed to prevent white borders during transfer.
Think ahead about white underbase and opacity, especially on dark fabrics. In a UV DTF workflow, plan how the white area will print relative to your final color palette so that the artwork remains legible and vibrant after transfer. Remember to simplify ultra-fine details if needed to preserve sharpness after pressing.
3. UV DTF Transfer Tutorial: Step-by-Step Design to Application
UV DTF Transfer Tutorial guides you from concept to finished product, emphasizing steps like design preparation, print setup, film handling, heat pressing, and finishing. This structured approach helps you build a repeatable workflow and troubleshoot common issues along the way.
In practice, this tutorial touches on how to apply UV DTF transfers: ensuring your color profiles are correct, selecting compatible transfer film, and tuning heat press parameters for your fabric. By following a clear sequence—design, printing, cutting, pressing, and finishing—you can achieve professional results and quickly iterate on new designs.
4. Print Setup and Film Handling for Consistent Results
Print setup for UV DTF printing requires tuning for color accuracy and edge sharpness while protecting the transfer film. Choose a film compatible with UV-curable inks and ensure your print resolution is high enough (typically 1200 dpi or better) to preserve fine details.
Proper film handling minimizes waste and misalignment. Allow the print to cool briefly, trim the transfer to the artwork size with a small margin, and manage the carrier layer carefully to avoid smearing. A precise alignment setup helps ensure the final transfer sits perfectly on the garment, contributing to the overall quality of the UV DTF transfer.
5. Heat Pressing, Finishing, and Aftercare for Durability
Transfer application relies on calibrated heat press settings. Start with a test for temperature, pressure, and dwell time, then adjust based on the fabric type and film. A brief pre-press helps remove moisture and reduces wrinkling, contributing to a stronger bond and crisper edges.
Finishing and aftercare extend the life of your UV DTF transfers. Consider a post-press cure if recommended by your ink or film supplier, and advise customers on washing inside-out, using mild detergents, and avoiding high heat early in wear. Proper care habits help preserve color vibrancy and adhesion.
6. Troubleshooting, Best Practices, and Comparing DTF vs UV DTF
Even with careful prep, issues can arise. Common problems include color shifts, edge blurring, or poor adhesion. Recalibrate monitor and printer profiles, test prints with a color chart, and adjust temperature, dwell time, or pressure in small increments to improve results.
When deciding between DTF vs UV DTF, consider factors like cure time, equipment needs, and substrate compatibility. This comparison helps you choose the right approach for your project, budget, and production pace. For ongoing learning, revisit the core steps outlined in a DTF transfer tutorial and incorporate feedback from each print run to refine your workflow.
Frequently Asked Questions
What is the UV DTF Transfer Tutorial and why should I follow it?
The UV DTF Transfer Tutorial is a step-by-step guide for creating durable transfers using UV-curable inks on DTF film. It covers design to finish—from setup and printing to heat pressing and care—helping you achieve bright colors, sharp detail, and reliable results for beginners and small businesses.
How does the UV DTF Transfer Tutorial compare UV DTF printing to traditional DTF (DTF vs UV DTF)?
The tutorial explains how UV DTF printing uses UV-curable inks and typically a curing step, producing vibrant colors with fast cure times, compared to traditional DTF that uses standard inks and materials. It outlines differences in equipment, workflow, and compatibility, guiding you to choose the method that fits your project, budget, and production pace.
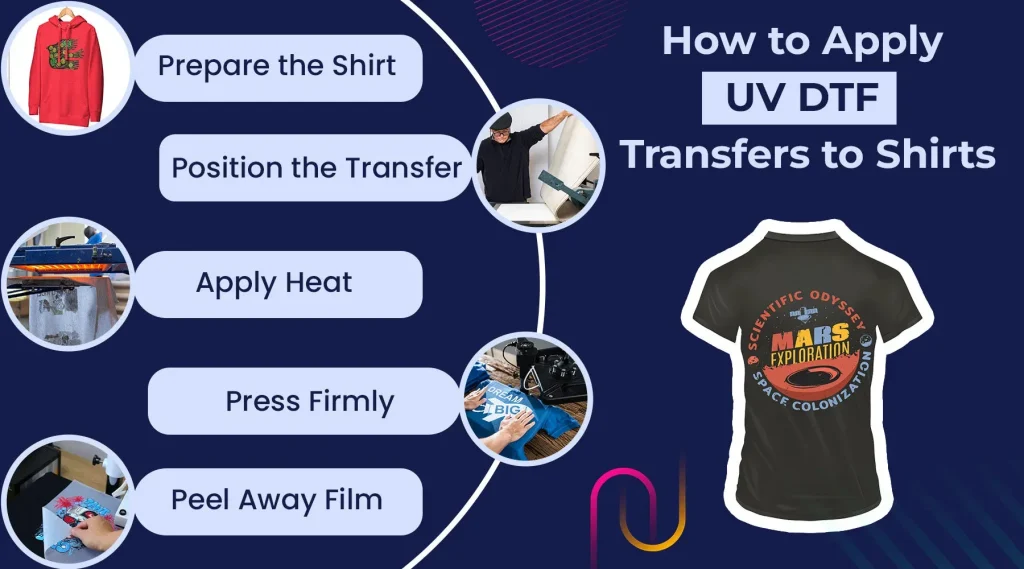
How to apply UV DTF transfers according to the UV DTF Transfer Tutorial?
Follow the tutorial’s sequence: design prep with bleed, print on UV DTF film, trim to size, align on the garment, perform a pre-press, and apply with a heat press at the recommended temperature and time. Finish with a post-press cooldown and appropriate peel method (warm or cold) as advised by your film and ink supplier.
What equipment and settings does the UV DTF printing section of the UV DTF Transfer Tutorial recommend?
Recommended gear includes a UV DTF printer with UV-curable inks and a compatible transfer film, plus a heat press and optional curing lamp. Set print resolution to high levels (around 1200 dpi), use proper color management, and apply a white underbase if needed for dark fabrics. Typical transfer settings start around 150–170°C for 10–20 seconds, then follow the ink/film maker’s guidance.
What common issues are covered in the UV DTF Transfer Tutorial and how can I troubleshoot UV DTF transfers?
Common issues include color shifts, edge blur, banding, and adhesion problems. Troubleshooting tips include recalibrating monitor and printer color profiles, running test prints, adjusting temperature, dwell time, and pressure, ensuring proper film handling and alignment, and verifying fabric compatibility.
What color management and finishing practices are recommended in the UV DTF Transfer Tutorial for UV DTF printing?
Use printer color profiles and test prints, convert colors to the printer’s color space, and plan bleed margins. Consider a white underbase for opacity on dark fabrics, perform a final cure if required, and provide proper washing and care instructions to preserve color vibrancy and durability.
| Section | Key Points | Notes |
|---|---|---|
| What is UV DTF Transfer Tutorial? | UV-curable inks print on DTF film; heat transfer to fabric; bright colors, crisp lines, durable; compares with standard DTF; requires UV-capable inks/film. | |
| Design Preparation | Use scalable/vector artwork; color management; bleed/margins; legibility of text; plan white underbase for dark fabrics. | |
| Print Setup | Film compatibility; high resolution (1200 dpi+); balanced ink channels; white underbase handling; post-print curing per supplier. | |
| Film Handling & Preparation | Allow off-gassing; trim to artwork; manage carrier layer; alignment/grid. | |
| Heat Press Setup & Transfer | Temp 150–170°C; 10–20s; proper pressure; pre-press; peel method; post-press cooling. | Follow ink/film manufacturer guidelines. |
| Finishing & Aftercare | Final cure; washing care; storage; troubleshooting steps. | Durability and color retention. |
| Troubleshooting & Best Practices | Color accuracy, edge sharpness, adhesion, fabric compatibility, pressing quality. | Adjust temps, pressure, dwell time as needed. |
| UV DTF vs Traditional DTF | UV DTF offers faster cure and vibrant colors on some fabrics; may need specialized equipment; consider workflow suitability. |