
DTF printing mistakes are a common hurdle for brands seeking bold apparel, and recognizing them early helps prevent costly revisions. From inconsistent heat press settings to mismanaged transfer issues, these problems often stem from preparation and workflow gaps. Understanding the root causes—like file preparation, garment prep, and curing steps—lets you apply targeted DTF troubleshooting strategies and reduce waste by correcting DTF misprints. By tightening the process, you can improve color fidelity, adhesion, and wash durability across fabrics while delivering vibrant results customers trust. This guide highlights common mistakes and practical prevention steps, underscoring how proper DTF heat press settings and quality control shape outcomes.
From a different angle, the Direct-to-Film workflow can encounter film-to-fabric transfer issues that mirror the same avoidable errors. You may encounter misalignments, inconsistent opacity, or texture irregularities—errors often labeled as Direct-to-film printing faults. By tightening prepress checks, color calibration, and final curing, designers can address these film transfer challenges and safeguard print durability. A disciplined approach using the same best practices, just described with alternative terms, helps readers grasp the broader landscape of printing quality.
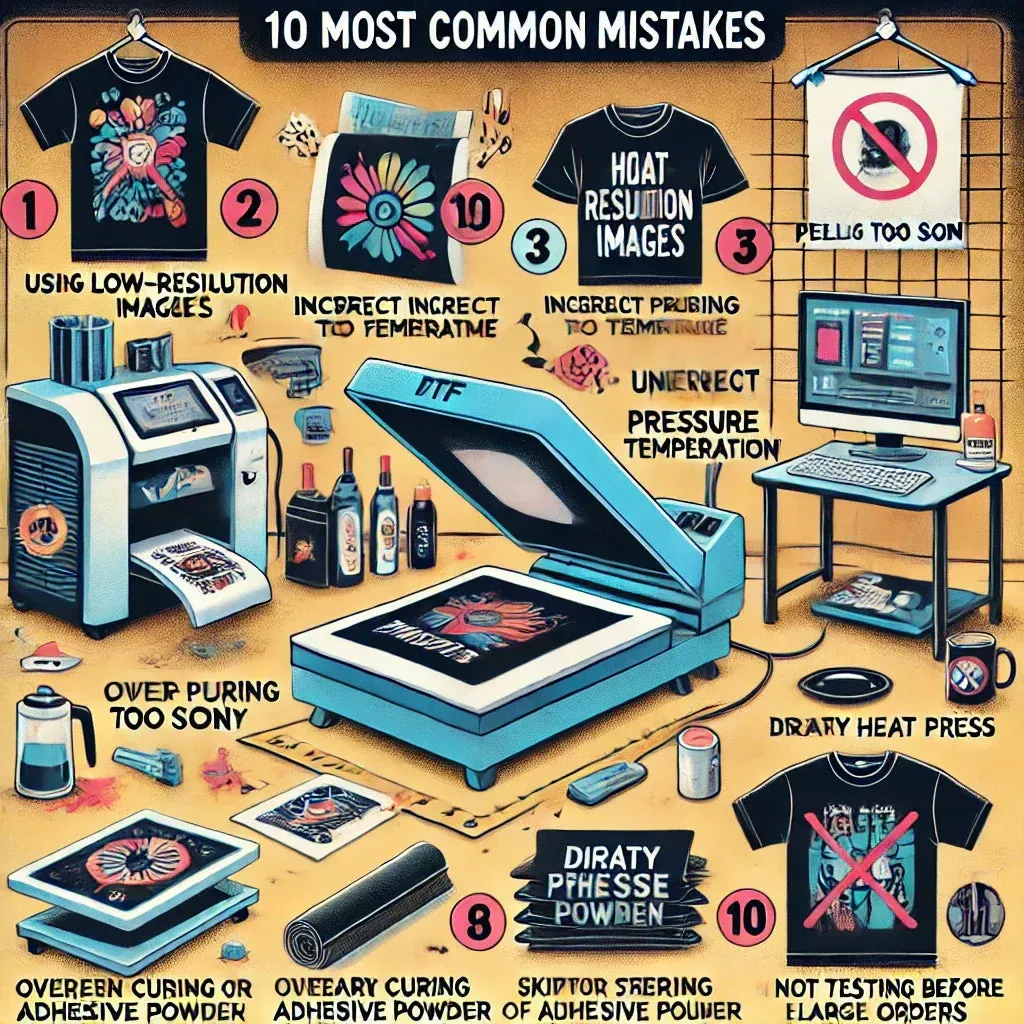
DTF Printing Mistakes: Root Causes, Prevention, and Workflow Standards
DTF printing mistakes often stem from upstream steps that set the stage for the final result. Poor file preparation, including low-resolution artwork, incorrect color space, missing bleed, and weak soft-proofing, can produce color shifts, jagged edges, and designs that don’t resemble the original concept. Recognizing these root causes helps you stop problems before they reach the printer and protects you from wasting materials on flawed runs.
Prevention starts with a disciplined workflow: a preflight checklist, calibrated monitoring, and a color-managed process that uses consistent ICC profiles for the printer and film. By embedding fonts, using vector artwork where appropriate, and performing soft proofs against a neutral background, you create a reliable baseline for color fidelity. When these steps are routine, DTF printing mistakes become exceptions rather than the rule, and you can deliver prints that align with customer expectations.
DTF Transfer Issues: Diagnosing Adhesion, Alignment, and Substrate Challenges
Beyond the artwork, the garment and its prep play a crucial role in how well a transfer adheres and feels. Substrate issues such as moisture, lint, and inconsistent fabric weave can lead to adhesion problems, softer hand feel, or premature cracking. Preheating or pre-drying garments, selecting compatible fabrics, and implementing fabric-specific guidelines help stabilize the transfer and reduce variation across runs.
Alignment and substrate interaction are areas where even small missteps cascade into visible transfer issues. Using alignment marks, fixed jigs, and test prints on scrap garments allows you to verify registration before production. Clear guidelines for pre-treatments on dark fabrics and moisture targets for different blends help ensure the printable surface remains predictable, minimizing the likelihood of DTF transfer issues during production.
DTF Misprints: Common Manifestations and How to Avoid Them
DTF misprints can manifest as blurry edges, color bleed, or whites that don’t stay clean and opaque. These issues often trace back to inconsistent ink density, incomplete curing, or improper powder fusion. Understanding the typical misprints you see helps you pinpoint the stage that needs adjustment, whether it’s the artwork, the film, or the post-press finish.
To avoid misprints, refine your process with targeted adjustments: verify raster vs. vector settings, check that white ink builds consistently, and ensure a clean transfer with properly fused powder. Build in small test plates to validate edge clarity, density, and opacity before committing to larger batches, and document any parameter changes so you can reproduce successful results.
DTF Printing Troubleshooting: Quick Steps to Isolate and Fix Problems
When you encounter a problem, a structured troubleshooting approach helps you isolate the root cause quickly. Start with the basics: confirm file integrity, color management, and preflight results, then move to the printing process, examining ink density, curing, and powder adhesion. This workflow aligns with DTF printing troubleshooting best practices and prevents guesswork that wastes material and time.
Next, test a controlled variable—such as a single fabric type, a fixed heat press setting, or a known-good file—and compare results against a baseline. Keeping a running log of outcomes, calibrated equipment checks, and observed anomalies makes it easier to reproduce fixes and reduces the risk of repeating the same problems across future jobs.
DTF Heat Press Settings: Tuning Temperature, Time, and Pressure by Fabric
The heat press is a critical determinant of color fidelity, texture, and durability. Proper DTF heat press settings involve balancing temperature, time, and pressure for each fabric type and garment composition. Regularly calibrating the press with a thermometer and maintaining consistent contact across the platen help prevent color washouts, edge feathering, and gloss differences that can undermine the print’s appearance.
Documenting the recommended parameters for dark vs. light fabrics, blends, and specialty textiles creates a repeatable framework that reduces variation. Include preheating steps, cure durations, and post-press handling to ensure the film and adhesive cure correctly. When you combine precise heat press settings with routine verification, you build a dependable process that supports strong adhesion and long-lasting results.
Best Practices for a Robust DTF Workflow: QC, Documentation, and Post-Press Care
A robust DTF workflow relies on rigorous quality control, clear documentation, and thoughtful post-press care. Implement multi-stage QC at each milestone—print quality, color accuracy, alignment, and finish—to catch issues before moving to the next step. A scalable SOP with record-keeping for fabric types, design specifics, and parameter histories helps you reproduce successful results and quickly diagnose repeated problems that tie back to DTF transfer issues.
Post-press care completes the lifecycle of a print. Cooling time, curing duration, and customer care instructions all influence durability and wash performance. By standardizing finishing steps, tourning care labels for customers, and maintaining detailed logs of settings and outcomes, you reduce misprints, installation errors, and future rework, delivering consistently reliable DTF projects.
Frequently Asked Questions
What are the most common DTF printing mistakes and how can I prevent them from the start?
Common DTF printing mistakes often start with file prep and color management. Use high-resolution source files (at least 300 dpi for large prints), convert to the correct color space, and embed or convert fonts. A color-managed workflow with ICC profiles and a preflight checklist helps ensure color fidelity and sharp edges.
What are the main causes of DTF transfer issues and how can I diagnose and fix adhesion and alignment problems?
DTF transfer issues are frequently caused by movement, misalignment, or substrate challenges. Use alignment marks or a fixed jig, run test prints on scrap garments, and verify registration before production. Also standardize preheating, pressure, and platen temperature to maintain consistent results.
Why do DTF misprints occur on certain fabrics and how can I use DTF printing troubleshooting to identify and fix color, edge, and clarity issues?
DTF misprints arise from color management gaps, resolution problems, or improper proofing. Check artwork resolution (aim for at least 300 dpi for large prints), use proper color profiles, and soft-proof on a neutral background. Run a controlled proof and test print before full runs to catch issues early.
Which DTF heat press settings most commonly cause problems, and how should you optimize temperature, time, and pressure for different fabrics?
DTF heat press settings are a common source of mistakes. Establish fabric-specific temperature, time, and pressure ranges, verify platen temperature with a thermometer, and document parameters for each substrate. Use protective sheets, test with small samples, and adjust density and cure times to avoid color loss or edge issues.
How can I prevent DTF printing mistakes due to misalignment and registration errors?
Misalignment and registration errors are a frequent cause of DTF printing mistakes. Implement alignment marks, a fixed jig, and repeatable setup procedures. Do test prints on scrap garments and sign off on checks before running production to keep designs centered and aligned.
What post-press finishing and care steps are essential in DTF printing troubleshooting to prevent peeling and washing damage?
Post-press finishing and care steps are essential to prevent peeling and washing damage. Include a cooling period, proper cure times, and clear customer care instructions. Provide care labels and guidelines to extend wash durability and avoid premature cracking or peeling.
| DTF Mistake / Topic | Root Causes | Prevention | Impact |
|---|---|---|---|
| 1) Poor file preparation and color management | Causes: low-resolution artwork (under 300 dpi for large prints), not converting to the correct color space, or neglecting color management and ICC profiles. | Prevention: high-resolution source files, use vector artwork where appropriate, and embed or convert fonts. Use a calibrated monitor and soft proofing to preview colors on substrate. Use a color-managed workflow with consistent ICC profiles for printer and film. Create a standard preflight checklist (resolution, color space, proofing on white/neutral background). | Impact: colors look muddy, whites may appear translucent, edges can be pixelated, and final prints fail to meet customer expectations. |
| 2) Inconsistent garment prep and substrate selection | Causes: fabrics with high moisture, fuzz or lint, fabrics not pretreated or that react poorly with ink/powder, and fabrics with inconsistent weave. | Prevention: choose compatible fabrics; ensure clean, lint-free surfaces; preheat/pre-dry garments; pre-treat dark fabrics to improve opacity and vibrancy; create fabric-specific guidelines for preheat times, moisture targets, and handling blends vs. 100% cotton/poly. | Impact: prints appear dull, whites lose brightness, durability suffers after washing. |
| 3) Powder adhesive mismanagement and curing errors | Causes: uneven powder distribution, incorrect powder type, or insufficient curing time. | Prevention: follow powder application guidelines, use calibrated distributors, perform a test cure on scrap to verify adhesion and surface finish. Ensure powder fuses into the film during the heat cure and remove excess powder before final pressing. | Impact: peeling, cracking, or a raised texture that feels undesirable to the touch. |
| 4) Inaccurate heat press settings and press technique | Causes: wrong temperature, press time, and pressure; inconsistent press contact; platen temperature drift; inadequate preheating. | Prevention: establish a standard temperature/time/pressure range per fabric; test with sample runs; monitor platen temp with a quality thermometer; maintain consistent pressure with a calibrated press; use a silicone or parchment sheet to protect prints; document parameters for dark, light, and specialty fabrics. | Impact: color washout, ghosting, edge feathering, or gloss differences across the print. |
| 5) Misalignment and registration errors | Causes: movement during transfer, incorrect task sequencing, or improper alignment tools. | Prevention: use alignment marks or a fixed jig; perform test prints on scrap garments; verify registration before production; maintain a dedicated setup station with repeatable procedures and checkoffs; for multi-color designs, use a go-to workflow that spaces color layers predictably and confirms alignment between passes. | Impact: distorted designs, mismatched seams, or off-center prints that spoil appearance. |
| 6) Glossy finish and edge issues | Causes: excessive ink or powder, improper curing, or insufficient post-press finishing. | Prevention: optimize ink density, reduce unnecessary passes, and validate edge clarity via test plates; consider a post-curing step if needed; ensure correct post-wash finishing settings to avoid color bleeding. | Impact: overly glossy surface and visible edges that reduce comfort and wash durability. |
| 7) Insufficient post-press finishing and washing guidance | Causes: skipping post-press curing, insufficient cooling, or telling customers to wash before curing is complete. | Prevention: implement a post-press finishing protocol (cooling times, curing duration) and provide clear care instructions for customers; print care labels or guidance to extend print life. | Impact: premature cracking, peeling, or color fading after a few washes. |
| 8) Best practices for a robust DTF workflow | N/A | Preflight and planning: establish standard operating procedures for file checks, color management, and garment prep; standardize materials; calibrate equipment; implement multi-stage QA; document settings for scalability. | Improved reliability, reproducibility, and scalability of DTF projects. |
| 9) Troubleshooting quick tips | Symptoms-driven guidance | White areas turning gray or translucent: check color density, ensure white ink prints correctly, verify preprint color layers; increase white ink intensity in small increments and test on scrap. Fuzzy edges/halos: review resolution, scaling, anti-aliasing; use clean vector outlines and proper rasterization. Peeling after washing: re-evaluate heat press settings, verify curing times, confirm compatible fabric and proper post-wash care. Cracking on flex areas: reduce ink coverage in flex zones, confirm proper curing, lighter top-layer pressure. Color shifts between batches: re-profile printer, reproof colors with a controlled reference, and keep a running log of adjustments. | Impact: quick isolation and fixes accelerate production and reduce waste. |
| 10) Advanced tips for better color accuracy and durability | N/A | Color management discipline: calibrated monitors, ICC profiles, soft proofing; color charts and periodic re-calibration. Substrate-specific recipes: fabric-specific print recipes for cotton, polyester, blends; note heat, pressure, cure times per substrate. Consistent post-press finishing: cooling time, post-heat cure if needed, standard washing protocol. Continuous improvement: review failed projects, update SOPs, train the team regularly to reduce DTF mistakes over time. | Better color fidelity and longer durability across fabrics. |
Summary
DTF printing mistakes are common in the apparel and printing industry, but they can be dramatically reduced with a structured approach to preparation, equipment settings, and process discipline. Focusing on the most frequent issues—file preparation, garment prep, powder curing, heat press settings, alignment, and post-press care—helps improve color fidelity, adhesion, and wash durability across fabrics. Implementing the prevention strategies from this guide promotes a robust workflow, consistent quality control, and scalable production. By documenting parameters, training staff, and continuously refining procedures, shops can minimize waste, shorten timelines, and deliver vibrant, durable DTF prints customers will trust.